
Heat Press 16 X 20: The Complete Buyer's Guide
You've got the press on the bench, the garment stack is already growing, and the first question is the one that matters most, does a heat press 16 x 20 fit the way you work, or is it just more machine than you need? In a small studio, that answer shows up fast when the first adult tee slides under the platen and the full front graphic lands in one clean press instead of two awkward passes. The size looks simple on paper, but in the shop it behaves like a production platform, not just a bigger rectangle.
Why 16 x 20 Became the Default Large-Format Platen
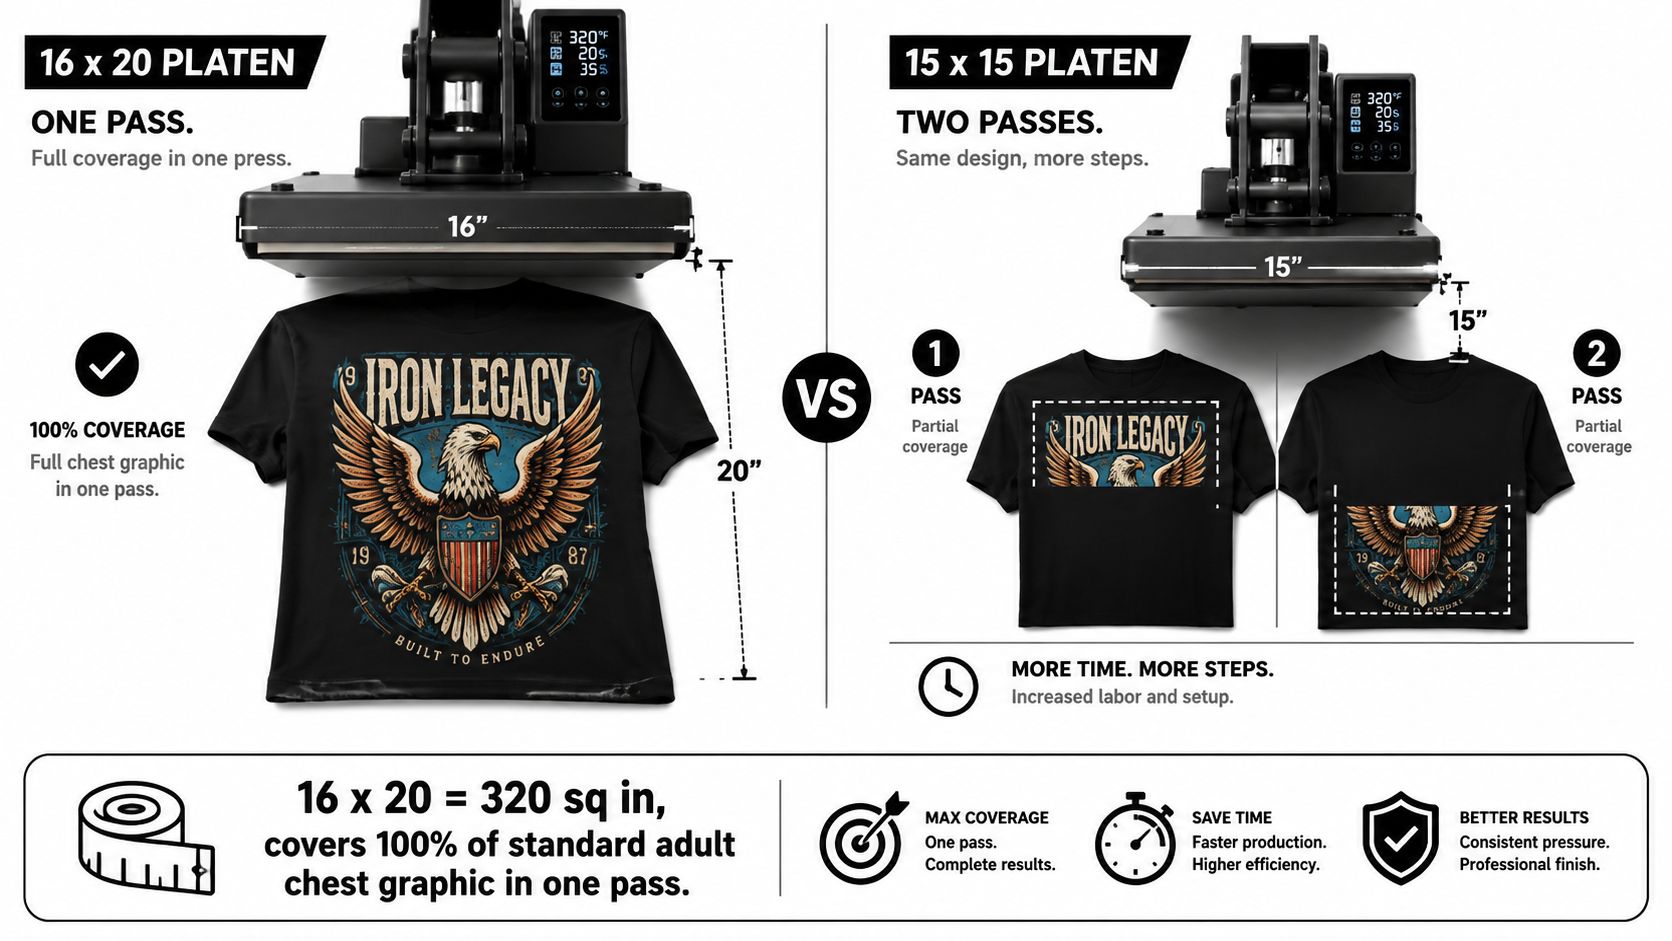
A shop usually reaches for a 16 x 20 heat press after a smaller platen starts creating extra handling. Adult front graphics fit with useful clearance, so the operator can position a transfer accurately and finish the application in one press. The working field measures 16 inches by 20 inches, about 40 x 50 cm, as described by commercial platen guidance. That combination suits common tees, hoodies, and other apparel without making every order a special setup.
The practical reason the size stuck
Run a full adult shirt on a smaller platen and the limitations show quickly. Artwork approaches the edges, alignment takes more care, and a large transfer may require repositioning. A 16 x 20 platen gives the operator more placement tolerance while keeping the press manageable for a small studio.
The format has also remained visible across mainstream press families for years. Major product lines have repeatedly listed 16 x 20 alongside smaller platens, supporting its role as a general-purpose large format rather than a specialist option in catalog listings from 2019 through 2026.
Why it feels like a production platform
The useful decision is larger than platen area. A 16 x 20 station also has to support interchangeable platens, repeatable pressure, suitable electrical capacity, and enough bench space for loading and unloading. Those details determine whether the added surface improves output or makes the equipment harder to place and operate.
Stahls' commercial platen guidance describes garment setups that support multiple print zones, including sleeve, leg, and center tag work as described in its garment platen guidance. The accessory approach matters because a base 16 x 20 platen handles broad surfaces, while smaller or shaped platens improve control on narrow areas. The result is a production platform that can move between adult apparel and mixed orders without dedicating a separate press to every placement.
Shop-floor rule: if the press covers the artwork in one pass and leaves enough room to place the transfer cleanly, the platen size is doing its job.
For a growing brand, that flexibility often marks the move beyond beginner hardware. The format is not automatically right for every workspace, but it gives one press a practical range of jobs before the shop needs more specialized equipment.
Applications a 16 x 20 Press Handles Best
A mixed order is where a heat press 16 x 20 proves its value. One afternoon may include adult tees, hoodie fronts, youth garments, tote panels, and samples. A platen that handles those jobs without constant repositioning gives a small shop steadier production than a machine chosen for one narrow product line. The standard MAXX 20 product guide from ScreenPrintingSupplies lists the large-format platen for broad garment applications as product guidance for the MAXX 20.
Garments that stay inside the comfort zone
Adult shirt fronts, hoodie fronts, crewnecks, and standard tote panels sit comfortably within the 16 x 20 field. That extra room also helps with oversized left-chest placements, where a smaller platen can make alignment feel cramped. The practical limit is the artwork and garment shape. If the transfer fits flat with space to position it cleanly, the press is working in its comfort zone.
Accessory platens expand the platform beyond one flat surface. Interchangeable lower platens can make sleeves, youth blanks, and other small substrates easier to load and align. They also reduce the temptation to press a small item against an unnecessarily large surface. Stahls' garment platen guidance describes setups for multiple print zones, including sleeves, legs, and center tags in its garment platen guidance.
That flexibility matters during mixed runs. A shop can move from full-size shirts to youth pieces and then to tote panels without assigning a separate press to each placement. The trade-off is setup discipline. Operators still need to choose the lower platen, thread the garment correctly, and confirm that seams or zippers are not sitting under the transfer area.
Shop-floor rule: if the press covers the artwork in one pass and leaves enough room to place the transfer cleanly, the platen size is doing its job.
Where it starts to feel small
The format becomes less comfortable with very wide canvas wraps, large sublimation blanks, and oversized full-back graphics. A design may technically fit while leaving too little room for reliable placement or even pressure. That can turn a nominally suitable press into a slow production step.
The 16 x 20 format covers common DTF and HTV work well, but platen size does not determine every decoration method. For hard surfaces, the catalog for Get UV DTF Transfers by Size describes adhesive-backed transfers for smooth materials such as glass, plastic, metal, and ceramic. Those jobs depend more on surface preparation, transfer placement, and pressure control than on having a larger garment platen.
| Substrate Compatibility for a 16 x 20 Heat Press | ||
|---|---|---|
| Substrate | Typical Size | Fit on 16 x 20 |
| Adult tee front | Standard chest graphic | Strong fit |
| Hoodie front | Large chest print | Strong fit |
| Tote bag | Full panel | Strong fit |
| Mousepad | 12 x 18 | Good fit with proper lower platen |
| Ceramic tile | 8 x 10 | Good fit |
| Coaster | Small round or square | Good fit |
| Name badge | Small format | Good fit |
| Wide canvas wrap | Large-format blank | Tight fit |
| Full-back shirt | Oversized back graphic | Borderline fit |
Temperature, Pressure, and Time for DTF Transfers
A reliable heat press 16 x 20 station begins with calibration, not the purchase. For DTF work, 360°F / 182°C is the reference setting used for platen testing. Check the center and all four corners, because a large platen can show the correct display temperature while an edge remains cooler at the reference setting used for testing. That unevenness often appears as partial adhesion on a wide graphic rather than as an obvious machine fault.
Why even heat matters more than peak heat
Operators often raise the setpoint when the problem is heat distribution. A manufacturer test sheet for heating-plate testing notes that temperature variation can reach up to 40°C across one plate which is enough to create inconsistent transfer results. On a 16 x 20 platen, that gap can produce failed corners, dull areas, or weak adhesion along the design edge.
Pressure needs calibration as well. Set enough pressure to press the adhesive into the fabric, but avoid crushing the garment or leaving a shiny mark. Cotton tees generally take medium-firm pressure. Polyester and stretch blends usually need lighter pressure to prevent surface distortion.
The press should close evenly. A firm handle does not guarantee balanced pressure if the garment is thick, the lower platen is misaligned, or the transfer sits over a raised seam.
Fabric-specific setup
| DTF Settings for Common Fabrics on a 16 x 20 Press | |||
|---|---|---|---|
| Fabric | Temperature | Time | Pressure |
| Cotton tee | 360°F | 15 seconds | Medium-firm |
| Hoodie fleece | 360°F | 18 to 20 seconds | Medium-firm |
| Polyester tee | 360°F | 10 to 12 seconds | Light to medium |
| Stretch blend | 360°F | 10 to 12 seconds | Light to medium |
| Heavy canvas | 360°F | 18 to 20 seconds | Medium-firm |
Thick garments require more dwell time because the fabric absorbs heat before the adhesive bonds fully. Thin polyester and tri-blends need less time because they scorch, gloss, or warp sooner than cotton.
Practical rule: if the center looks good but the edges fail, check platen uniformity, pressure balance, and transfer placement before changing the time.
For a new station or first production run, compare the press behavior with this DTF heat press settings guide, then confirm the bond on the actual garment and transfer combination. A 16 x 20 platen becomes a production advantage only after its heat, pressure, and timing are repeatable across the working area.
Platen Accessories That Multiply Production Zones
A 16 x 20 press becomes a production platform only when its platen system matches the order mix. The base platen handles broad chest prints, while interchangeable tools create dedicated zones for youth shirts, sleeves, pockets, tags, and other small placements. That choice affects alignment, changeover time, and how often operators re-center garments during a shift.
The platen swap changes the job
Swappable platens let you match the work area to the substrate instead of placing every item on a full-size bed. A 15 x 15 adult chest zone, 12 x 10 youth or pocket pad, 6 x 10 sleeve cap, and 5 x 5 tag or label platen each support a defined placement. Smaller surfaces reduce excess fabric around the transfer and make repeat positioning easier.
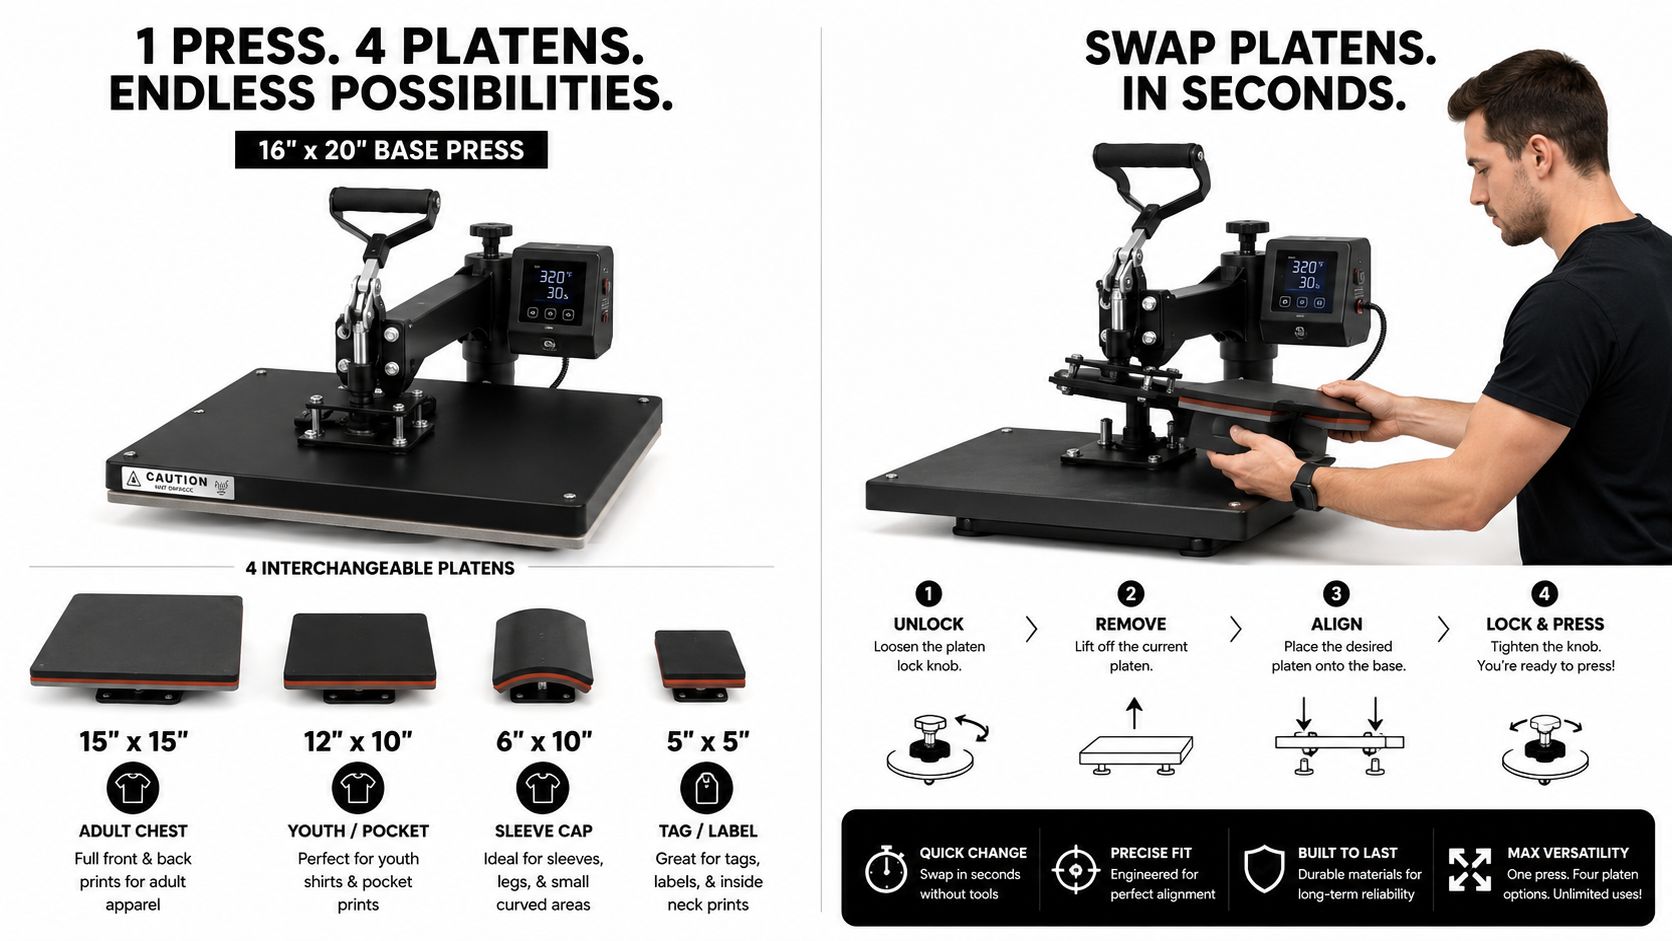
A center-mounted lower platen also helps with difficult garments. It keeps seams, pockets, and thick edges away from the main pressure zone, reducing the chance that a transfer bridges a raised area. For sleeve work, use a narrow platen that supports the print without pulling the garment across the rest of the bed. The right tool often saves more time than trying to make one large platen handle every placement.
Material covers and curved tools
The cover changes how the platen behaves during repeated cycles. Silicone-rubber and Nomex covers differ in glide, insulation, and how much surface texture they transfer into the garment. Check the cover regularly for cuts, compression, or trapped debris, since any raised spot can affect placement and pressure.
Curved cap platens and shoe-shaped platens fit shops with steady orders for those items. They add another changeover and occupy storage space, so occasional jobs may not justify them. A sleeve or youth platen usually delivers a clearer production benefit when those placements appear routinely.
The workflow math is blunt. A dedicated youth platen reduces centering and re-centering on repeated youth orders. A sleeve platen makes sense when sleeve volume is consistent, while low job counts can still favor outsourcing. Review the full range of heat press accessories alongside the platen list before selecting the base machine.
Workspace and Electrical Requirements
A heat press 16 x 20 can fit a small studio, but the station still needs room for garment staging, safe heat movement, and reliable power. The STAHLS' Hotronix MAXX 16" x 20" press is listed at 1750W and 14.5 amps in the manufacturer's press specifications. Plan the circuit around that load. A dedicated 20A line leaves workable headroom, while sharing power with a printer, compressor, or space heater can cause nuisance trips and unstable operation.
Fit the room to the machine
Measure the station before the press arrives. A clear 36 x 30 inch work zone supports garment staging, transfer placement, and post-press handling without forcing the operator into surrounding equipment. Leave a 4 to 6 inch rear vent gap so the controller and housing do not sit against the wall, and check the swing path for the upper platen and heat shield.
The bench must stay rigid under clamp force. A flexible table lets a swing-away head move the garment during closing, which can shift a DTF transfer or create uneven pressure. An anti-vibration mat under the base can reduce movement, but it cannot correct an undersized or unstable table.
Keep the press where you can reach the power cut-off without crossing the hot zone.
Ventilation and operator comfort
DTF production also affects the room plan. Adhesive vapors benefit from a vapor-filtered exhaust path, particularly in enclosed rooms and home studios. Position the press so the operator can load garments without reaching over the heated platen, then set the bench near a 36-inch task height to reduce repeated shoulder and back strain during longer runs.
| Workspace Specs for a 16 x 20 Heat Press | |
|---|---|
| Requirement | Target Spec |
| Electrical supply | Dedicated 20A line |
| Press draw reference | 1750W, 14.5A |
| Clear bench zone | 36 x 30 inches |
| Rear vent gap | 4 to 6 inches |
| Bench height | 36 inches |
| Ventilation | Vapor-filtered exhaust recommended |
| Base stability | Anti-vibration support |
Use the commercial heat press setup guide when mapping cable runs, operator clearance, and equipment placement. The press size is only one part of the decision. Electrical capacity, footprint, ventilation, and access to the working surface determine whether the machine supports a steady production platform or becomes an obstacle in the room.
Maintenance and Safety Habits That Protect Your Press
A 16 x 20 heat press rewards a routine that is dull, documented, and consistent. Wide platens expose small faults first, especially along the edges. Keep the working surface clean, confirm that pressure remains even, and inspect the electrical path before a minor fault becomes downtime.
Daily habits
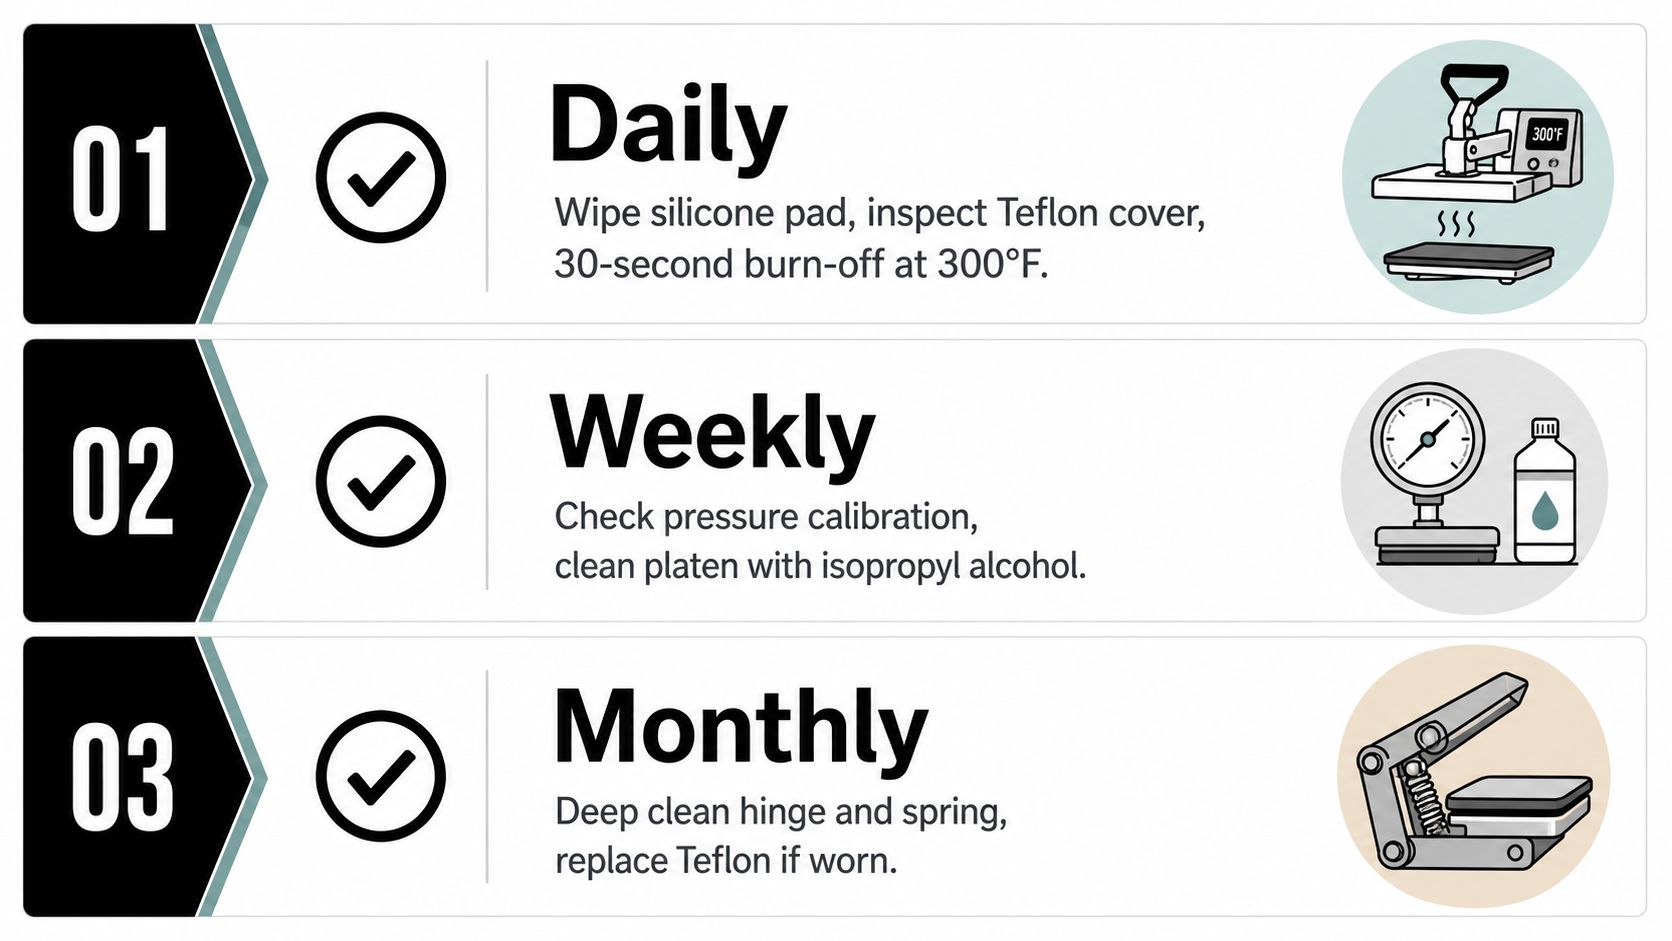
After each DTF run, let the press cool enough to handle safely, then wipe adhesive residue from the silicone pad and inspect the cover for wrinkles, cuts, or trapped debris. A contaminated surface can transfer residue to the next garment and prevent the platen from closing flat.
Check the power cord, plug, and strain relief while the machine is cool. Stop using the press if insulation is split, the plug is warm, or the cord pulls against the outlet. Keep the emergency shutoff reachable without crossing the heated zone.
Weekly and monthly checks
Each week, check the upper-platen bolts and confirm pressure with a slip test using Teflon. A loose connection can reduce force at the platen edges, producing cold spots even when the center transfer looks correct. Clear dust from controller vents with a vacuum rather than blowing debris deeper into the housing.
Once a month, inspect the silicone pad for compression, lifting edges, cuts, or permanent low spots. Replace it when the surface no longer supports the garment evenly. Check the lower-platen mounting bolts against the manufacturer's torque specification, then re-zero the thermocouple against a reference probe and replace cracked heat tape. Record cycle hours and repairs so recurring drift is visible before it affects a full batch.
Safety that actually gets used
Keep heat-rated gloves beside the press and maintain a clear path to the power cut-off. Avoid pressing directly over zippers or heavy seams unless the platen setup accommodates them, since hard hardware can score the surface and distort pressure.
Clean presses make predictable transfers. Predictable transfers make profitable days.
Is a 16 x 20 Heat Press Right for Your Workflow
A rush order exposes the question quickly. The heat press 16 x 20 may cover the artwork, yet the station can still fail if the press crowds the bench, exceeds the circuit, or needs accessories the shop did not budget for. Treat it as a production platform, not only a platen measurement. Order mix, room layout, electrical capacity, and transfer calibration all determine whether the format earns its space.
Match the press to the actual workload
For standard adult shirts, crewnecks, long sleeves, and tote panels, the 16 x 20 platen handles common artwork without repeated repositioning. Most small-shop operators find 30 garments a day is a practical ceiling for this platen class when the work includes loading, alignment, peeling, and quality checks. That is an operator benchmark, not a universal production rule.
Youth blanks, sleeve prints, hem tags, and small samples do not rule out the platform. A compatible 5 x 5 or 6 x 8 platen can turn one base machine into several work zones, often making more sense than buying a second press.
When to step up or step back
A higher-volume shop will feel the limits first. If you are printing 100+ adult shirts daily, pressing oversized 16 x 20 panels, or handling full-chest designs wider than the platen can host comfortably, a larger swing-away may suit the workflow better. A smaller platen can be faster for a day dominated by pockets, labels, and other small placements.
Substrate mix matters as much as shirt count. Ceramic tiles and large plaques require stable lower-platen support, clearance for rigid goods, and a staging area that will not interfere with garment loading. A mixed apparel-and-accessory studio often gets more value from the 16 x 20 platform because one base can support garment work and add-on jobs.
DTF work adds a calibration step buyers often overlook. Confirm the film, adhesive, and garment manufacturer's settings, then verify temperature at the platen rather than trusting the controller alone. Set pressure by the actual garment thickness, and run a peel and wash test before batching. A press that fits the artwork but produces uneven edge pressure is not production-ready.
Check voltage, amperage, plug location, and bench clearance before buying. The press, outlet, transfer workflow, and operator path need to fit the same station.
For a DTF or mixed apparel setup, Raccoon Transfers supplies DTF and UV DTF transfers that can be used with a heat press 16 x 20 workflow. Visit Raccoon Transfers to review transfer options and match artwork dimensions to the planned production run.