
Your Heat Press Temperature Guide for Perfect Prints
Jumping into the world of heat pressing can feel like you're trying to crack a secret code. But don't worry, this heat press temperature guide is here to make things simple. Think of the information here as your personal cheat sheet for getting it right the first time, with solid starting points for popular fabrics like cotton, polyester, and blends.
Your Go-To Heat Press Temperature and Time Chart
When you're just starting out, the sheer number of combinations for temperature, time, and pressure can feel a little intimidating. We've cut through the noise to create a straightforward chart that you can use as your reliable reference. This isn't just a list of random numbers; it’s a foundation built to help you steer clear of those frustrating beginner mistakes, like scorched shirts or designs that start peeling after one wash.
Having a solid chart on hand saves you from costly trial-and-error and, more importantly, builds your confidence. Instead of frantically searching for new settings every time you switch from a basic cotton tee to a sleek polyester jersey, you have one place to turn. This lets you focus on the fun part—being creative—instead of worrying about accidentally ruining your blanks.
This visual guide gives you a great snapshot of the ideal starting temperatures for the three most common fabric families you'll work with.
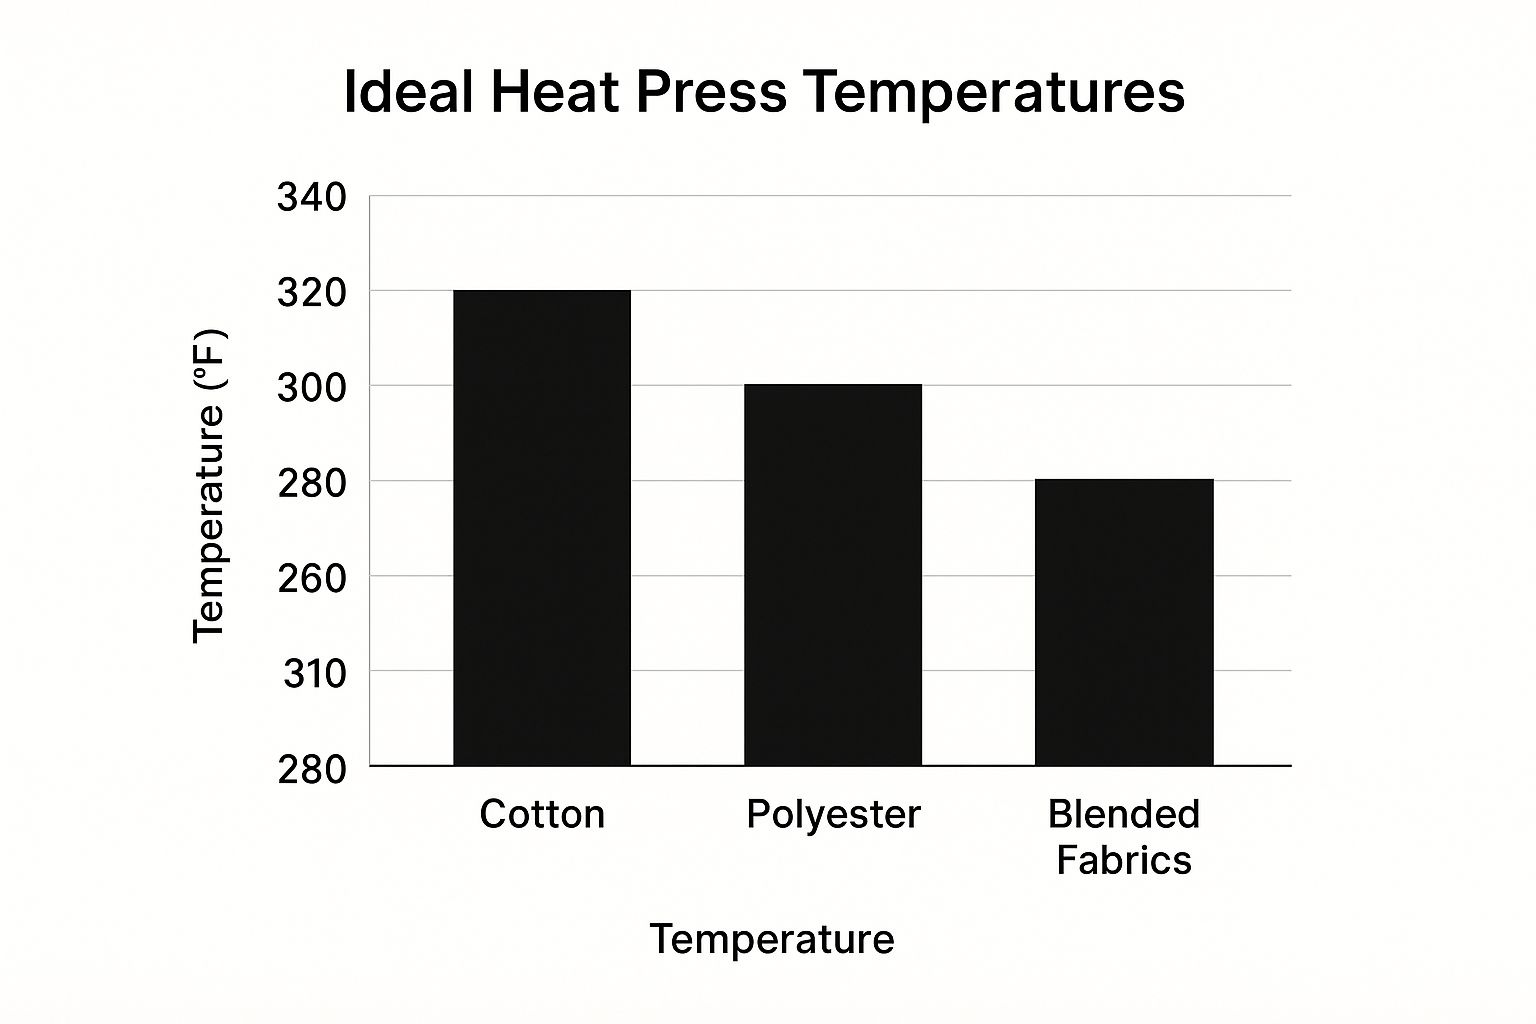
As you can see, the basic rule of thumb is that more delicate materials like polyester need less heat, while a sturdy fabric like cotton can take a higher temperature without any trouble.
Quick Reference Heat Press Settings by Material
The table below gives you our recommended starting points. Think of these as your baseline—we always, always recommend doing a quick test press on a scrap piece of fabric or a hidden spot on the garment itself before you press your final design.
| Material | Transfer Type | Temperature Range (°F) | Time (Seconds) | Pressure |
|---|---|---|---|---|
| 100% Cotton | DTF, HTV | 305°F - 325°F | 10 - 15 | Medium-Firm |
| 100% Polyester | Sublimation, HTV | 270°F - 400°F | 15 - 60 | Light-Medium |
| 50/50 Blends | DTF, HTV | 280°F - 305°F | 12 - 15 | Medium |
| Ceramics | Sublimation | 385°F - 400°F | 180 - 240 | Firm |
| Canvas Bags | DTF, HTV | 320°F - 340°F | 10 - 15 | Firm |
A good temperature chart is an indispensable tool, giving you a trusted baseline for different materials and transfer methods. For instance, sublimation on polyester requires a much higher heat, often between 385°F and 400°F for up to a minute, to turn the ink into gas. On the other hand, standard heat transfer vinyl (HTV) on a cotton shirt only needs about 305°F for just 15 seconds. Direct-to-Film (DTF) transfers usually land somewhere in the middle, typically around 320°F.
Of course, settings can vary by brand and project, which is why it's so helpful to read the full guide to heat press time and temperature to see how these numbers change for different applications.
Key Takeaway: Always pre-press your garment for 3-5 seconds. This is one of the most important steps! It instantly removes hidden moisture and smooths out wrinkles, giving you a perfect canvas for your transfer. The result is better adhesion and a professional finish that lasts.
Why Temperature, Time, and Pressure Matter

If you want to move from inconsistent, frustrating results to professional-quality prints every single time, you have to get a feel for the science behind your heat press settings. Think of your heat press less like a simple iron and more like a high-performance oven. The adhesive on your transfer is the "batter," and just like baking, getting the recipe wrong means your final product is a flop.
This whole process boils down to a delicate balance between three core pillars: temperature, time, and pressure. These three variables are in a constant dance, working together to create a permanent, durable bond between your design and the fabric. Once you truly understand why each one matters, you'll be able to troubleshoot any issue and confidently press onto any new material that comes your way.
The Role of Temperature in a Heat Press
First up is temperature. Heat is the trigger—it's what activates the adhesive on the back of your transfer, whether you're using Heat Transfer Vinyl (HTV) or a Direct-to-Film (DTF) print. Every single transfer material is engineered to activate at a specific temperature.
If you set the heat too low, the adhesive never properly melts. You end up with a weak bond that looks okay at first but starts peeling, cracking, or completely washing off after a few laundry cycles. It’s like trying to melt butter in a lukewarm pan; you’ll just make a mess.
But cranking the heat up isn't the answer, either. Too much heat can be just as destructive. Excessive temperatures will scorch delicate fabrics like polyester or tri-blends, leaving behind permanent, shiny burn marks. It can also completely melt your vinyl or cause the dyes from the shirt to bleed into your design, a frustrating problem known as "dye migration." Nailing that perfect temperature is everything.
Why Pressing Time Is Crucial
Next, we have time. This is simply how long you apply the heat. Time works in tandem with temperature to ensure the adhesive doesn't just melt, but has enough of a window to seep into the fabric's fibers and form a truly permanent connection.
Here’s a good way to think about it: Temperature unlocks the door to the fabric's fibers, and time is what allows the adhesive to walk through that door and make itself at home. If you cut the time short, the door slams shut before the adhesive has a chance to settle in.
Rushing the press time is one of the most common mistakes we see. Even if your temperature is perfect, the transfer needs that specific duration to cure correctly. On the flip side, pressing for too long can over-cure the adhesive, making it brittle and prone to cracking, or cause the same scorching and melting issues as having the heat set too high.
The Unsung Hero of Heat Pressing: Pressure
Finally, there's pressure. It’s often overlooked, but pressure is the critical element that ensures heat and time are applied evenly across every single inch of your design. Without the right pressure, you’ll get patchy results where some parts of the transfer stick perfectly and others peel right off.
Imagine trying to put a patch on a jacket by just letting a hot iron rest on top of it. It’s not going to work. You have to apply firm, even pressure to force that adhesive into the fabric. Your heat press is designed to do exactly that, but on a much larger and more consistent scale.
The correct pressure forces every bit of your transfer into intimate contact with the garment. It eliminates tiny air pockets and pushes the melted adhesive deep into the weave of the fabric for maximum durability. This is what gives you that smooth, integrated finish that looks and feels like it belongs there. These principles are fundamental whether you're using DTF, DTG, or other print methods. If you're curious about how they stack up, you can explore our guide comparing DTF vs DTG printing methods for a deeper dive.
How to Adjust Settings for Different Materials

Think of your heat press like a kitchen oven. You wouldn't bake a delicate cake and a dense loaf of bread at the same temperature, right? The same exact logic applies here. Every fabric has its own ideal "recipe," and dialing in the right settings is the difference between a perfect, durable design and a scorched, peeling disaster.
A basic cotton t-shirt is your sturdy loaf of bread—it can handle plenty of heat. But a sleek polyester jersey? That’s your delicate cake. It needs a much gentler approach to avoid melting or leaving a permanent shiny spot. Mastering this is what separates the pros from the rookies.
Adjusting for Natural Fibers like Cotton
Cotton is your best friend when you're starting out. It’s forgiving, widely available, and its natural fibers are tough enough to handle higher temperatures without much fuss.
For most of the transfers you'll be using, like standard Heat Transfer Vinyl (HTV) or Direct-to-Film (DTF), these settings are a fantastic starting point:
- Temperature: Aim for 305°F to 320°F (152°C - 160°C). This is the sweet spot—hot enough to cure the adhesive but well within the safe zone for the fabric.
- Time: A quick press of 10 to 15 seconds is all it usually takes to create a solid bond.
- Pressure: Use medium to firm pressure. You want to ensure the transfer's adhesive gets pushed right into the fabric's weave for a bond that lasts wash after wash.
Heavier fabrics like canvas bags follow similar rules. Because they have a thicker weave, you might want to bump the temperature up slightly (closer to 320°F - 340°F) and stick with firm pressure to get the job done.
Handling Sensitive Synthetic Fabrics
This is where you need to be more careful. Synthetics like polyester are essentially a form of plastic. Too much heat will scorch them, leaving a shiny, irreversible mark. Because of this, you have to turn the temperature way down.
A good rule of thumb for polyester is to start around 270°F (132°C). This lower heat protects the fabric while still working for transfers designed for synthetics. You also have to watch out for "dye migration"—where the fabric's dye heats up, turns into a gas, and stains your white or light-colored design. Lower temps and special "subli-block" vinyls are your best defense against this common headache.
Expert Tip: For 50/50 cotton/poly blends, always default to the more sensitive material's settings. Start on the lower end, around 280°F - 300°F, to protect those polyester fibers from damage. It’s always better to be safe than sorry.
Settings for Different Transfer Types
The garment fabric is only half the story. The transfer material you're applying is just as crucial, as each type has its own unique application needs.
For instance, most standard Heat Transfer Vinyl (HTV) works best somewhere between 260°F and 315°F. This range activates the adhesive properly without scorching the garment. But it's not a one-size-fits-all rule. A glitter HTV might need a much hotter press, around 350°F, to set its thick, textured layers, while a stretch HTV made for polyester works best at a gentle 270°F.
Here’s a quick rundown of some common transfer types and their quirks:
- Standard HTV: Your everyday workhorse. The settings will vary by brand, but they generally fall in line with the fabric you're pressing on (e.g., 305°F on cotton).
- Glitter & Specialty HTV: These often have thicker layers and need more heat or a longer press time to adhere correctly. Always check the manufacturer's instructions.
- Direct-to-Film (DTF): DTF is a fantastic, versatile option that works on almost any fabric. The settings are surprisingly consistent across different materials, making it a reliable choice. If you want to dive deeper, we have a complete guide covering heat press settings for DTF.
- Sublimation: This is a completely different process where the ink becomes a gas and permanently dyes the fabric. It only works on polyester or specially coated items and requires very high heat—think 385°F to 400°F—to open up the polyester fibers so they can absorb the ink.
Mastering Pressure and Peeling Techniques
When we talk about heat pressing, everyone focuses on temperature and time. But honestly, pressure is the unsung hero of a great transfer. You can dial in the perfect heat and timing, but without the right amount of force, your project is doomed from the start. Getting a feel for pressure, and knowing when to peel the transfer backing, is what separates a homemade-looking shirt from a truly professional product.
Think about it like making a grilled cheese sandwich. You can't just let the bread hover over the hot pan. You need that press-down action to ensure every bit of cheese melts perfectly and the bread gets that even, golden-brown toast. It's the same idea with your heat press. Pressure ensures the hot platen makes full, even contact with the transfer and the garment.
This firm contact pushes the transfer's adhesive deep into the fabric's fibers, creating a strong, permanent bond that feels like it’s part of the shirt, not just sitting on top of it.
What Do "Light," "Medium," and "Firm" Pressure Actually Mean?
Let's be real—when the instructions say "medium pressure," it can feel like a guessing game. While some high-end presses give you a digital PSI reading, most of us are working with a manual knob and our own best judgment. So, here’s a practical breakdown of what those settings should feel like.
- Light Pressure: Think of this as a gentle touch. The top platen rests on the garment with very little force. It's ideal for delicate fabrics or for certain transfers designed to sit on the surface.
- Medium Pressure: This is your everyday, go-to setting. You should feel definite resistance, making it a bit tough to close with one hand but perfectly manageable with two. It's the sweet spot for most heat transfer vinyl (HTV) and DTF transfers.
- Firm Pressure: You're going to need to put some muscle into this one. It requires real effort, maybe even using some body weight, to lock the handle down. This heavy-duty pressure is reserved for thicker materials like hoodies and canvas or for specialty processes like sublimation.
Here’s a great little trick I learned years ago: tear off four small pieces of paper and place one in each corner of your lower platen. Close and lock the press. Now, try to pull each piece of paper out. If one slips out easily while another is stuck tight, your pressure is uneven. Keep adjusting until all four pieces have the same amount of drag. Simple, but it works every time.
Hot Peel vs. Cold Peel: Why It Matters So Much
Once the timer beeps, your job isn't done. The next step—peeling off the plastic carrier sheet—is just as critical. Transfers are specifically designed to be either hot peel or cold peel, and if you mix them up, you can ruin a perfectly good shirt in a split second.
Key Insight: The difference comes down to the transfer's adhesive. Hot peel adhesives are formulated to release the design from the carrier while everything is still screaming hot. Cold peel adhesives need to cool down and solidify completely before you can safely remove the backing.
If you try to peel a cold peel transfer while it's hot, you'll get a stretched, warped, or completely ruined mess. On the flip side, letting a hot peel transfer get cold can make the carrier sheet a nightmare to remove and might leave your design with a rough, uneven texture.
Always, always check the instructions that came with your transfers. The manufacturer will tell you which peel type to use. It's a non-negotiable step for getting that flawless, professional finish. For a deeper dive into different materials, our guide on how to use heat transfer paper breaks it down even further.
When you master both pressure and peeling, you're truly in control of your craft. It’s this attention to the "other" settings that ensures your work not only looks amazing right off the press but also holds up to everything life throws at it.
Troubleshooting Common Heat Press Problems
Even with the perfect settings from a heat press temperature guide, sometimes projects just don't turn out right. It’s frustrating, for sure, but every failed press is a chance to learn something new. Figuring out what went wrong is how you truly master the craft and make sure it doesn't happen again.
Think of this section as your troubleshooting field manual. We'll walk through the most common headaches, get to the root of why they happen, and lay out clear steps to fix them.
Why Is My Vinyl Peeling or Cracking?
There's nothing more deflating than pulling a freshly washed shirt out of the dryer only to see your design peeling away. When this happens, the culprit is almost always one of the "big three": temperature, time, or pressure.
Simply put, peeling vinyl means the adhesive on the back never truly melted into the fabric's fibers. It created a weak, superficial bond that just couldn't hold on. A few things can cause this.
- Not Enough Time or Temperature: The adhesive needs a specific amount of heat for a certain duration to activate and cure properly. It's crucial to go back and check the manufacturer's recommendations for that exact type of vinyl.
- Incorrect Pressure: Too little pressure is like a weak handshake; the vinyl and fabric never make full, firm contact. On the flip side, too much pressure can actually squeeze the melted adhesive out from the edges, leaving the center with nothing to grab onto.
- Fabric Coatings: Many new garments come from the factory with a light chemical coating to keep them looking crisp. This finish can act as a repellent to your vinyl's adhesive. The fix is easy: always pre-wash and dry new clothes before you press them.
To get things right, start by recalibrating your settings. If the peeling continues, try bumping up your press time by 3-5 seconds or adding a bit more pressure. If you're seeing cracking instead of peeling, that’s usually the opposite problem—too much heat or time has "over-baked" the vinyl, making it brittle.
How to Prevent Scorch Marks and Ghosting
That moment your heart sinks when you lift the press and see a faint brown outline of the platen on a brand-new white shirt? We've all been there. These scorch marks are basically permanent burns, while "ghosting" is a lighter discoloration that sometimes fades.
These problems pop up most often on materials that are sensitive to heat, like polyester or light-colored cotton blends. The cause is straightforward: the heat was too intense for the fabric.
The Essential Fix: A Teflon cover sheet is your absolute best friend here. By placing this non-stick sheet between your design and the hot platen, you create a protective buffer. It helps distribute the heat more gently and evenly, which dramatically lowers the risk of scorching your garment.
If you’re still scorching garments even with a cover sheet, your next move is to lower the temperature. Try dropping it by 5-10 degrees and add a few extra seconds to your press time to make up for the lower heat. A lower, slower press is always the safest bet for delicate fabrics.
Solving Dull or Faded Sublimation Prints
Sublimation is a bit of magic—solid ink becomes a gas that permanently dyes polyester fibers. When your prints come out looking dull, faded, or blurry, it’s a telltale sign that this ink-to-gas transfer didn't go as planned.
Let's look at what's likely going wrong and how to fix it:
- Low Polyester Count: Sublimation ink is only attracted to polyester. For a truly vibrant, punchy image, you need a garment with at least a 65% polyester count. For photo-quality, jaw-dropping results, 100% polyester is the gold standard.
- Insufficient Heat or Time: The ink needs a blast of high heat (typically 385°F - 400°F) and a good amount of time (usually 45-60 seconds) to fully turn into a gas and penetrate the fabric. Skimping on either will leave you with a weak-looking print.
- Moisture in the Garment: This is the silent killer of good sublimation. Any moisture trapped in the fabric will turn to steam under the press, blocking the ink gas from reaching the fibers and causing splotchy, uneven color. Always pre-press your blank item for 5-7 seconds to bake out any hidden humidity before you even think about placing your transfer.
Ready to Go Beyond the Basics? Advanced Tricks for Pro-Level Results
Once you've got the hang of pressing a standard t-shirt, you'll naturally start wondering, "What's next?" This is where the fun really begins. Moving beyond the basics means tackling those trickier items and learning how to layer colors for designs that look truly professional. These are the skills that will set your work apart and help you create stunning, retail-quality products.
The Easiest Pro-Tip You'll Ever Learn
One of the biggest secrets to a perfect press is also one of the simplest: pre-press your garment. Seriously, it's a game-changer. Just press the blank item for a quick 3-5 seconds before you even think about placing your transfer. This little step does two crucial things: it smooths out any stubborn wrinkles and, more importantly, it zaps any hidden moisture lurking in the fabric. A dry, flat surface is exactly what your transfer needs to stick perfectly.
But what about those items that just won't lay flat? We've all been there—trying to press a zippered hoodie or a collared polo, only to have the seams get in the way and ruin the pressure.
How to Handle Tricky Seams and Awkward Shapes
This is where a few specialized tools become your best friends. For anything with zippers, thick seams, or buttons, a heat press pillow is a must-have. Think of it as a small, heat-resistant cushion that you slip inside the garment. It raises the main pressing area, allowing all those bulky bits like zippers and collars to sink down and out of the way. The result? The smooth, even pressure you need for a flawless transfer.
For things like hats, mugs, or shoes, you'll need to swap out your flat platen for a specialized attachment. These platens are molded to fit those unique curves, giving you a firm, properly shaped surface to work on. Trying to press a baseball cap on a flat press is a recipe for frustration; a cap platen makes it easy.
The Art of Layering HTV Like a Pro
Creating a multi-color design with Heat Transfer Vinyl (HTV) isn't about just stacking and pressing. If you press each color for the full time, you'll end up over-baking the bottom layers. They'll get brittle, shrink, and eventually crack. The secret is a series of quick "tack" presses followed by one final cure.
Here's how you do it:
- Tack the First Layer: Place your base layer and press it for just 2-3 seconds. That's it! You only need enough heat to make it stick so you can peel away the carrier sheet.
- Repeat for Other Layers: Align your next color and give it the same quick 2-3 second press. Keep doing this for every color in your design.
- Do the Final Press: Once all the layers are tacked down, cover the whole design with a Teflon sheet or parchment paper. Now, press it one last time for the full recommended duration (usually 10-15 seconds). This final step fully cures all the layers together without scorching any of them.
This layering method is fundamental for anyone serious about custom apparel. While the general sweet spot for most heat pressing is between 300°F and 400°F, every material is different. Delicate synthetics need a gentle touch, while something dense like ceramic needs the heat cranked up. To get a better feel for this, you can learn more about fabric-specific heat settings on kindle-tech.com. Getting these details right is what separates the amateurs from the pros.
Got Questions? We’ve Got Answers.
Even with the best heat press temperature guide on hand, a few questions are bound to pop up. That's totally normal! We've gathered some of the most common ones we hear from both newcomers and seasoned pros to help you clear up any confusion and press with more confidence.
Can I Just Use a Regular Iron Instead of a Heat Press?
Look, we get the temptation. For a quick, one-off craft, you can technically use a household iron for some heat transfer vinyl. But if you're aiming for anything that needs to last, it's a really bad idea.
Think about it: a regular iron is full of holes and has wild temperature swings across its surface. It's impossible to get the even heat and, more importantly, the consistent, heavy pressure needed for the adhesive to truly bond with the fabric. This is exactly why iron-on projects so often crack, peel, and wash away after a trip or two through the laundry. A heat press is designed to eliminate those problems by delivering uniform heat and pressure every single time.
The Bottom Line: A heat press isn't just a nice-to-have; it's essential for professional, durable results. The investment quickly pays for itself when your products look great and last for years.
How Do I Know if My Heat Press Temperature Is Even Accurate?
You can't always trust the digital display on your press. It's a common issue—over time or even right out of the box, the temperature on the screen might not be the real temperature of the platen. That difference can ruin a perfectly good shirt.
The only way to know for sure is to test it yourself with an infrared (IR) temperature gun. They're inexpensive and invaluable.
- First, heat up your press to a temperature you use often, say 320°F.
- Next, use the IR gun to take readings from multiple spots on the top platen—the center, all four corners, and along the edges.
- Finally, compare the numbers. This simple test will show you if your display is accurate and expose any frustrating cold spots.
If you find your press is consistently off, you can simply adjust for it. For example, if the display says 320°F but your gun reads an average of 305°F, you now know to set your machine 15 degrees hotter than what the instructions call for.
Why Do My Sublimation Prints Look So Dull?
When sublimation prints come out looking faded or muted, it's almost always because something went wrong during the ink-to-gas transfer. Sublimation is like a science experiment; it needs the perfect combination of time, temperature, and material to produce those stunning, vibrant colors.
Here are the usual suspects behind a lackluster print:
- Wrong Settings: This is the number one cause. Sublimation demands high heat (usually 385-400°F) and enough time (often 45-60 seconds) for the ink to fully turn into a gas and permanently dye the fibers. Not enough of either will result in a weak transfer.
- Not Enough Polyester: Sublimation ink can only bond with polyester. If you're pressing on a 50/50 cotton-poly blend, you're only going to get 50% of the potential color. For that pop you're looking for, stick to 100% polyester garments or substrates specifically coated for sublimation.
- Hidden Moisture: Any moisture trapped in the fabric will flash to steam during pressing, creating a barrier that blocks the ink gas. This leads to splotchy, uneven colors. Always pre-press your blank for 5-7 seconds to zap away any humidity before placing your transfer.
Ready to skip the guesswork and get flawless, vibrant designs every time? The DTF transfers from Raccoon Transfers are engineered for consistency and ease of use on any fabric. Create your custom gang sheet today and enjoy next-da shipping on us!