
Heat Transfer on Hats The Definitive How-To Guide
Getting a professional, long-lasting finish on a hat starts way before you ever fire up your heat press. Seriously. The real secret is in the prep work—picking the right materials and getting your surface just right. This is the stuff that separates a perfect custom hat from one that starts peeling or scorching after the first wear.
Building the Foundation for Flawless Hat Transfers

Before you even think about dialing in your temperature and pressure, the hat itself is where your success begins. Its material is everything. Cotton, polyester, and their various blends all behave differently under heat. A 100% cotton hat, for example, is pretty forgiving and can handle the heat well. But a polyester blend? It’s much more sensitive and can scorch if your settings are off by just a little bit.
Look beyond the fabric and consider the hat's actual construction. A seamless five-panel cap gives you a beautiful, flat canvas that’s ideal for larger designs. On the other hand, a classic six-panel hat has that pesky seam running right down the middle, which can really mess with your application. For those, you'll often need a heat press pillow or a specialized platen to get the even pressure required for a good bond. The structure—whether it's a firm, structured front or a soft, unstructured "dad hat"—will also change how you approach the press.
Matching the Transfer to the Hat
Once you've got your hat picked out, the next move is to pair it with the right kind of DTF transfer. DTF is known for being incredibly versatile, but you still need to think about how the ink and adhesive will bond with that specific fabric to get the best color and durability.
Getting this combo right is fundamental to producing high-quality work. Although DTF is a fantastic solution for most fabrics, you can learn more about general material compatibility by checking out our guide on the best vinyl for heat press applications.
For a quick cheat sheet, here’s how different hat materials and transfers typically pair up.
Essential Hat and Transfer Compatibility Chart
This table is a great starting point for matching common hat materials with the right transfer and initial press settings. Always remember to do a test press if you're working with a new material!
| Hat Material | Best DTF Transfer Type | Starting Temperature Range | Key Consideration |
|---|---|---|---|
| 100% Cotton | Standard DTF | 300-320°F (149-160°C) | Very forgiving, but pre-pressing is crucial to remove moisture. |
| Polyester | Low-Temp or Blocker DTF | 260-280°F (127-138°C) | Prone to scorching and dye migration. Low-temp transfers are a must. |
| Cotton/Poly Blends | Low-Temp or Standard DTF | 275-295°F (135-146°C) | Test press to find the sweet spot that prevents scorching the poly. |
| Nylon/Synthetics | Specialty Low-Temp DTF | 250-270°F (121-132°C) | These materials are very heat-sensitive. Start low and use a protective cover. |
This chart should help you avoid some of the most common material-related headaches and get you closer to a perfect press on the first try.
The Prep Steps You Can't Afford to Skip
Okay, you've got your hat and your transfer. Now for two simple, non-negotiable steps that will save you from a world of frustration.
First, always use a lint roller on the spot where you're applying the design. I can't stress this enough. Even the tiniest speck of dust or a stray fiber can get trapped under the adhesive, creating an imperfection that leads to peeling down the road.
Second, always pre-press the hat for 5-10 seconds. This quick step does two incredibly important things:
- It Zaps Moisture: All fabrics hold a bit of moisture from the air. If you don't get rid of it, it turns into steam during the press and completely ruins the transfer's bond.
- It Smooths Everything Out: Pre-pressing flattens the surface, removing any wrinkles or creases. This gives your transfer a perfectly smooth area to adhere to, which is critical for a clean look.
Trying to get consistent heat and pressure on a curved surface like a hat isn't a new problem. In fact, modern hat presses were developed to solve issues that decorators were facing back in the 1980s, like cold spots and uneven temperatures that made transfers a nightmare.
Getting Your Heat Press Dialed In
This is where the magic happens. Nailing your heat press settings is what separates a professional, long-lasting hat from a peel-and-fade disaster. It's less about guesswork and more about understanding the interplay between heat, time, and pressure on a uniquely curved surface.
First things first: you absolutely need a hat-specific platen. Seriously, don't even try using your flat press. It's a recipe for frustration. A standard flat plate can't make proper contact with the hat's curve, which means you'll get uneven pressure, spotty adhesion, and transfers that lift at the edges. A curved lower platen is non-negotiable—it cradles the hat's shape, giving you the solid, even surface you need for a perfect press.
Temperature and Time: The Core Settings
Every transfer comes with instructions, and that's always your best starting point. But remember, the material of the hat itself plays a huge role. Heat presses work by using a heated aluminum upper platen to activate the transfer's adhesive, and any cold spots can ruin the application.
Here’s my go-to starting point for the most common hat fabrics:
- Cotton & Cotton Blends: These materials are pretty forgiving. I usually start at 300-320°F and press for a solid 10-15 seconds.
- Polyester & Synthetics: Be careful here, as these can scorch easily. Drop your temperature down to 260-280°F and shorten your press time to just 8-12 seconds.
For a deeper dive into different materials, having an essential heat press temperature guide handy is a smart move. It'll save you a lot of headaches.
The Feel of Firm Pressure
Pressure is the most abstract setting, especially if your press doesn't have a digital readout. So what does "firm" pressure actually feel like on a hat press? It’s all about creating enough force to embed the transfer's adhesive right into the fabric weave.
My rule of thumb: Adjust the pressure knob until it takes a firm, two-handed push to lock the press down. You should feel solid resistance, but you shouldn't have to throw your whole body weight into it.
Before you press your actual product, always do a test run. Grab a scrap piece of similar material or sacrifice an old hat for the cause. This quick check lets you see if the temperature is causing any scorching and ensures the transfer peels cleanly. It’s a simple step that can save you a ton of money and inventory in the long run. If you're new to this, our guide on how to properly use a heat press covers more of these foundational techniques.
By taking a methodical approach—using the right platen and testing your settings—you take the chance out of the equation. This is how you develop the confidence and skill to press any hat that comes your way, every single time.
Nailing the Placement and Press
This is where the magic happens—and where precision really counts. Getting a transfer perfectly applied to a curved surface like a hat is what makes the final product look sharp and professional, not like a DIY rush job.
For that classic, centered logo, your best friend is the hat's center seam. I usually just eyeball it, but a small ruler can help. Line up the vertical center of your transfer with that seam. As for height, a good rule of thumb is to keep the bottom of the design about a half-inch above the brim. This sweet spot ensures the design is clearly visible and looks balanced.
Lock It Down: Securing the Transfer
Once you've got the placement just right, you absolutely have to make sure it doesn't budge. Even a tiny shift when you close the press can leave you with a crooked, blurry mess. This is exactly why heat-resistant tape is a non-negotiable tool.
I use two to four small pieces to tape the corners of the transfer film directly to the hat. You want it snug, but don't pull so tight that you stretch or warp the design. This stuff is made to handle the heat and peels right off afterward without leaving any gunk behind.
Seriously, don't even think about using regular Scotch tape. It will melt into a sticky, gooey disaster all over your hat and your heat press. It’s a nightmare to clean and can easily ruin both your project and your equipment.
Hot Peel vs. Cold Peel: Know the Difference
Not all DTF transfers are created equal, and how you peel the film is a critical step. Your transfer will be either hot peel or cold peel, and this isn't just a suggestion—it's based on the chemistry of the adhesive.
-
Hot Peel: You peel this one immediately. The second your press opens, while everything is still piping hot, you peel back the film. This method tends to push the ink deeper into the fabric, giving you a softer feel and a more matte finish. It's my go-to for cotton hats where you want that barely-there feel.
-
Cold Peel: For these, patience is key. After pressing, take the hat off the platen and let it cool down completely. I usually wait 30-60 seconds, or until it's no longer warm to the touch. Peeling cold often leaves a slightly glossier finish and is fantastic for holding onto tiny, intricate details that might get messed up with a hot peel.
Knowing which one you have is crucial for the final look and durability of your design.
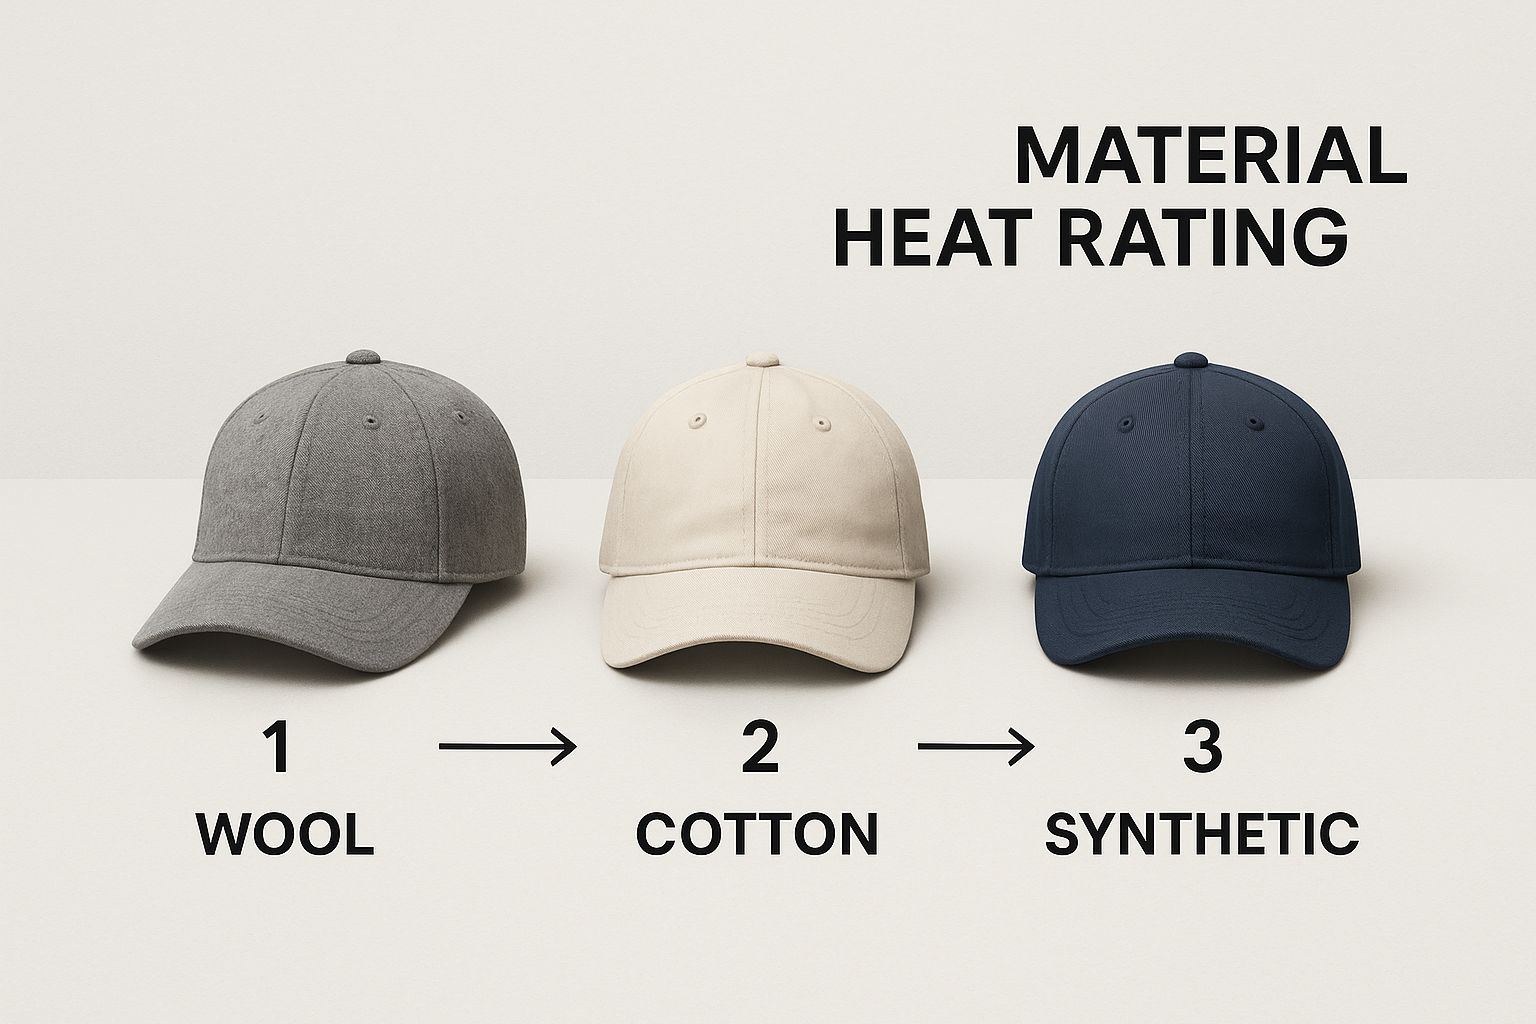
This chart is a great visual reference for the heat tolerances of different hat materials. Checking it before you start can save you from scorching a perfectly good hat.
The Final Touch: A Post-Press for Durability
You've peeled the film and the design looks great. Awesome! But don't stop there. There's one final step I never skip because it makes a huge difference in how well the design holds up over time.
It’s called the post-press.
Just place a sheet of parchment paper over the transfer and press it again for a quick 5-10 seconds at the same temperature. This final press melts the ink directly into the fabric fibers, which dramatically improves wash durability and helps prevent cracking down the road. It also knocks back any glossiness for a clean, professional finish. For a deeper dive into settings, our heat press temperature chart is a fantastic resource to have on hand.
Advanced Techniques for Challenging Hats
Sooner or later, you'll move beyond the basic six-panel cap and run into a real head-scratcher. Applying transfers to hats isn't always a walk in the park, especially when you're dealing with floppy, unstructured styles, delicate materials, or that dreaded center seam. Getting these tricky jobs right is what separates the pros from the amateurs, and it’s how you open the door to more creative and profitable work.
When you’re up against a structured hat with a thick center seam, your biggest enemy is that uneven surface. If you press a flat transfer over that bump, you’ll get gaps where the adhesive can’t make contact with the fabric. The result? A design that looks broken and starts peeling after the first wear.
Taming Seams and Unstructured Caps
The trick is to build a firm, even surface to press on. A small, firm heat press pillow or a specialized rubber pad is your best friend here. Just slip it inside the hat and push it firmly against the front panels. It fills that empty space and lifts the area around the seam, giving your heat press a flat, level playing field to work with.
Unstructured hats, like those classic "dad hats," present the opposite problem. The fabric is so floppy that it's tough to keep the transfer in place and get even pressure without creating a bunch of creases. The key here is to really lock that hat down on the lower platen. Use the holding strap or clips on your press to pull the material completely taut before you even think about pressing.
Applying a heat transfer on hats demands precise heat control to protect the hat’s shape and fabric. The curve alone is a unique challenge, but some pros take it a step further. I’ve seen experts preheat a difficult hat up to 10-12 times just to condition the surface and get rid of any potential for creases, ensuring the transfer comes out perfectly smooth. You can see how the pros do it by checking out these advanced heat pressing methods on YouTube.
Working with Delicate Mesh and Sensitive Fabrics
Trucker hats, with their foam fronts and plastic mesh backs, bring a whole new set of rules. That plastic mesh is incredibly sensitive to heat—it will melt or warp in a heartbeat if your temperature is too high. This is one of those situations where precise temperature and time control are absolutely non-negotiable.
For a typical trucker hat, you'll want to dial your temperature way down, often into the 260-280°F range. You also need to shorten your press time to just 8-10 seconds. Any longer, and you're running a serious risk of ending up with a melted, warped mess.
Here’s a quick rundown for tackling these trickier projects:
- Bring in a Pillow: For any hat with a prominent seam, insert a heat press pillow to create a firm, even surface. It's a game-changer.
- Stretch it Taut: On unstructured hats, use your press's tensioner to pull the fabric tight. No wrinkles allowed.
- Cool it Down for Mesh: Start on the low end (around 270°F) and do a quick test press to make sure you're not melting the mesh.
- Always Use Protection: A Teflon sheet or a piece of parchment paper is a must. It’s a simple barrier between the hot platen and the hat that prevents scorching.
Adding these techniques to your repertoire will give you the confidence to take on just about any hat style that comes your way. You'll no longer have to turn down jobs because of difficult materials or weird construction, which ultimately expands what you can offer and ensures every single piece you make is top-notch.
Even when you've done everything right, a press can still go wrong. It happens to everyone. Seeing a transfer peel, a hat get scorched, or a design that just refuses to stick is incredibly frustrating. But here's the good news: most of these problems come down to a few common culprits, and they're usually simple to fix once you know what you're looking for.
Think of yourself as a heat press detective. The way the transfer is failing is your first and most important clue. A little bit of smart troubleshooting will get you back to pressing perfect hats without wasting a bunch of time or inventory.

What to Do When Edges Are Peeling or Lifting
This is probably the number one issue people run into. You peel back the film, and the edges of your design are lifting right off the hat. Or, even worse, it looks fine at first but starts peeling after one wash. This is almost always a pressure problem. The adhesive simply wasn't pushed deep enough into the fabric's fibers to create a solid, lasting bond.
Your first move should be to crank up the pressure. Give that adjustment knob a good turn to get a much firmer clamp. If the peeling is happening near a seam, that's a dead giveaway you need a heat press pillow to even out the surface. Don't underestimate this—insufficient pressure is the leading cause of transfer failure.
A failed transfer feels like a waste, but it's really a lesson. Each mistake teaches you something specific about your materials, your press, or your process. Don't get discouraged—get diagnosing.
Another thing to check is moisture. Did you skip the pre-press? If so, steam from the fabric could have gotten in the way of the adhesive. Always give the hat a quick 5-second pre-press to zap any moisture and create a perfect canvas for your transfer.
Dealing With the Dreaded Scorch Mark
You finish a press and see that faint, discolored box around your design. That's a scorch mark. It happens when the heat is too high for the hat's material, and it’s especially common on polyester and other synthetic blends, which are way more sensitive than cotton.
Thankfully, the fix is pretty straightforward:
- Turn Down the Heat: Immediately drop your temperature by 10-15°F.
- Press for Less Time: Shave a few seconds off your dwell time.
- Use Protection: Always, always use a Teflon sheet or a piece of parchment paper over the transfer. This simple barrier helps diffuse the heat and provides a crucial layer of protection for the fabric.
When the Transfer Refuses to Let Go of the Film
This one can be maddening. You go to peel the carrier film, and the design decides to stick to it instead of the hat. This almost always points to one of two things.
First, are you sure about the peel type? Double-check if you're working with a hot peel or a cold peel transfer. Trying to peel a cold peel transfer while it’s still hot is a guaranteed way to fail, as the adhesive needs time to cool and set.
If you’re positive you’re peeling correctly, then the issue is likely not enough heat or time. The adhesive didn't get a chance to fully activate. Try adding a few seconds to your press time or bumping the temperature up by 5 degrees. That little extra bit is often all it takes to get a clean, complete release.
Sometimes, a quick reference guide is all you need to diagnose a problem on the fly. We've put together this table to help you quickly identify what's going wrong and how to get back on track.
Quick-Fix Troubleshooting Guide for Hat Transfers
| Problem | Likely Cause | How to Fix It |
|---|---|---|
| Edges of the design are lifting or peeling. | Not enough pressure. | Increase the pressure on your heat press. Use a heat press pillow if pressing over seams. |
| A discolored box appears around the design. | Heat is too high for the fabric. | Lower the temperature by 10-15°F and always use a Teflon cover sheet for protection. |
| The transfer won't release from the carrier film. | Not enough heat/time, or wrong peel type. | Verify if it's a hot or cold peel. Increase press time by 2-3 seconds or temp by 5°F. |
| The design looks faded or has an uneven texture. | Uneven pressure or a warped platen. | Check for gaps with the "paper test." Ensure the hat is seated perfectly on the platen. |
| Adhesive residue is left on the hat. | Too much heat or pressure. | Reduce your temperature slightly and ease up on the pressure adjustment. |
Keep this chart handy near your press. Most issues are minor adjustments, and having a quick guide can save you from wasting materials while you figure things out.
Answering Your Top Hat Pressing Questions
Struggling to get your heat transfers to stick to a hat? You're not alone. The curve of a hat is notoriously tricky, and using a standard flat press is often the culprit behind peeling or distorted designs. The simple truth is you need a dedicated hat platen. It’s a game-changer, giving you that perfectly even pressure for a clean transfer every single time.
Why Is My Hat Scorching?
Ah, the dreaded scorch mark. It's especially common with polyester blends, which can scorch if you're just a few degrees too hot. If you see browning, immediately back off your settings. Try dropping the temperature by ten degrees or shortening the press time by a couple of seconds.
Here are a few tricks I’ve learned over the years to avoid it altogether:
- Always use a Teflon sheet as a protective barrier. It prevents the heat platen from making direct, harsh contact.
- Give the hat a quick pre-press for about five seconds. This gets rid of any hidden moisture, which can cause steam and lead to scorching.
- Never skip a test run. If you have a scrap piece of fabric or an extra hat, dial in your settings on that first.
Hot Peel vs. Cold Peel: What's the Difference?
This one trips up a lot of people. The type of transfer you have dictates everything.
Hot peel transfers mean you rip that film off the second the press opens, while it's still piping hot. This technique gives you a beautiful matte finish that feels soft and almost screen-printed right into the fabric.
On the other hand, cold peel transfers need to cool down completely before you even think about touching the film. Being patient pays off here, as it’s the best way to keep super fine details and get those razor-sharp, glossy edges.
| Peel Type | When to Peel | The Final Look |
|---|---|---|
| Hot Peel | Immediately | Soft, Matte Finish |
| Cold Peel | After it's completely cool | Glossy, Sharp Finish |
Getting the Pressure Just Right
If the edges of your design are lifting, nine times out of ten, it’s a pressure problem. You need to apply firm, even pressure to really embed that adhesive into the hat’s fibers. We’re talking a solid, two-handed clamp down onto that curved platen.
For hats with a pesky seam running down the middle, a press pillow is your best friend. It slides underneath and creates a smooth, even surface to press on.
- Get a feel for it by testing on an extra hat.
- Keep adjusting the pressure until you need a good, firm two-handed effort to lock the handle down.
What if the design cracks after washing? That’s another sign that the adhesive didn't fully bond with the fabric. Double-check your pressure and temperature, and always do a post-press. Just cover the design with parchment paper and hit it again for about ten seconds to really lock it in.
What to Do When the Film Won't Release
So you've opened the press, and the carrier film is clinging on for dear life. Don't panic. The first thing to check is your timing and temperature. If you're using a hot peel transfer, the film can get stuck if the press wasn't quite hot enough.
Try bumping the temperature up by five degrees or adding two more seconds to your press time. A tiny adjustment is usually all it takes to get a clean release.
Here’s a quick mental checklist to run through:
- Am I using the right peel method (hot or cold) for these specific transfers?
- Could the temperature be a touch too low?
- Did I remember to pre-press the hat to remove any moisture?
Getting this stuff down is key. In fact, seasoned decorators who follow a structured troubleshooting process report over a 90% success rate on their first press.
Mastering these little details can save you a ton of time and prevent a pile of wasted hats. Keep experimenting on scrap gear, and soon enough, these settings will become second nature.
Ready to stop guessing and start pressing with confidence? Grab some premium DTF transfers from Raccoon Transfers. We offer same-day shipping and free delivery on all orders over $79.90.
You can upload your art, build out custom gang sheets, and get hands-on support to ensure every application is flawless. See for yourself how vivid and detailed your designs can be.
And if you’re looking for more great advice, check out our blog for more hat pressing tips and ideas.