
Your Guide to Heat Transfer Print Paper for Custom Designs
Ever wondered how you can get a custom design onto a t-shirt right from your home computer? The secret is often heat transfer print paper. It's a special kind of paper with a polymer coating on one side designed to work with your everyday printer.
Think of it as a temporary carrier for your ink. You print your design on it, and then, with a bit of heat and pressure, that design gets released and bonded directly onto fabric. It’s the go-to method for DIY creators and small businesses looking to make custom gear without a huge investment.
The Magic Behind Your Custom T-Shirt
That awesome digital graphic you designed? Heat transfer paper is the bridge that lifts it off your screen and puts it onto a real, wearable piece of clothing. It's what empowers hobbyists and entrepreneurs to create one-of-a-kind items on demand.
The science behind it is pretty straightforward. One side of the paper has a special heat-activated film that holds onto the ink from your printer. When you introduce heat from an iron or heat press, that film softens just enough to fuse with the fibers of the fabric, embedding your design right into the material.
The Essential Toolkit for Beginners
One of the best things about this method is how little you need to get started. This low barrier to entry is why it's so popular for personal projects and small-scale ventures. And it’s not just for fabrics—with the right kind of paper, you can even customize items like imprinted college diploma covers.
Here’s your basic setup:
- Heat Transfer Paper: The core ingredient, with different types available for inkjet vs. laser printers and for light vs. dark fabrics.
- A Printer: The standard inkjet or laser printer you probably already have will do the trick.
- A Design: Any digital file works, whether it's a simple line of text or a full-color photo.
- A Heat Source: A household iron can get you started, but for consistent, professional-grade results, a heat press is a game-changer. It delivers even temperature and pressure, which is key for durability.
- The Substrate: This is just the blank item you’re decorating—most commonly a cotton or poly-cotton blend t-shirt, hoodie, or tote bag.
A simple way to think about it: The paper is like a high-tech temporary tattoo. Your printer creates the image, and the heat press makes it stick for good. It’s a beautifully simple way to bring digital art into the physical world.
Understanding the Basic Workflow
The whole process boils down to three key steps: print, trim, and press.
First, you print your design onto the coated side of the heat transfer print paper. An important note: for light-colored fabrics, you almost always need to mirror your image before printing so it appears correctly when transferred.
Next, you'll want to trim away any blank, unprinted areas of the paper around your design. If you don't, you’ll end up with a faint, transparent film box on your shirt. Finally, you press the design onto the garment. This is where the magic happens, and getting the time, temperature, and pressure right is crucial for a vibrant, long-lasting print.
While this method is a fantastic starting point, it's just one of several ways to decorate apparel. To see how it fits into the bigger picture, check out our guide on what is transfer paper to learn about other options.
How To Choose The Right Heat Transfer Paper
Walking into the world of heat transfer paper can feel a little overwhelming at first. With so many options, how do you know which one is right for your project? The good news is that it really boils down to two key things: your printer and the color of your fabric.
Nail these two choices, and you're already on your way to a great-looking, long-lasting print.
Match The Paper To Your Printer And Fabric
First things first, you have to match the paper to your printer. This is a non-negotiable step. Heat transfer papers are specifically formulated for either inkjet printers or laser printers, and they absolutely cannot be used interchangeably.
Inkjet paper is coated to absorb and hold liquid ink, while laser paper is designed to bond with a heat-fused powder called toner. Using the wrong one is a recipe for a smeared, messy design that won't stick, and you could even risk damaging your equipment.
Once you’ve got the right paper for your printer, the next decision is all about the color of your shirt or garment.
-
Paper for Light Fabrics: This paper is basically transparent. Think of it like a clear decal. Any unprinted area you don't trim away will leave a faint, clear film on the fabric. Since it's see-through, the fabric color underneath will affect the final look, which is why it's only suitable for white, pastel, or very light-colored materials.
-
Paper for Dark Fabrics: This type has a solid, opaque white background. It acts more like a high-quality white sticker. That white base layer is crucial—it blocks out the dark fabric underneath, ensuring your colors stay bright and true. Without it, your vibrant design would look dull and muddy on a black or navy shirt.
Here's a simple way to think about it: trying to print a transparent design on a black shirt is like painting with watercolors on black construction paper. The colors just vanish. The opaque paper for darks essentially lays down a fresh white canvas first, making your design pop beautifully, no matter what color the shirt is.
The main trade-off between the two often comes down to the "hand," which is just industry-speak for how the design feels on the shirt. Transfers on light fabrics usually feel much softer, almost like they're part of the fabric itself. Because of that opaque base, transfers on darks can feel a bit thicker and more like a graphic sitting on top of the material.
If you want to dive deeper, you can check out our complete guide to the best paper for heat transfer to find the perfect fit.
Comparing Your Options At A Glance
Getting this choice right matters, and it’s a big business. The global heat transfer paper market was valued at USD 525.3 million in 2023 and is only expected to grow. The most popular paper thickness, between 51 and 150 GSM, is a huge driver of this growth, projected to take up over 46.3% of the market share because it works so well across different fabrics.
To make things easier, we've put together a quick comparison table to help you visualize the key differences and pick the best paper for your job.
Heat Transfer Paper Comparison Guide
This table gives you a side-by-side look at the most common types of heat transfer paper, helping you choose the right one based on what you value most—be it feel, color pop, or longevity.
| Paper Type | Best For | Feel (Hand) | Color Vibrancy | Durability |
|---|---|---|---|---|
| Inkjet for Lights | White or pastel cotton/poly-blend shirts and hobbyist projects. | Softer, more flexible feel that blends into the fabric. | Good, but colors may appear slightly less saturated. | Moderate; prone to fading without proper care. |
| Inkjet for Darks | Any color fabric, especially blacks, navies, and deep reds. | Thicker, more noticeable feel due to the opaque base. | Excellent, as the white background makes colors pop. | Good, but can be prone to cracking if stretched. |
| Laser for Lights | High-volume projects on light fabrics where speed is key. | Very soft, often with a "no-feel" result. | Bright and sharp, with crisp lines for text and logos. | Very durable and wash-resistant. |
| Laser for Darks | Professional results on any color fabric, especially complex designs. | Can feel stiff initially but softens with washing. | Superior color accuracy and vibrancy. | Excellent; highly resistant to cracking and fading. |
Each type of paper has its strengths. Inkjet is fantastic and accessible for smaller projects and hobbyists, while laser paper often provides a more durable, professional-grade finish ideal for businesses or high-volume work.
A Step-By-Step Guide to a Perfect Press Every Time
Getting a flawless, professional-looking print isn't about luck—it's about following a proven process. Once you get the hang of these core steps, you'll be able to consistently turn your digital designs into incredible, wearable art. Let's walk through the entire journey, from prepping your artwork to that satisfying final peel.
The path from a digital file to a finished shirt starts long before you turn on the heat press. Getting your design ready is easily the most important step, as it lays the groundwork for everything else.
This flowchart breaks down the first few decisions you need to make, helping you match your printer and fabric to the right kind of paper from the get-go.
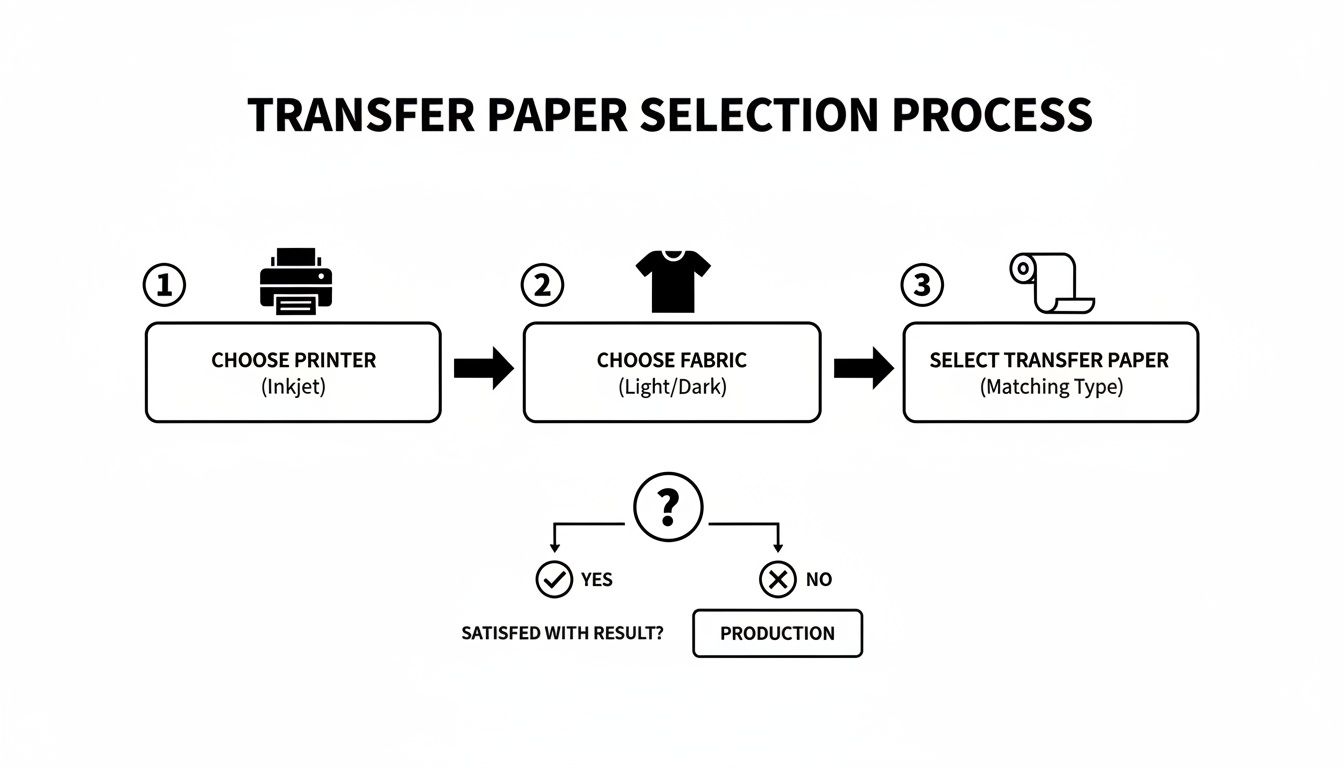
As you can see, it all starts with two simple questions: what kind of printer do you have (inkjet or laser), and what color is your fabric (light or dark)?
Step 1: Prep and Print Your Design
Before you even think about hitting "print," you have to get your artwork set up correctly. The single most important part of this step? Mirroring your image.
- For light fabrics: You must mirror your design. The paper goes face-down on the shirt, so flipping the image ensures it reads correctly once it's transferred.
- For dark fabrics: You usually do not mirror the design. This type of paper is applied face-up, so you print it exactly as you want it to look on the final product.
Of course, always double-check the instructions that came with your specific paper, but this is the golden rule. When you're ready to print, choose a high-quality setting. This tells your printer to lay down plenty of ink, which is key for a rich, vibrant transfer.
Step 2: Trim Your Design Like a Pro
Once printed, your design is sitting on a full sheet of paper. If you press that whole sheet onto your shirt, the blank areas will leave a faint, plastic-like box around your graphic. We call this a "polymer window," and it’s not a good look.
To avoid it, grab a pair of scissors or a craft knife and carefully trim away all the unprinted paper. The closer you can get to the edge of your design, the cleaner and more professional it will look. A little patience here pays off big time in the final result.
Think of it like weeding a vinyl decal. The goal is to get rid of all the extra material, leaving only the artwork you want on the shirt. A clean cut helps the design look like it's part of the fabric, not just stuck on top.
Step 3: Press With Precision
It’s showtime! Whether you're using a commercial heat press or a simple home iron, the magic comes from the same three ingredients: time, temperature, and pressure. A heat press is your best bet by a long shot, as it delivers the kind of consistent, even results that are nearly impossible to get with an iron.
First things first, pre-press your garment for 5-10 seconds. This simple step smooths out wrinkles and, more importantly, removes any lingering moisture from the fabric. This gives you a perfectly flat, dry canvas for your transfer to stick to.
Next, carefully position your trimmed design on the shirt. Now, pull out the instructions for your transfer paper—this is where you need to follow the manufacturer's specific settings.
- Set the Temperature: This is usually somewhere between 350–375°F (175–190°C).
- Set the Time: The sweet spot is often 15–25 seconds.
- Apply Firm Pressure: This is what truly bonds the transfer's ink layer deep into the fabric fibers.
Once the timer goes off, there’s one last critical step: the peel. Some papers are "hot peel," meaning you rip the backing off immediately. Others are "cold peel," requiring you to wait until it's completely cool to the touch. Peeling at the wrong time can stretch, crack, or completely ruin the transfer, so don't skip this detail
Ensuring Your Custom Designs Last

It’s one thing to press a vibrant, perfect-looking design. It’s another thing entirely for that design to look just as good after a dozen trips through the laundry. The true test of a great custom print is its durability, and that all comes down to two things: the fabric you choose from the get-go and how you care for the garment afterward.
When it comes to heat transfer print paper, not all fabrics are going to give you the results you want. The material you press onto is just as important as the transfer itself, directly affecting the look, feel, and lifespan of your work. For the best results, natural fibers are almost always the way to go.
Choosing The Right Fabric Canvas
Think of the fabric as the foundation for your art. A weak, unstable foundation will ruin the final product, no matter how good the design is. The best materials have a tight weave and can handle the heat and pressure of the application process without a problem.
Here are the fabrics I always recommend:
- 100% Cotton: This is the gold standard for a reason. Cotton fibers play incredibly well with the transfer’s polymer film, locking in the color and creating a vibrant print that feels relatively soft to the touch.
- Cotton/Polyester Blends (50/50): A 50/50 blend is a fantastic workhorse material. You get the soft, breathable feel of cotton combined with the strength and wrinkle resistance of polyester. It's a reliable choice for most projects.
- Canvas and Denim: These rugged, cotton-based fabrics are also excellent choices, especially for things like tote bags, custom aprons, or jean jackets.
On the flip side, some fabrics are a definite no-go. Synthetics like 100% polyester, nylon, or spandex are just too sensitive to heat and can easily scorch or even melt under a heat press. I'd also steer clear of heavily textured materials like ribbed knits. The uneven surface prevents the transfer from getting full, even contact, which often leads to a patchy, cracked design right from the start.
A great print starts with a great garment. Sticking to cotton and poly-cotton blends ensures your design has a stable and receptive surface to bond with, dramatically increasing its chances of a long, vibrant life.
The Secrets to a Long-Lasting Print
Once your design is pressed and looking sharp, its future is in your hands. How you wash and dry the item will make all the difference. Get it right, and your print can last for ages. Get it wrong, and it could crack and peel after just a handful of washes. Following proper care instructions isn't just a suggestion—it's essential.
To keep your custom apparel looking its best, just follow these simple but critical rules.
Washing Do's and Don'ts:
- DO wait at least 24 hours after pressing before that first wash. This is non-negotiable. The adhesive needs that time to fully cure and form a permanent bond with the fabric fibers.
- DO turn the garment inside out. This simple step protects the print from rubbing against other clothes and the inside of the washing machine.
- DO use cold water and a mild detergent. Hot water is the number one enemy of a heat transfer; it can soften the adhesive and cause it to fail.
- DON'T use bleach or fabric softeners. These harsh chemicals can break down the transfer film and cause it to degrade or peel right off.
Drying Best Practices:
- DO tumble dry on a low heat setting. Better yet, hang it up to air dry. This is the gentlest method and will give you the longest life.
- DON'T blast it on high heat in the dryer. Just like hot water, high heat can reactivate the adhesive, leading to a cracked, peeling mess.
- DON'T ever iron directly over the design. If the garment needs ironing, turn it inside out, use a low temperature setting, and avoid the printed area.
By following these guidelines, you're not just washing a shirt; you're preserving your work. This is how you ensure your creations stay looking fresh, vibrant, and professional, wash after wash.
Heat Transfer Paper vs DTF Transfers
If you’ve mastered the basics of heat transfer paper, you might be wondering what’s next. While it’s a fantastic starting point for any creator, it’s not your only option. A more modern method, Direct-to-Film (DTF) transfers, delivers a professional-grade finish that solves many of the common headaches associated with traditional paper transfers.
Think of it this way: starting with heat transfer paper is like learning to drive a reliable sedan. It’s easy to get the hang of, accessible, and gets you where you need to go for everyday projects. DTF, on the other hand, is like stepping up to a high-performance sports car—it offers superior results, incredible durability, and a much smoother ride from start to finish. It’s the choice for pros.
The Key Differences That Matter
When you put these two methods side-by-side, the differences become crystal clear, especially in the areas that matter most to small businesses and serious crafters. This isn’t just about how the final product looks; it’s about the entire workflow, from your computer screen to the finished shirt.
The single biggest game-changer with DTF is the complete elimination of weeding or trimming. With heat transfer paper, you have to meticulously cut around your design to avoid that dreaded polymer box on the fabric. DTF transfers are printed onto a film, and only the ink itself gets the adhesive. This means you can press incredibly intricate designs just as easily as you can a simple block of text.
With DTF, what you print is what you press. There are no borders, no halos, and no tedious trimming. This one difference can save creators hours of work and unlocks a level of design complexity that’s just not realistic with paper.
Another huge factor is the "hand," or how the design feels on the shirt. Heat transfer paper, particularly the kind for dark fabrics, often leaves a noticeable, sometimes stiff layer on top of the garment. DTF transfers are the polar opposite—they are remarkably thin and flexible, stretching with the fabric for a soft, premium feel that’s much closer to screen printing.
Durability and Vibrancy Showdown
While a well-applied paper transfer can hold its own for a while, DTF is in a completely different league when it comes to durability. DTF ink bonds directly into the fabric's fibers, giving it exceptional stretchability and resistance to cracking or fading. It’s engineered to look great after dozens of washes, making it the undeniable winner for any products you plan to sell.
This focus on long-lasting quality is a major trend. Sublimation, another advanced printing technology, held a dominant 47.2% share of the market in 2023. Its popularity comes from its ability to create prints that don't fade or peel—a quality that DTF also delivers exceptionally well. You can see more on this trend in the heat transfer paper market report.
Let’s break it down point by point:
| Feature | Heat Transfer Paper | DTF Transfers |
|---|---|---|
| Weeding/Trimming | Required; you must trim the design | Not required; only the design transfers |
| Feel (Hand) | Can be thick, especially on darks | Very soft, flexible, and lightweight |
| Durability | Moderate; can crack or fade over time | Excellent; superior wash and stretch resistance |
| Color Vibrancy | Good, but can be limited by paper type | Outstanding; bright, opaque colors on any fabric |
| Material Compatibility | Best on cotton and poly-blends | Works on cotton, poly, leather, and more |
When to Choose Each Method
So, when should you stick with heat transfer print paper, and when is it time to move up to DTF? The right answer really just depends on your goals.
Heat transfer paper is still the undisputed champ for beginners, quick prototypes, personal one-off projects, and gifts. You simply can't beat its low cost and immediate accessibility for those kinds of uses.
However, if you're running a small business, launching a clothing brand, or need to create consistent, top-tier merchandise that will have customers coming back, DTF is the logical next step. It gives you the professional look, feel, and durability that separates products meant for sale from homemade crafts. To get a better handle on the technology, check out our guide on what a DTF transfer is and how it works.
Got Questions? We've Got Answers
Even when you follow the steps perfectly, you're bound to run into a few snags. It’s all part of the learning process. Let's walk through some of the most common questions and issues that pop up when working with heat transfer print paper, so you can get back to creating fantastic results.
Can I Just Use My Home Iron Instead of a Heat Press?
Technically, yes, but I wouldn't recommend it if you want your designs to last. A regular home iron is a tough tool for this job because its heat is inconsistent—it has hot spots and cooler spots. It's also nearly impossible to apply the even, firm pressure needed for a solid transfer.
This is why a heat press is the gold standard. It provides perfectly even heat and pressure across the entire design, which is the secret to getting that ink to bond permanently with the fabric. Without it, you'll likely see your work start to peel or crack after just a few washes.
Help! Why Is My Design Cracking After I Wash It?
This is a classic and frustrating problem, and it almost always comes down to one of three things: not enough heat, not enough pressure, or not enough time. If the transfer doesn't fully bond with the fabric fibers during application, it will quickly break down in the wash.
Always double-check the specific instructions that came with your paper. To give your finished shirt the best chance at a long life:
- Turn it inside-out before washing.
- Use cold water on a gentle cycle.
- Tumble dry on low, or better yet, hang it up to air dry.
What's This Faint, Clear Border Around My Image?
Ah, the dreaded "polymer window." That transparent outline exists because the entire sheet of paper is coated with the transfer film, not just the part you printed on. When you press it, the unprinted film transfers right along with your design.
The only way to get rid of it is to trim meticulously around your artwork before pressing. The closer you can get, the less noticeable that window will be. This is one of the biggest reasons creators eventually switch to DTF transfers—they have no background film, so you get just the design, no trimming required.
For anyone turning their hobby into a business, another question often comes up: "How do I make my products look amazing online?" Mastering effective product photography for custom designs is a game-changer for making your creations stand out and driving sales.
Ready to skip the trimming and elevate your designs with professional-grade quality? Raccoon Transfers offers premium, ready-to-press DTF transfers that provide superior durability, a soft feel, and vibrant colors on any fabric. Explore our easy-to-use services at https://raccoontransfers.com.