

Printing on Onesies: A DTF Pressing Guide
A fresh batch of blank onesies arrives, the artwork is centered on screen, and the first press looks perfect. Then the garment stretches over a baby's chest, the ribbed knit opens up, and the design appears cracked, uneven, or slightly crooked. That result usually isn't caused by the transfer alone. It comes from treating a small, elastic, seam-heavy infant garment like a miniature adult T-shirt.
Printing on onesies demands tighter control over fabric selection, placement, pressure, heat, and compliance. The print area is small, the fabric moves constantly, and parents care about more than washability. They also need confidence that the blank, adhesive, film, and ink system are appropriate for infant apparel.
Why Infant Garments Require a Different Approach
The first mistake many decorators make is pressing the onesie completely flat and assuming the job is finished. Ribbed fabric behaves differently once the garment is worn. The ribs expand, flatten, and move across the transfer, so a graphic that looks smooth on the platen can show small gaps or distortion when the baby moves.
I've found that the problem becomes more obvious with large solid graphics and fine lettering. A broad transfer bridges several ribs at once, while a stretchy neckline, side seam, or snap placket pulls the design in different directions. The print may still be bonded, but it no longer looks intentional.
Practical rule: Evaluate the design on the garment both flat and gently stretched. A onesie is a moving surface, not a rigid panel.
Fabric content also changes the workflow. Light cotton or cotton blends generally respond differently from stretchy synthetic blends, and a transfer that performs well on a smooth adult tee may need a different application approach on infant knitwear. Before pressing, check the fiber label, identify the transfer class, and test the exact blank whenever the order is new.
The commercial opportunity makes this extra care worthwhile. The global baby apparel market was estimated at USD 44.5 billion in 2024 and is projected to reach USD 71.4 billion by 2034, at a 4.9% CAGR over that period, according to global baby apparel market data. The same source places the market at USD 39.3 billion in 2021, showing sustained category demand rather than a brief novelty.
Personalized baby clothing is a substantial part of that market. In 2023, global production of customized baby clothing exceeded 150 million units, while onesies and bodysuits with names or birth dates represented over 60% of personalized garments. Personalized onesies and bodysuits alone accounted for about 90 million units, and e-commerce handled 58% of personalized baby product unit sales, according to personalized baby product market data.
That scale favors decorators who can handle short runs, variable names, and consistent fulfillment without sacrificing garment safety. It also helps to understand the difference between baby sleepwear and onesies, since garment purpose, construction, and labeling can affect how a finished product should be assessed.
For a broader workflow covering garment selection and decoration choices, the custom children's clothing guide is a useful reference. The main production lesson is simple: infant apparel needs its own setup, not a scaled-down adult apparel routine.
Dialing in Heat Press Settings for Delicate Blends
Heat application has three variables that must work together: temperature, dwell time, and pressure. Change one without considering the others, and a thin infant blend can scorch, fail to bond, or develop a permanent press mark.
For heat-applied vinyl on soft garments, independent technical guidance commonly places the operating window around 305°F to 320°F for 10 to 15 seconds with medium to firm pressure. Sublimation examples for baby onesies are closer to 385°F for 55 seconds, which shows why decorators must identify the transfer type before choosing a setting. Those benchmarks and the warning about uneven pressure are summarized in this onesie heat-transfer application guidance.
DTF transfer instructions should take priority over a generic setting. If the transfer supplier specifies a different temperature, dwell time, pressure level, peel method, or second-press requirement, follow that specification and validate it on a spare blank. A DTF transfer isn't automatically interchangeable with HTV just because both are applied with a heat press.
Build a stable pressing surface
The snaps and seams create a raised perimeter under the chest panel. If you press directly over that uneven structure, the center of the transfer may receive more contact than the edges. The result can be partial adhesion, weak corners, or a print that looks fine until laundering.
Use a padded pressing pillow, foam insert, or other heat-press support inside the onesie. The support should lift the printable panel above the snaps and allow the chest area to lie flat. Smooth the garment without stretching it aggressively. Excess tension during pressing can make the design appear correctly aligned only while the onesie is held taut.
A useful sequence is:
- Inspect the blank. Check the fiber content, ribbing, seams, snaps, and printable area.
- Pre-press briefly if appropriate. Remove surface moisture and flatten minor wrinkles without overheating the fabric.
- Position the transfer. Keep the artwork compact and away from seams, plackets, and closures.
- Press with even contact. Use the supplier's DTF setting, with the supported panel level under the platen.
- Peel as instructed. Hot, warm, and cold peel films behave differently.
- Repress only when specified. Use a protective sheet if the transfer instructions call for a finishing press.
The DTF heat-press settings guide can help organize the file and application workflow, but always pair general guidance with the instructions supplied for the specific transfer.
Prevent the two common failures
Under-pressing leaves parts of the adhesive unbonded. It often happens at ribbing, near seams, or along the transfer edges where pressure is inconsistent. The design may lift during the first wash or develop weak corners when the garment stretches.
Over-pressing can flatten the rib texture, scorch a delicate synthetic fiber, or leave a shiny rectangle around the artwork. More heat isn't a substitute for better contact. If the transfer isn't bonding evenly, correct the support and pressure before just increasing temperature.
Run a test on the same blank whenever possible. Check the front, stretch the fabric gently, and inspect the edges after cooling. A successful press should remain flexible, lie flat, and show no obvious edge lift or heat damage.
Navigating Placement and Ribbed Fabric Distortion
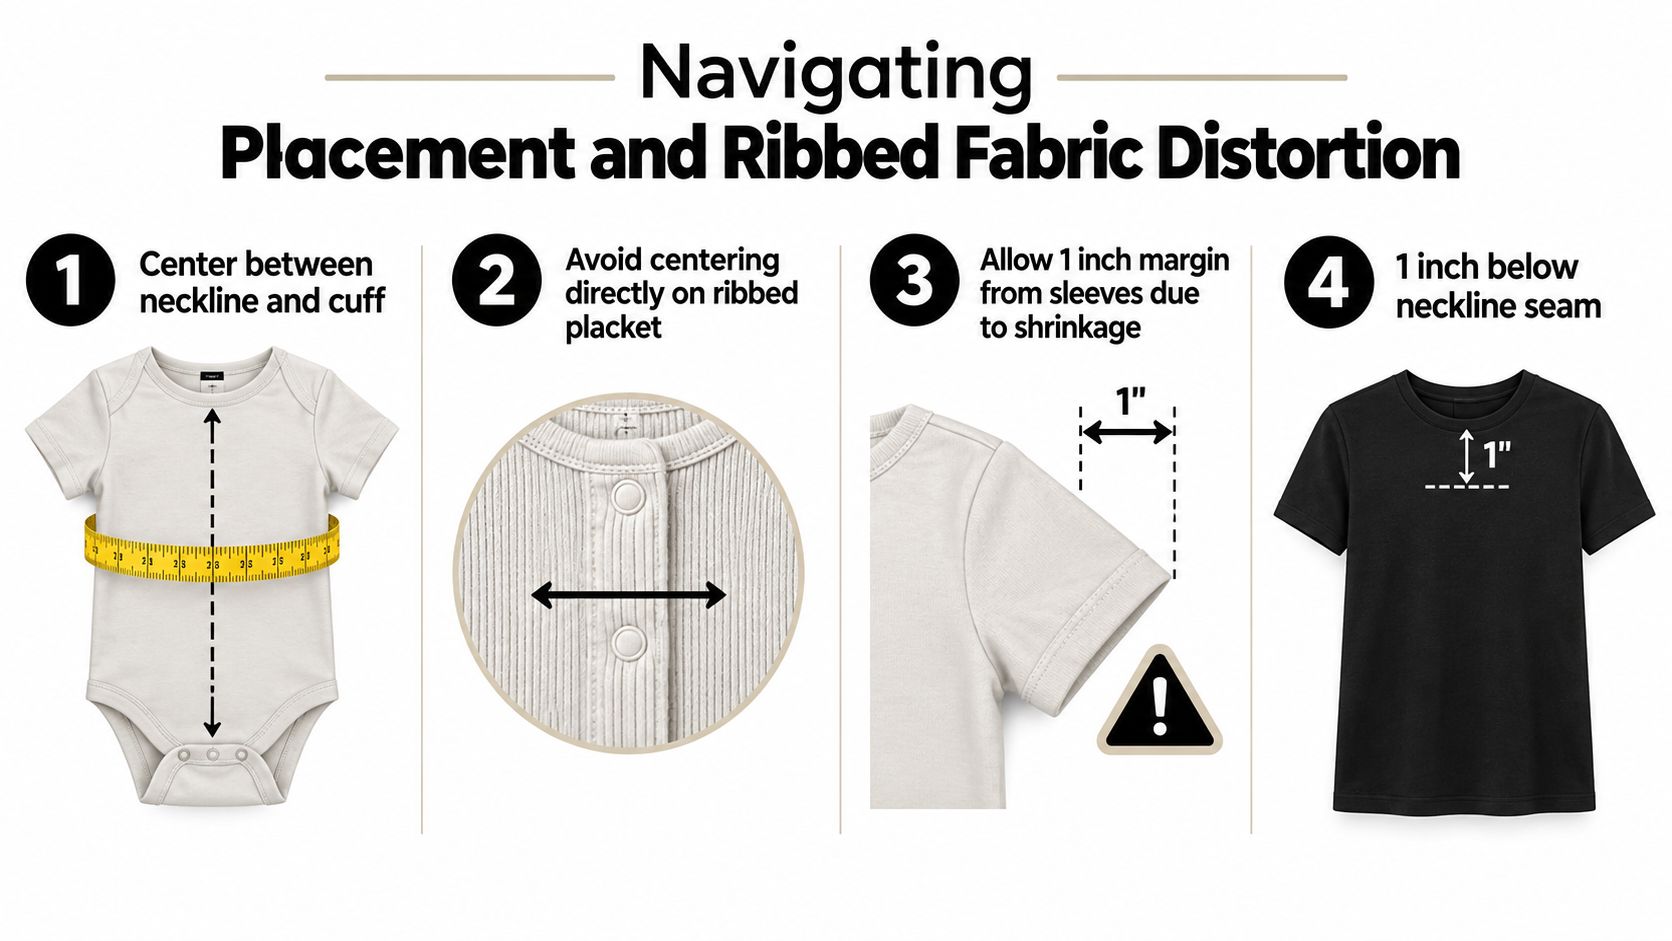
Adult-shirt placement gives decorators too much confidence. A typical adult graphic sits visibly below the collar, but infant proportions leave much less vertical space between the neckline, chest, and snap closure. If you copy an adult template, the design can land too low, crowd the snaps, or disappear into the baby's folds when the garment is worn.
For infant apparel, one placement guide recommends positioning the design approximately 0.5 to 1 inch from the collar, compared with 2 to 3 inches for adult tees, as explained in infant and adult shirt placement guidance. Treat that as a starting range, not a universal rule. Neckline width, garment size, artwork height, and the location of the bottom closure all affect the final anchor point.
Place for the worn garment
Lay the onesie flat without pulling the side seams outward. Find the center between the neckline and the lower snap area, then assess whether the graphic will remain clear when the garment curves around a baby's torso. The visual center of the flat garment isn't always the visual center when worn.
Keep the artwork compact enough to avoid the side seams. A transfer that reaches too far outward can wrap around the body and distort when the side panels stretch. It can also interfere with sleeves or create an uneven appearance from the front.
The lower edge deserves equal attention. Don't let a large design extend into the snap closure area. Snaps need to open and close without catching the film, and the lower ribbing often moves more than the chest panel. A smaller graphic usually performs better than a larger one with more detail.
Design around the rib structure
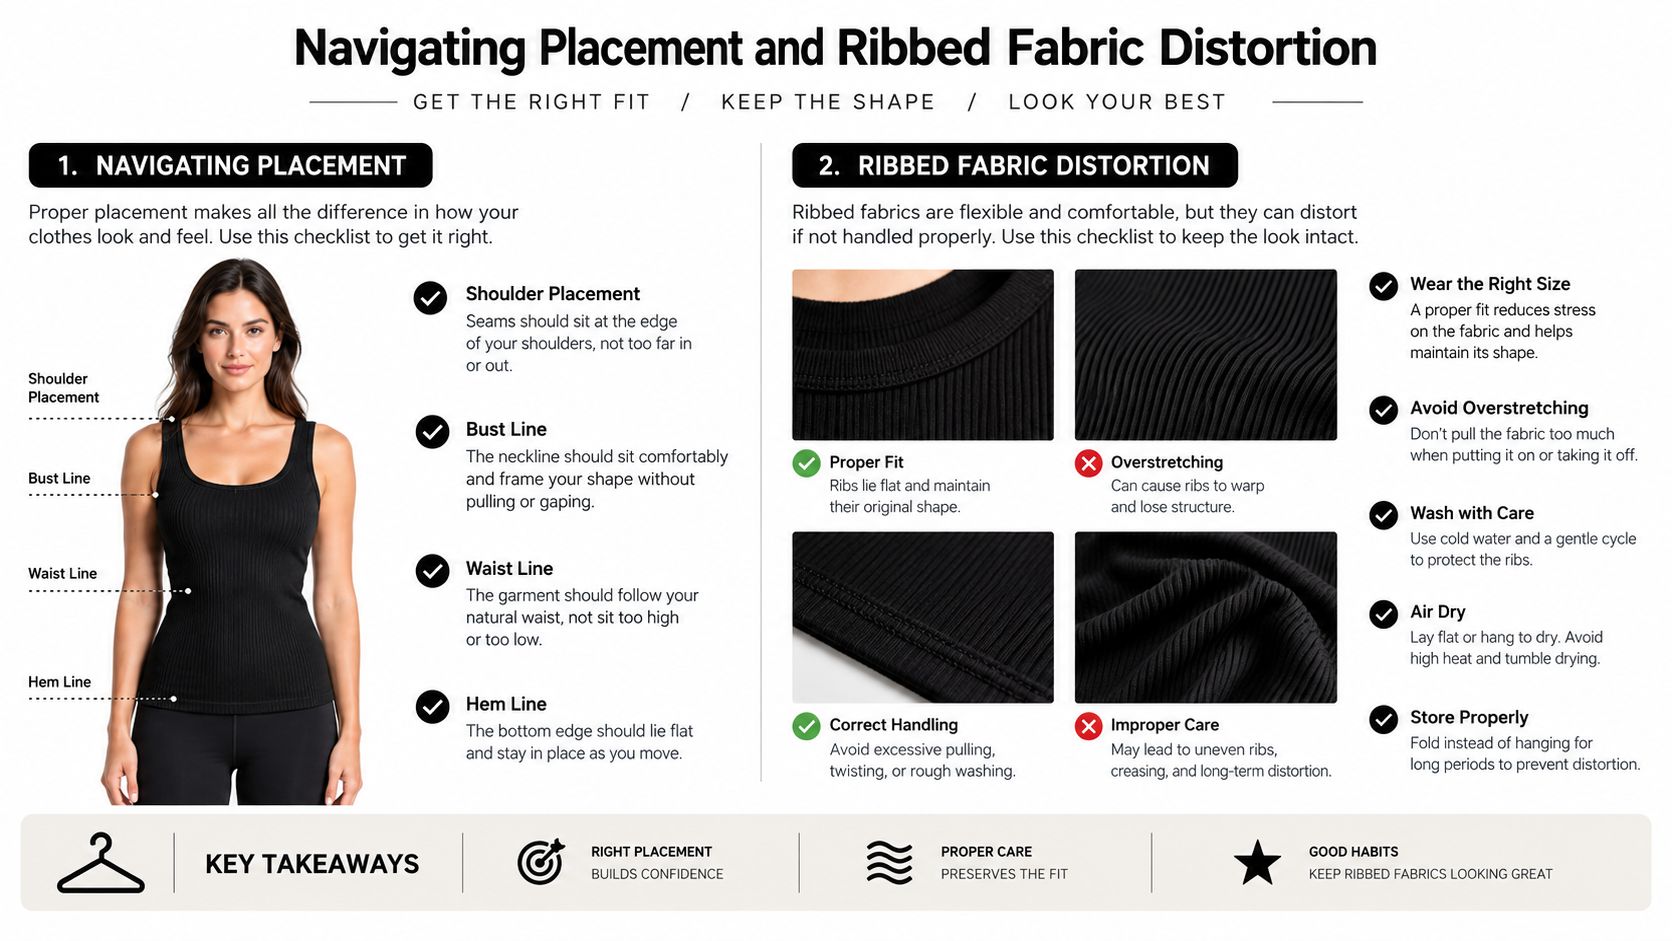
Ribbed fabric can reveal gaps as it stretches because the raised ribs pull apart beneath the printed surface. That doesn't mean every ribbed onesie is unsuitable for decoration. It means the design should tolerate movement.
Solid, compact artwork generally gives a more controlled result than very fine lines, tiny lettering, or delicate negative-space details. A name and small icon can work well when the letters have enough visual weight to remain legible after movement. Test intricate artwork on the actual blank before accepting a large personalized order.
A smooth cotton blank intended for flat decoration can be easier to position than a heavily ribbed infant garment. For comparison, the Gildan Heavy Cotton T-shirt (Small to XLarge) is described as having a smooth, seamless finish and a cotton construction for solid colors, with a cotton-polyester blend for heather colors. That type of adult blank can provide a more predictable print surface, but its geometry and fabric behavior shouldn't be used as a direct template for onesies.
Use a washable fabric marker or removable placement guide to establish the centerline before pressing. Measure from stable features such as the neckline seam, not from the edge of a loosely laid sleeve. Then check the transfer against the snap line and side seams one final time.
Meeting Safety and Compliance Standards for Baby Apparel
A print can be washable and still raise safety questions. Infant apparel touches sensitive skin, may be mouthed, and combines several materials in one finished product. The blank garment, ink, adhesive, transfer film, labels, and packaging can all matter.
For products intended for children, U.S. child-product rules address lead and phthalates. The compliance guidance summarized in safety considerations for printed kids' clothing identifies a lead limit of 100 ppm and phthalate restrictions below 0.1% in plasticized components under CPSIA requirements. Babies and toddlers up to age three fall within the strictest textile category discussed in that guidance.
Verify the whole product
Don't assume that a transfer is safe just because it feels soft or survives a wash cycle. Wash durability describes performance, not chemical compliance. Ask suppliers for documentation covering the blank and decoration system, and retain that information with the order record.
A practical review should include:
- Blank documentation: Confirm the manufacturer, fiber content, intended use, and any relevant certification information.
- Transfer materials: Ask what the film, ink, adhesive, and powder system contains and whether supporting compliance documents are available.
- Skin-contact considerations: Assess the print location, printed labels, and any areas likely to rub against the child's skin.
- Care labeling: Give parents clear washing instructions and avoid unsupported claims such as “chemical-free” or universally “safe for baby skin.”
- Recordkeeping: Keep supplier documentation, test samples, artwork files, and batch notes together.
OEKO-TEX-style limits can vary according to age group and skin-contact class, so one certification statement shouldn't be generalized across every product or component. A certified blank is useful evidence, but it doesn't automatically certify a separately applied transfer.
The Gildan Heavy Blend Sweatshirt 18000 illustrates why product specifications need to be read carefully. Its catalog description identifies an 8.0 oz. pre-shrunk 50/50 cotton-polyester construction, air-jet spun yarn, athletic rib knit details, and a tear-away label. Those facts describe that sweatshirt, not an infant onesie, and they shouldn't be transferred to another garment without verification.
For small brands, compliance is also a customer-service issue. Parents want to know what they're buying, how to care for it, and whether the seller can explain the materials. If you can't document a claim, describe the process accurately and avoid promising more than your suppliers support.
Curing and Care Instructions for Long-Lasting Prints
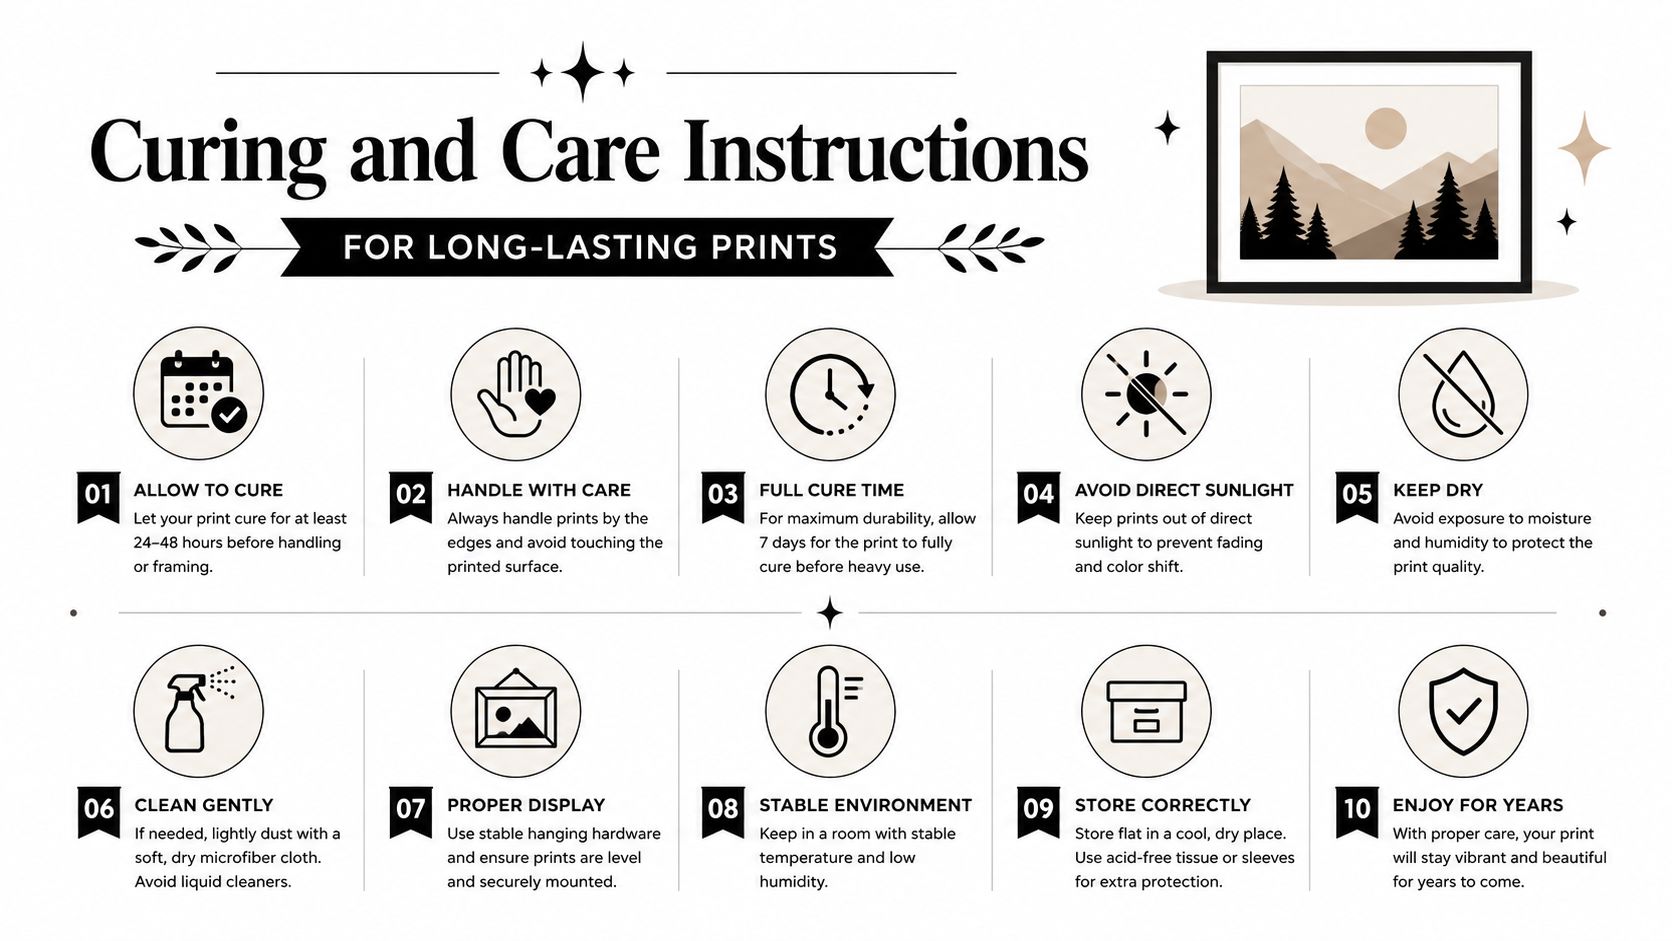
A finished press needs time to cool before the garment is folded, stretched, or packed. Moving the onesie while the adhesive and print surface are still warm can disturb the bond, especially around the edges and on flexible ribbing.
Set the garment aside on a clean, flat surface until it has cooled completely. Don't stack warm garments face to face. Once cool, inspect the perimeter, stretch the fabric gently, and look for lifting, bubbles, or areas that didn't contact the platen evenly.
Give parents simple instructions
Care labels and packaging should use plain language. A workable instruction set is:
- Turn the onesie inside out before washing.
- Use cool or lukewarm water rather than a hot cycle.
- Choose a gentle wash program when the garment allows it.
- Avoid bleach and aggressive stain treatments on the printed area.
- Don't scrub directly across the design.
- Keep the garment away from high direct heat unless the transfer instructions specifically permit it.
- Air dry when practical, or use a gentle drying method.
- Don't iron directly over the print.
- Store the garment flat or loosely folded after it is fully dry.
- Inspect the edges occasionally so early lifting can be addressed before it spreads.
Parents often use stain removers on infant clothing, so mention that harsh chemicals can affect the print surface. If a stain requires treatment, recommend testing the product on an inconspicuous area and keeping it away from the design.
The DTF transfer care instructions can support the care information you include with an order. Your own instructions should still match the exact transfer and blank combination, because garment fibers, finish, and application method affect the result.
Your Workstation Setup Checklist for Infant Apparel
A reliable onesie workflow starts before the heat press reaches temperature. Keep the blank, transfer, measurement tools, support insert, protective sheet, and care instructions together so a rushed order doesn't create a preventable error.
Before pressing
- Confirm the blank: Check fiber content, ribbing, seams, snaps, and size.
- Inspect the transfer: Verify the artwork, orientation, edges, and personalization.
- Scale for infant proportions: Keep the design compact and away from the side seams and snap area.
- Prepare the support: Use a pressing pillow or foam insert to level the chest panel.
- Calibrate the press: Confirm the displayed temperature and pressure are producing consistent contact.
- Choose the setting: Follow the transfer supplier's temperature, dwell, peel, and finishing instructions.
- Test first: Use a spare garment from the same style and color when available.
After pressing
Let the onesie cool fully, then stretch it gently and inspect the entire print. Record the blank, transfer, setting, and result so a successful sample becomes a repeatable production reference. Finally, attach accurate care instructions and retain the material documentation needed for your product claims.
Raccoon Transfers offers DTF and UV-DTF transfers, artwork uploads, custom gang sheets, and heat-press instructions for decorators producing personalized apparel. Visit Raccoon Transfers to prepare transfers for your next onesie run and build a workflow around accurate placement, consistent bonding, and documented care.