
How Do You Iron On Transfers The Right Way A Complete Guide
Getting a flawless iron-on transfer is much easier than you might think. I’ve found the whole process really boils down to four key moments: getting your garment ready, placing the transfer just right, applying the perfect mix of heat and pressure, and finally, peeling the film correctly.
Modern DTF transfers have made this even simpler, giving you incredible results on almost anything, from classic cotton tees to tricky materials like leather.
Your Guide To A Perfect Iron-On Transfer Application
That professional, store-bought finish isn’t out of reach. Whether you’re a small brand owner churning out a new t-shirt line or just making a one-of-a-kind gift, the fundamentals don't change. It's one thing to have a great design, but it's another to get it onto the fabric so it looks sharp, feels great, and actually lasts in the wash.
This guide will walk you through the entire process, step-by-step, with practical advice for both a professional heat press and your trusty home iron.
Success really hinges on getting a few key variables just right:
- Heat: You need enough heat to activate the transfer’s adhesive, but not so much that you scorch the fabric. It’s a delicate balance.
- Pressure: Firm, even pressure is non-negotiable. It’s what forces the design deep into the fabric's fibers for a permanent bond.
- Time: Every transfer type has a sweet spot for how long it needs heat and pressure. Too little and it won’t stick; too much and you can ruin the adhesive.
- Peeling: Knowing whether to peel the backing film while it's still hot or after it has cooled down can make or break the final result.
The Four Steps to Success
Consistently nailing these variables is what separates a homemade-looking shirt from a truly professional product. Every step is important, from the initial prep work to the final, satisfying peel.
This graphic gives you a great visual breakdown of the workflow.
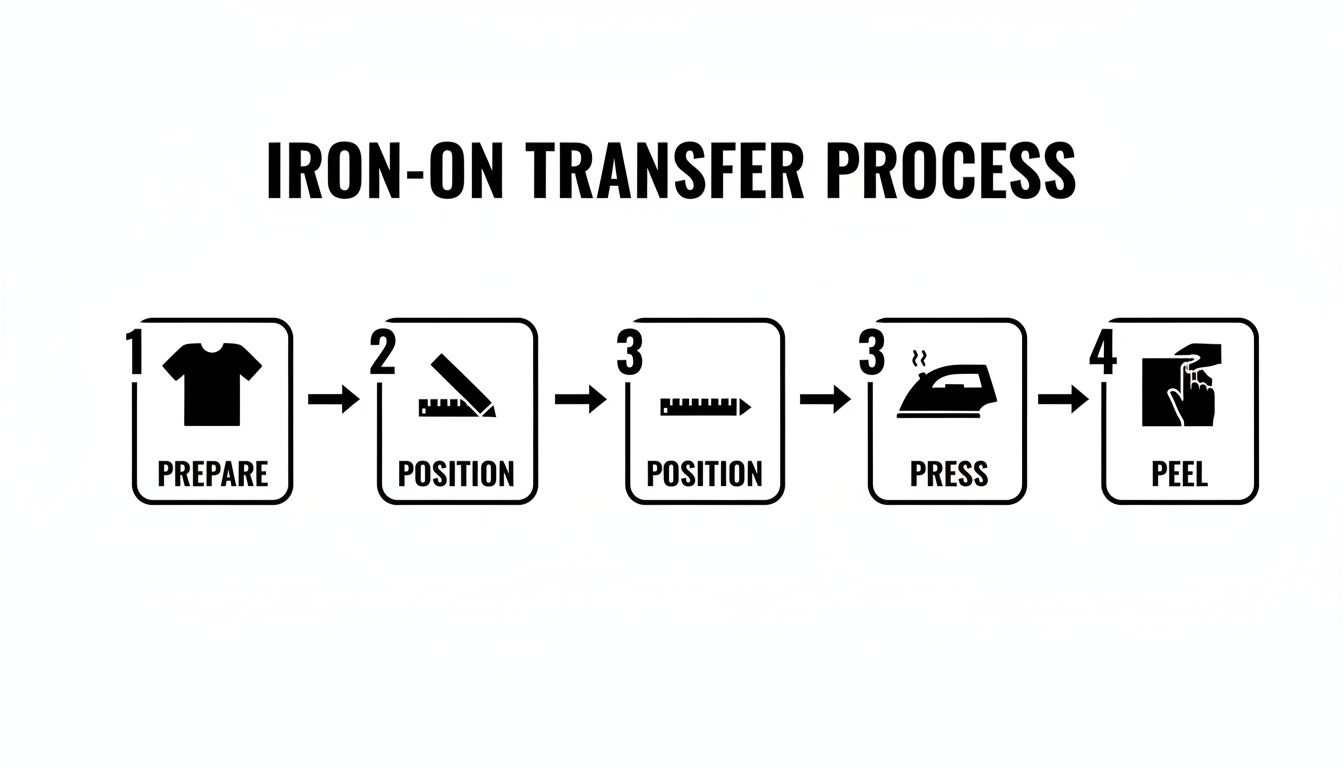
As you can see, a great result comes from being methodical—it's not just about the moment you apply the heat. For a more detailed look at creating custom apparel, this DIY Guide to Iron On Clothing Decals is a fantastic resource.
Iron-on transfers totally changed the game for custom apparel back in the 1970s, giving everyone a powerful alternative to expensive screen printing setups. The global market for Heat Transfer Vinyl (HTV), a huge part of this world, hit USD 371.4 million and is projected to climb to USD 551.96 million by 2034.
This boom is fueled by independent designers and e-commerce sellers who need an easy way to create personalized products. If you're using printable paper, we've got an entire guide on printable iron-on transfer paper packed with more tips. Much of this growth comes from North America, where advanced manufacturing has made it easier than ever for businesses to produce high-quality branded merchandise on demand.
Quick Guide To Transfer Application Settings
To get you started, here's a handy reference table with our recommended settings. Think of these as a starting point—you may need to tweak them slightly based on your specific equipment and material.
| Transfer/Fabric Type | Heat Press Temperature | Press Time (Seconds) | Home Iron Setting | Peel Type |
|---|---|---|---|---|
| DTF on Cotton/Poly Blends | 300-320°F | 10-15 | High (Cotton), No Steam | Cold |
| HTV on Cotton | 305-315°F | 10-15 | Cotton Setting | Hot or Cold |
| Glitter HTV on Cotton | 320-330°F | 15-20 | High (Cotton) | Hot |
| DTF on Polyester | 275-290°F | 8-12 | Medium (Synthetic) | Cold |
| HTV on Nylon/Leather | 275°F | 5-10 | Low (Synthetic) | Cold |
Always remember to do a test press on a scrap piece of fabric if you're unsure. It can save you a lot of frustration (and a good t-shirt!).
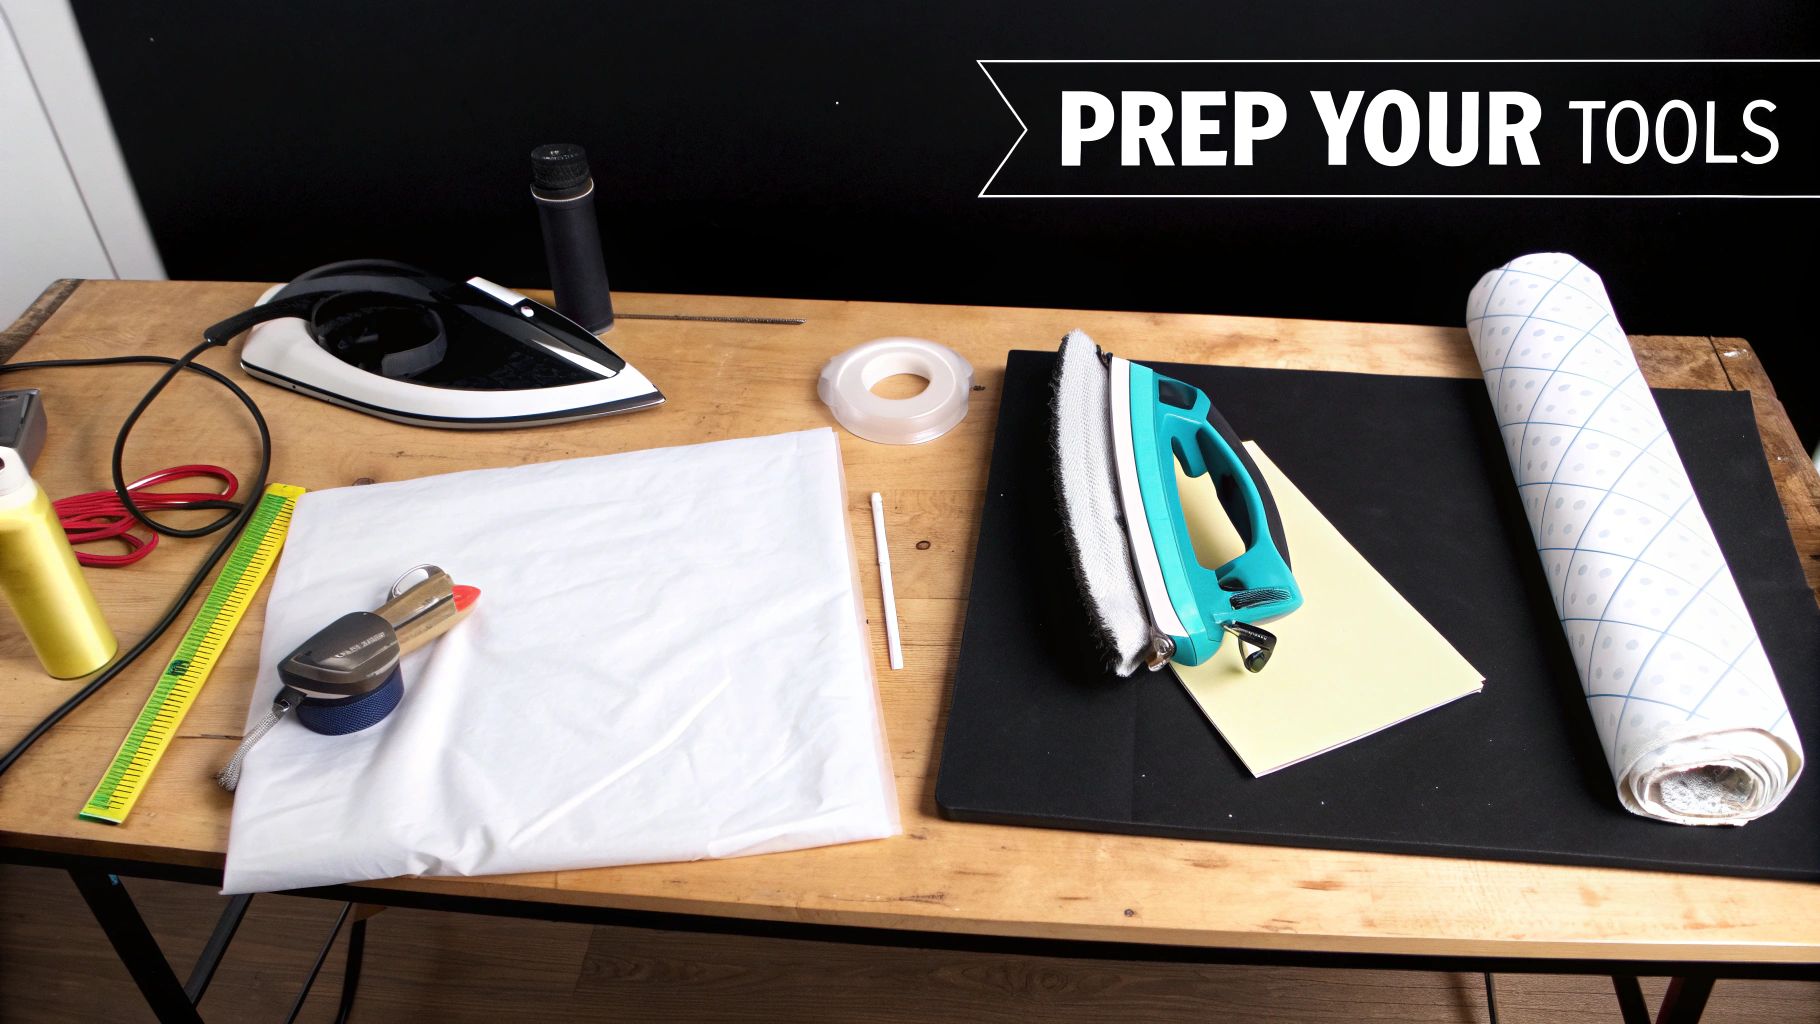
Gathering Your Tools For A Flawless Transfer
A great transfer starts long before you ever apply heat. I’ve learned over the years that having the right setup is the secret to avoiding those frustrating moments when a design just won't stick or comes out looking uneven.
Think of it like cooking a great meal—your ingredients and tools matter just as much as your technique. Whether you’re a pro with a heat press or you're working with a household iron, this checklist covers the essentials you’ll need to get the job done right.
For Heat Press Users
If you're using a heat press, you're already on the path to consistent, professional-grade results. But even the best machine needs the right accessories to truly shine.
- A Quality Heat Press: This is your most important piece of equipment. A good one provides steady temperature across the entire platen and delivers even, measurable pressure—two things an iron simply can't guarantee.
- Teflon Sheet: This non-stick sheet is a must-have protective barrier. It stops any stray ink from getting on your heat platen and shields your garment from direct, scorching heat. It’s a lifesaver, especially for delicate fabrics like polyester.
- Heat Press Pillows: These foam-filled, heat-resistant pillows are total problem-solvers. When you’re pressing a shirt with thick seams, zippers, or collars, a pillow elevates the application area. This ensures the press makes firm contact with the transfer itself, not just the bulky parts of the garment.
For Home Iron Users
Don't have a heat press? No problem at all. You can absolutely get amazing results with a standard household iron, but you have to be smart about your setup. The goal is to mimic the firm pressure and steady heat of a press as closely as you can.
First things first, not all irons are created equal for this job. You want one with a solid, flat base—ideally without any steam holes. Why? Steam holes create cold spots, which lead to patchy adhesion where parts of your design might not stick. Always make sure the iron is completely empty of water and the steam function is switched off.
Next, let’s talk about your pressing surface. A standard padded ironing board is your worst enemy here; its soft surface just absorbs all the pressure you're trying to apply.
A padded ironing board is designed to give way, which prevents you from applying the firm, consistent pressure needed to bond the transfer to the fabric fibers. It's the number one cause of failed home iron applications.
You need a hard, flat, and heat-resistant surface. A sturdy wooden table or a kitchen countertop protected by a Teflon sheet or a thin towel works perfectly. This solid base lets you use your body weight to get the pressure you need.
Finally, grab a sheet of parchment paper (the kind for baking, not wax paper) or a Teflon sheet. This will protect both your fabric and your iron during the process. For a deeper dive into materials, check out our guide to choosing the best paper for heat transfer applications.
Universal Must-Have Tools
No matter your heat source, there are a couple of small tools that make a massive difference in the quality of your finished project.
- Lint Roller: Before you even think about placing your transfer, give the garment a thorough roll-down. Even tiny, invisible bits of dust, hair, or lint can get trapped underneath, creating ugly bumps and preventing the adhesive from fully bonding with the fabric.
- Heat-Resistant Tape: This isn't your average office tape. It’s designed to handle high temperatures without melting or leaving behind a sticky mess. A few small pieces on the corners of your transfer will lock it in place, so it doesn’t shift when you close the press or move your iron.
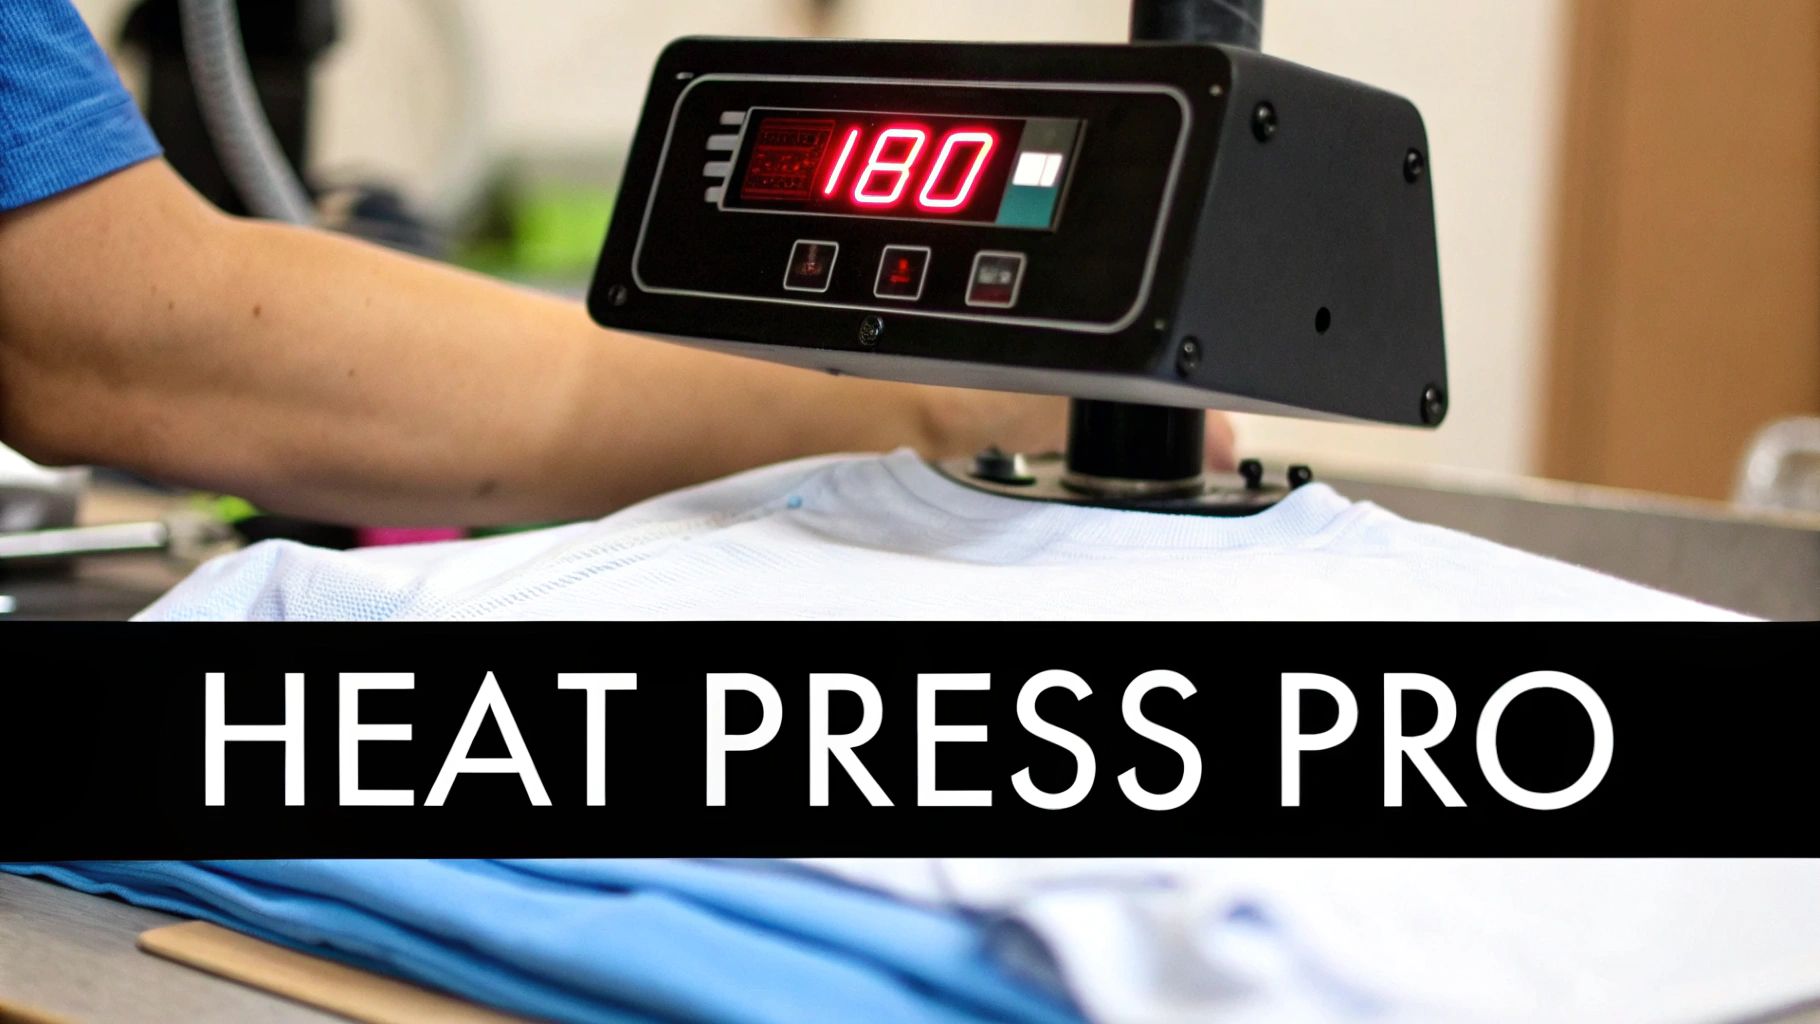
Achieving Professional Results With A Heat Press
If you're after that clean, commercial-grade finish for your custom apparel, a heat press is the only way to go. Unlike a regular household iron, a heat press gives you total command over the three things that matter most: precise temperature, even pressure, and accurate timing. This level of control is what guarantees your DTF transfers bond perfectly to the fabric, leaving you with a durable, professional-looking design.
Dialing In Your Machine and Prepping Your Garment
Getting started means calibrating your press. You'd be surprised how often the temperature on the display doesn't quite match the platen's actual surface heat, even on new machines. I always recommend grabbing an infrared temperature gun to check a few different spots on your platen. This quick test ensures you’re getting consistent heat everywhere.
Pressure is another one of those things that's more of a "feel." What one machine calls "medium" might be different on another. An old-school but effective way to check this is the "dollar bill test." Just place a bill at each of the four corners of the platen and close it. If you can easily pull any of them out, your pressure is too light or uneven. Adjust it until they all have a firm grip.
Once your press is dialed in, it’s time to prep the garment. This is a step you absolutely cannot skip. Every fabric, especially cotton, holds invisible moisture, and pressing a design onto a damp shirt is a recipe for disaster. That trapped moisture turns into steam and completely messes with the transfer's adhesive.
Always, always do a quick pre-press for about 3-5 seconds. It zaps away the moisture and irons out any wrinkles, giving you a perfect canvas.
Positioning and Pressing the Transfer
Now for the fun part. Carefully lay your DTF transfer onto the pre-pressed area. If you're doing a big batch of shirts and need them all to match, a T-shirt guide or a simple ruler is invaluable for getting the placement just right. Once you’re happy with it, you can use a couple of small pieces of heat-resistant tape to make sure it stays put.
Next, cover the transfer with a sheet of parchment paper or a Teflon sheet. This is a simple but crucial barrier that protects your shirt from getting scorched and keeps your heat platen clean from any ink residue. Now you’re ready to press.
Pro Tip: Working with hoodies, polos, or anything with thick seams, zippers, or buttons? A heat press pillow is a game-changer. Slide one inside the garment under your transfer area. It raises the surface so the platen makes solid, even contact with the design instead of just smashing down on the seams around it.
For a comprehensive breakdown of the exact settings for all kinds of different materials, make sure to check out our complete heat press temperature chart.
The growth in heat transfer technology has been incredible, empowering small businesses and hobbyists to create products that were once only possible with industrial equipment. The global market for these machines is expanding as more people discover they can achieve amazing results, like pressing a design at 300°F for 12 seconds to get a scratch-resistant finish that can last for over 100 washes.
DTF Heat Press Settings By Fabric
Getting the settings right is key to a perfect application. This chart gives you our go-to starting points for applying DTF transfers to some of the most common fabrics out there. Keep in mind that every heat press is a little different, so you might need to tweak these slightly to find what works best for your setup.
| Fabric Type | Temperature (°F/°C) | Time (Seconds) | Pressure Level | Peel Instruction |
|---|---|---|---|---|
| 100% Cotton | 300-320°F / 149-160°C | 12-15 seconds | Medium-Firm | Cold Peel |
| 50/50 Cotton/Poly Blend | 280-300°F / 138-149°C | 10-12 seconds | Medium | Cold Peel |
| Polyester | 260-275°F / 127-135°C | 8-10 seconds | Medium | Cold Peel |
| Tri-Blends | 260-275°F / 127-135°C | 8-10 seconds | Light-Medium | Cold Peel |
| Canvas/Denim | 300-320°F / 149-160°C | 12-15 seconds | Firm | Cold Peel |
These settings are your foundation. After a few presses, you'll get a feel for your machine and know exactly how to adjust for the perfect result every time.
The Final Touch: The Cold Peel
Once the timer beeps, open your press and carefully move the garment to a cool, flat surface to rest. This next part is absolutely critical: DTF transfers require a cold peel. You have to let the transfer cool down completely until it’s at room temperature.
I know it’s tempting, but do not peel it while it’s still warm. If you jump the gun, the adhesive hasn't had time to fully set and bond with the fabric, which can cause the design to lift, stretch, or even crack.
Once it's cool to the touch, start at a corner and slowly peel the film away from the garment at a low, smooth angle. You should be left with a vibrant, flawlessly applied design. For an even better matte finish and extra durability, you can do a quick final press for 3-5 seconds with a Teflon sheet covering the design.
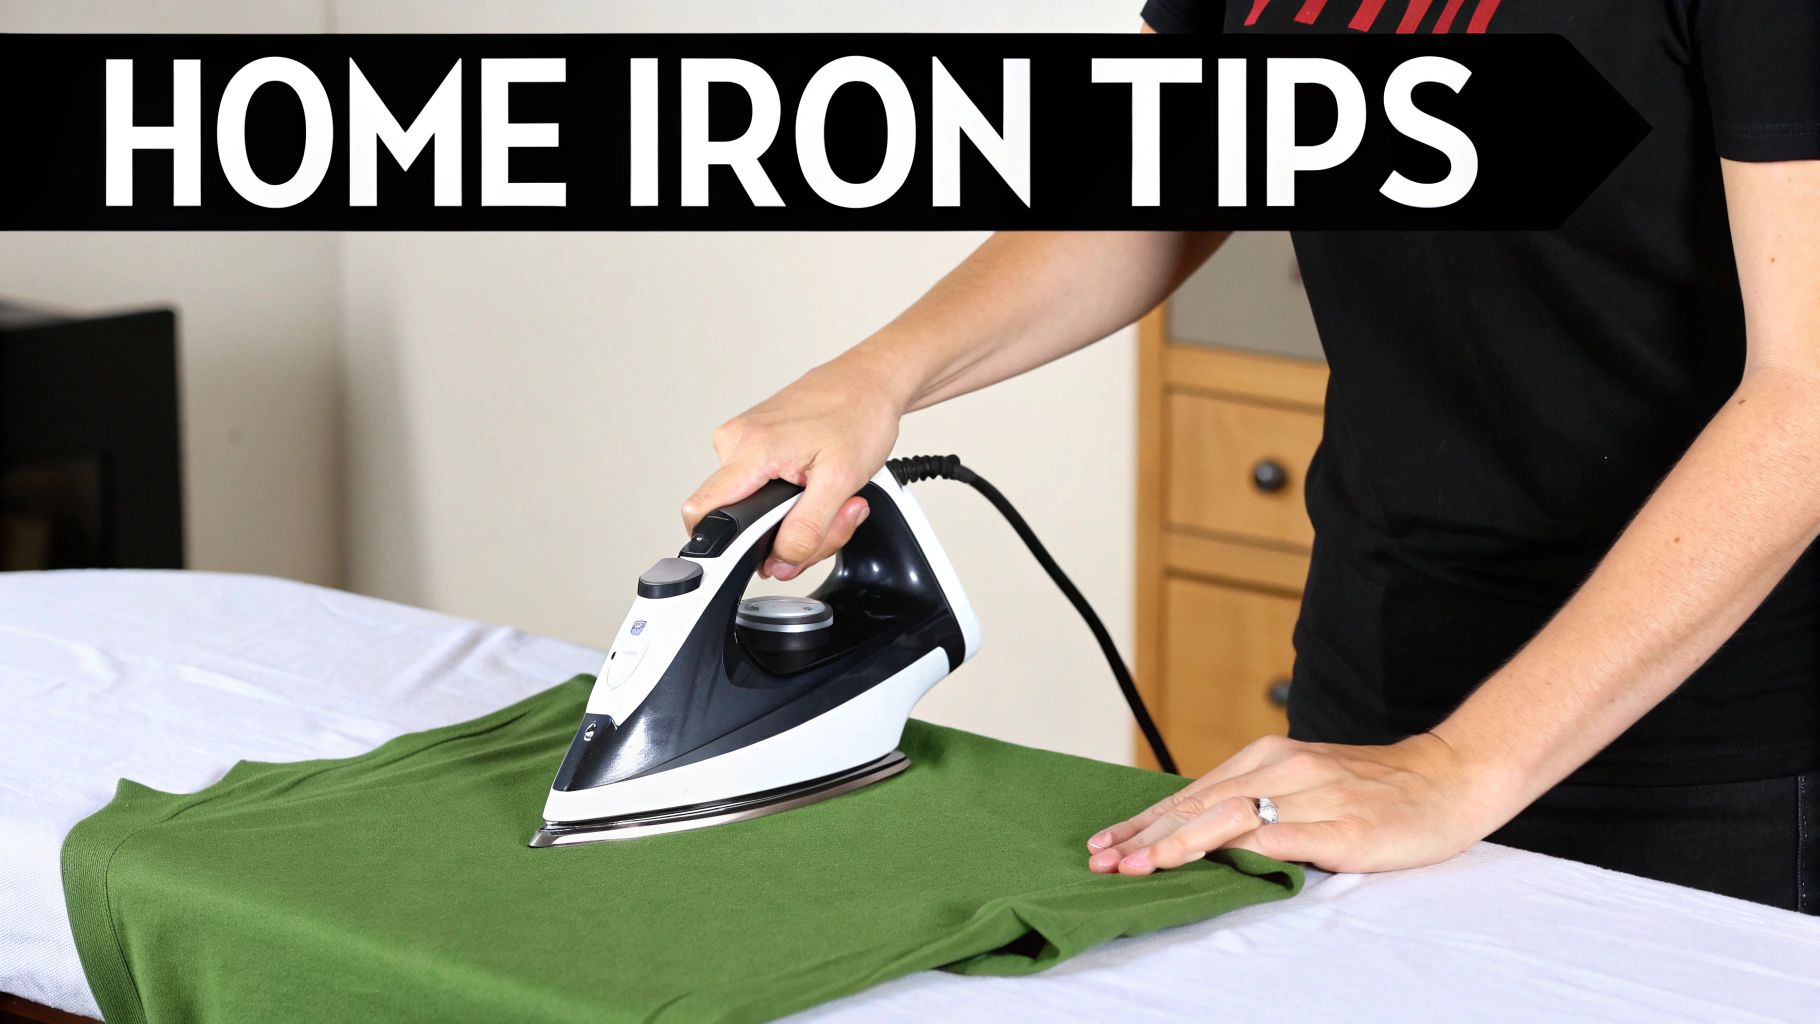
Getting Great Results With A Household Iron
No heat press? Don't worry. You can still get fantastic, long-lasting results with the standard iron you have at home. The real secret isn't fancy equipment—it's technique. You're essentially trying to mimic the high, even heat and firm pressure of a professional press, which is totally doable.
I've seen many people get frustrated when their first attempt with an iron doesn't stick, but the culprit is almost always the same: not enough consistent heat or pressure. Let’s walk through how to nail it every time.
Preparing Your Iron and Workspace
First things first, let's get your setup right.
Grab your iron and make sure it's completely empty of water. This is a big one. Any lingering water can turn into steam, which is the absolute enemy of a good transfer because it messes with the adhesive.
Next, find the temperature dial. Turn off any steam settings—you want pure, dry heat for this. Crank that dial all the way up to the highest setting, which is usually labeled Cotton/Linen. This gets you into the 350-400°F (175-205°C) range, which is the sweet spot for activating DTF transfer adhesive.
Now, let's talk about your work surface. This might be the most common reason home applications fail. A standard padded ironing board is designed to give way under pressure, making it nearly impossible to apply the kind of firm, direct force you need.
You need a hard, flat, and heat-resistant surface that won’t flex. A sturdy wooden table, a kitchen countertop, or even a clean spot on the floor will work. Just be sure to protect it with a heat-resistant mat or a folded cotton towel to prevent any damage.
This solid foundation is what allows you to really lean in and use your body weight, ensuring the adhesive gets a perfect bond with the fabric fibers.
Mastering the Pressing Technique
With your iron hot and your surface prepped, you're ready to press. Remember, this is all about controlled pressure, not the smooth gliding motion you use for everyday ironing. Think of your iron as a small, handheld heat press that you'll move from section to section.
Lay your garment out on your hard surface and give it a quick pre-press for a few seconds. This little step smooths out wrinkles and gets rid of any hidden moisture. Position your transfer exactly where you want it—a little heat-resistant tape on the corners can help keep it from shifting. Finally, cover the entire design with a sheet of parchment paper.
Here’s the core technique:
- Start at one corner of the design and place the iron down flat.
- Apply firm, consistent pressure. Don't be shy here. Use both hands and lean into it with your body weight. It should honestly feel like a bit of a workout.
- Hold the iron steady for about 15-20 seconds before lifting it straight up.
- Move to the next section, overlapping slightly with the area you just pressed, and repeat the process.
It is absolutely crucial to methodically press every single part of the design. Pay extra attention to the edges and corners, as these are the most common spots to see lifting later on. Whatever you do, do not slide the iron around. That’s a surefire way to shift the transfer or apply heat unevenly.
Checking for Adhesion Before You Peel
So, how do you know when you’re done? Before you even think about peeling that film off, let the transfer cool down completely. Once it’s cool to the touch, gently try to lift a tiny corner of the carrier film.
- If the film lifts away easily and the design stays perfectly bonded to the fabric, you nailed it.
- If you see the design starting to lift up along with the film, stop immediately. That spot simply needs more heat and pressure.
If your design does lift, just lay the film and parchment paper back down. Go over that specific area again with your iron, applying that same firm pressure for another 10-15 seconds. Let it cool all the way down again before you test the corner once more.
Never try to peel a DTF transfer while it’s warm when using an iron. The adhesive needs time to cool down and solidify its bond with the fabric. Peeling too early will almost certainly ruin your design.
Patience in this final stage makes all the difference. Once you've confirmed that the entire design is stuck solid, you can peel the film off slowly and at a low angle. By following these steps, you’ll end up with a vibrant, durable design that looks like it came from a professional shop.
And of course, for instructions tailored specifically to your order, always check the guide included with your Raccoon Transfers package.
Making Your Designs Last: The Post-Press Game Plan
You’ve pressed the design, peeled the film, and it looks absolutely perfect. But your job isn’t quite over yet. What you do after the press is just as important as the pressing itself if you want that custom creation to look great for years. Think of it as the secret sauce for making your transfers tough enough for daily wear and endless wash cycles.
The most important rule? Be patient. You have to give the garment at least 24-48 hours before its first trip through the laundry. This waiting period is critical because it allows the adhesive to fully cure and permanently lock onto the fabric fibers. Rushing this step is the fastest way to get peeling or cracking down the road.
The Art of Washing and Drying
When it's finally time for that first wash, a few simple habits will keep your design looking brand new.
First, always turn the garment inside out. This little trick is your first line of defense, minimizing the friction that can wear down the design as it tumbles around with other clothes.
From there, just stick to these simple rules:
- Wash in cold water, always. Hot water is the enemy—it can soften the adhesive and make the transfer start to lift.
- Use a mild detergent. Stay away from the harsh stuff. Bleach and fabric softeners can break down the transfer material and fade the colors.
- Stick to the gentle cycle. Less agitation means less stress on the bond.
This careful approach is part of a bigger picture. The entire Heat Transfer Film sector is expected to boom from USD 3.2 billion in 2025 to USD 8.9 billion by 2035, partly because conscious brands love that DTF uses way less water than traditional screen printing. It’s a durable, more sustainable choice. You can dig deeper into these market trends and their impact on fashion if you're curious.
Key Takeaway: The whole point of post-press care is to be gentle. If you treat your custom gear like a delicate garment, it will pay you back by lasting for 60+ wash cycles or more.
Drying and The Occasional Touch-Up
Just like washing, how you dry your custom apparel really matters. The high, direct heat from a standard dryer can wreak havoc on a transfer. For the absolute best results, hang it up to air dry. If you’re in a pinch and need to use a machine, make sure you tumble dry on the lowest heat setting you have.
Even with the best care in the world, after dozens of washes, you might see a tiny corner start to lift. Don't worry, it’s an easy fix! Just lay the garment flat again, cover the design with a sheet of parchment paper, and press the lifted spot with a hot iron for about 5-10 seconds. This little touch-up reactivates the adhesive and gets your design looking perfect again. Following these simple steps ensures every piece you create is built to last.
What to Do When Your Iron-On Transfer Goes Wrong
Even seasoned pros run into a snag every now and then when applying transfers. Don't stress—most problems are surprisingly easy to fix and are actually great learning moments. This is your project-saving cheat sheet for diagnosing and solving the most common transfer troubles.
We'll walk through each issue, figure out what likely caused it, and give you a straightforward fix to get things back on track. Whether it's a design that refuses to stick or colors that look a little faded, a simple adjustment is almost always the answer.
"Why Won't My Transfer Stick?"
This is hands-down the most common question I hear, especially from beginners. You go to peel back the carrier film, and to your horror, parts of the design (or the whole thing) lift right off with it. The good news? The solution almost always comes down to one of three things.
Problem: The transfer peels up along with the clear film.
-
Cause 1: Not Enough Heat. The adhesive on the back of the transfer needs a certain amount of heat to properly activate. If your iron or press is too cool, you'll get a weak, patchy bond. This is a classic issue with household irons, which often have hot and cool spots across their surface.
-
Solution: Check your temperature settings again. If you're using a heat press, make sure it’s set correctly for your fabric—usually 300-320°F for cotton. For a home iron, crank it up to the highest setting (Cotton/Linen), turn the steam OFF, and give it plenty of time to heat up. Go back over the design and press it again for another 10-15 seconds.
-
Cause 2: Not Enough Pressure. This is the number one culprit behind failed applications with a household iron. You really need to put your body weight into it to force that adhesive deep into the fabric's weave. A light touch just won't do the trick.
-
Solution: Lean into it! Use both hands and apply firm, even pressure. If you're using a standard ironing board, ditch it for now—they're too padded. Move to a sturdy table or even the floor (with a protective layer, of course) and press again, focusing your weight on the problem spots.
-
Cause 3: Fabric Coatings. Believe it or not, brand-new clothes sometimes have a light chemical coating or sizing from the factory. This invisible layer can act like a force field, preventing the transfer's adhesive from grabbing hold.
-
Solution: The fix is simple: always wash and dry new apparel before you press. This one step removes any residue and pre-shrinks the fabric, giving you a perfect canvas to work with.
"My Design Cracked After I Washed It!"
It’s a gut-wrenching moment. You pull your awesome new shirt from the laundry, and the design is cracked and peeling. This almost always means the transfer didn't get a deep enough bond with the fabric in the first place.
A cracked design after washing isn't a washing problem—it's a delayed symptom of an application problem. It tells you the adhesive didn't fully melt into the fabric fibers, usually because of not enough pressure or a skipped pre-press.
Problem: The design looked perfect right after pressing but cracked or peeled after a wash cycle.
- Cause: The usual suspect here is a lack of pressure during application, which creates a superficial bond that sits on top of the fabric instead of becoming part of it. Another possibility is that you skipped the pre-press step, which meant moisture was trapped in the fabric and turned to steam, interfering with the adhesive.
- Solution: While you can’t completely fix a badly cracked design, you can often rescue it. Cover the transfer with parchment paper and give it another firm press for about 10-15 seconds. This can help reactivate the adhesive and smooth out smaller cracks, strengthening the bond for future washes. Moving forward, make sure to really lean into your press and never, ever skip that 3-5 second pre-press.
And remember, if you ever run into an issue you can't solve, the printed instructions that came with your Raccoon Transfers are your best friend. Our support team is always here to help out, too.
Got Questions? We've Got Answers.
Even the most detailed guide can't cover every single question that pops up during a project. Over the years, we've heard just about everything from first-timers and seasoned pros alike. Here are a few of the most common questions we get about iron-on transfers.
Can I Use A Cricut EasyPress For DTF Transfers?
Absolutely. An EasyPress is a fantastic middle-ground tool for DTF transfers. Think of it as a major step up from a household iron, giving you a large, consistently heated surface to work with.
To get the best results, you need to treat it like a handheld heat press. Dial in the right temperature and time settings, and apply firm, even pressure. The key is to press straight down—don't slide it around like you're ironing a shirt.
One more pro tip: never press on the soft, padded Cricut mat. It’s designed to absorb pressure, which is the exact opposite of what you need. Always use a hard, heat-resistant surface underneath your garment.
Why Is My Transfer Peeling Up At The Edges?
Ah, the dreaded edge-peel. This is almost always a pressure problem. When you're using a home iron, it's incredibly difficult to get consistent force across the entire design, and the edges are usually the first to suffer.
Even with a professional heat press, this can happen if you're pressing over anything bulky like thick seams, collars, or zippers. These obstacles prevent the heat platen from making full, even contact with the transfer.
The easiest fix is a heat press pillow. It elevates the flat part of your garment, giving the platen a smooth, even surface to press against. If you’re using an iron, just make a point to give those edges a little extra focused pressure.
What Is The Difference Between A Hot Peel And Cold Peel Transfer?
This all comes down to when you pull off the clear carrier film after pressing. It seems like a small detail, but it’s one of the most critical steps for a successful application.
- Hot Peel: Just like it sounds, you peel the backing off immediately while the design is still piping hot. You'll often see this with certain types of heat transfer vinyl (HTV).
- Cold Peel: You have to let the transfer cool down completely—we mean back to room temperature—before you even think about peeling. All of our DTF transfers at Raccoon Transfers are cold peel.
Don't get impatient here. If you try to peel a cold peel transfer while it’s still warm, the adhesive hasn't had time to fully bond with the fabric. The design will likely lift, stretch, or even crack, and you’ll have to start over. Always, always follow the instructions for your specific transfer.
Ready to create stunning custom apparel with transfers that are vibrant, durable, and a breeze to apply? Raccoon Transfers offers premium DTF prints with a 24-hour turnaround to bring your designs to life.
Start your next project at the Raccoon Transfers website.