

How to Make DTF Transfers the Right Way
You've probably got a design ready, a roll of film on the table, and a heat press warming up. The part that usually goes sideways isn't the press. It's the assumption that DTF is forgiving enough to clean up a sloppy file or a rushed cure later.
That's why most first runs look fine on the bench and fail after washing. If you want to learn how to make DTF transfers that hold up, stop thinking in isolated steps. Think in two failure modes: under-cured powder and the wrong peel. Almost every ruined transfer traces back to one of those.
DTF isn't a fringe craft anymore. One market study estimated the global DTF printing market at USD 2.72 billion in 2024, with a projection to USD 3.92 billion by 2030 and a 6.0% CAGR from 2025 to 2030. The same report noted Europe at 36.0% of the market in 2024 and dedicated DTF printers at 45.0% of type share, which tells you this process now runs in serious production shops, not just hobby setups (Grand View Research DTF market report). At that scale, repeatable powder, cure, and press control matter more than shortcuts.
What a Real DTF Workflow Actually Looks Like
A real DTF run usually breaks down at the handoff points, not in the middle of a single step. The print looks clean on film, the powder seems fine, the press cycle finishes, then the shirt cools and the edge starts to lift. That usually comes from a workflow that was treated like five separate tasks instead of one controlled sequence.
In production, I want the RIP, film, powder station, and press set up before the first sheet prints. That cuts down on hesitation while ink is still wet on the film. It also keeps operators from touching the printable side, which is an easy way to leave skin oil on the film and create random powder rejection.
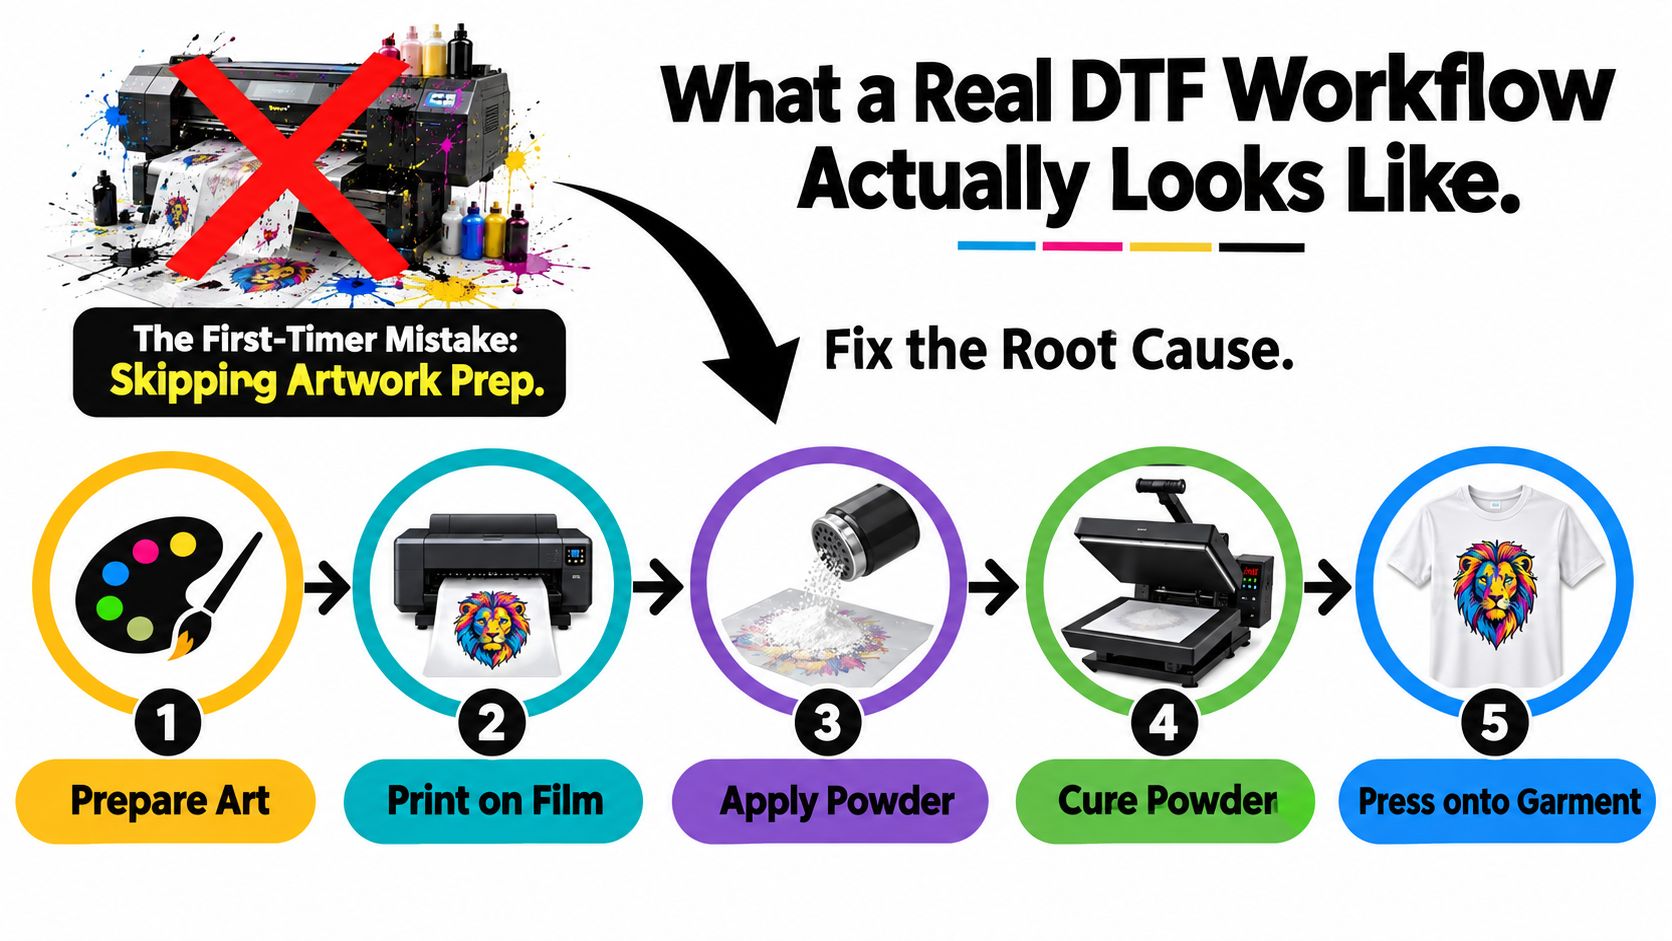
The five stages that matter
- Prepare the art. Start with artwork built at final size, clean edges, and the right color workflow for your RIP. Shops that skip cleanup here usually end up chasing fuzzy outlines, powder specks, or weak fine detail later.
- Print on PET film. Standard DTF output is color first, then white on PET film. Film handling matters more than beginners expect. Keep sheets flat, dry, and free of dust, and feed them consistently so your white layer stays registered.
- Apply adhesive powder. Coat the wet print fully, then knock off the excess. The goal is even coverage, especially around small text and outside edges. Heavy piles of powder are not safer. They just create a rough hand and uneven melt.
- Cure the powder. Typical curing guidance lands around 160 to 170°C (320 to 340°F) for 2 to 3 minutes, but the visual endpoint matters more than blindly trusting the timer. The powder should melt into a smooth, consistent layer without scorching the print, as outlined in this DTF process guide.
- Heat press and peel. Many shops start around 160°C for 15 to 20 seconds, then adjust for the transfer, fabric, and press behavior. The film has to release the way that transfer was designed to release. Hot peel, warm peel, and cold peel are not interchangeable.
The shortcut that costs new shops money is rushing the middle of the workflow. They print before the press is ready, let sheets sit too long in a dusty room, over-powder to compensate for weak coverage, or trust a cure setting that only works on one machine. The transfer may still look good on the table. Wear and wash are less forgiving.
Where the workflow usually gets sloppy
The file side, print side, powder side, and press side all affect each other. A clean RIP setup helps, too. For example, if your white ink pass is inconsistent or your choke setting is off, you can get exposed edges that look like adhesion trouble even though the problem started at print.
One practical rule helps here. Judge each stage by what the next stage needs.
Artwork needs clean edges so powder does not cling where it should not. Printed film needs a stable white layer so the adhesive has a consistent surface to bond to. Powder needs full, even melt so the press can drive it into the garment instead of trying to finish a bad cure.
That is what a real workflow looks like on the floor. It is less about memorizing isolated settings and more about keeping every handoff clean enough that the next step can do its job.
Preparing Artwork So Prints Hold Up After Washing
A transfer can look sharp coming off the film and still come back after two wash cycles with cracked edges, weak small text, or sections that start lifting. The failure often starts in the file. If the artwork creates ragged ink edges, stray semi-transparency, or detail too fine to carry adhesive, the press has no way to save it later.
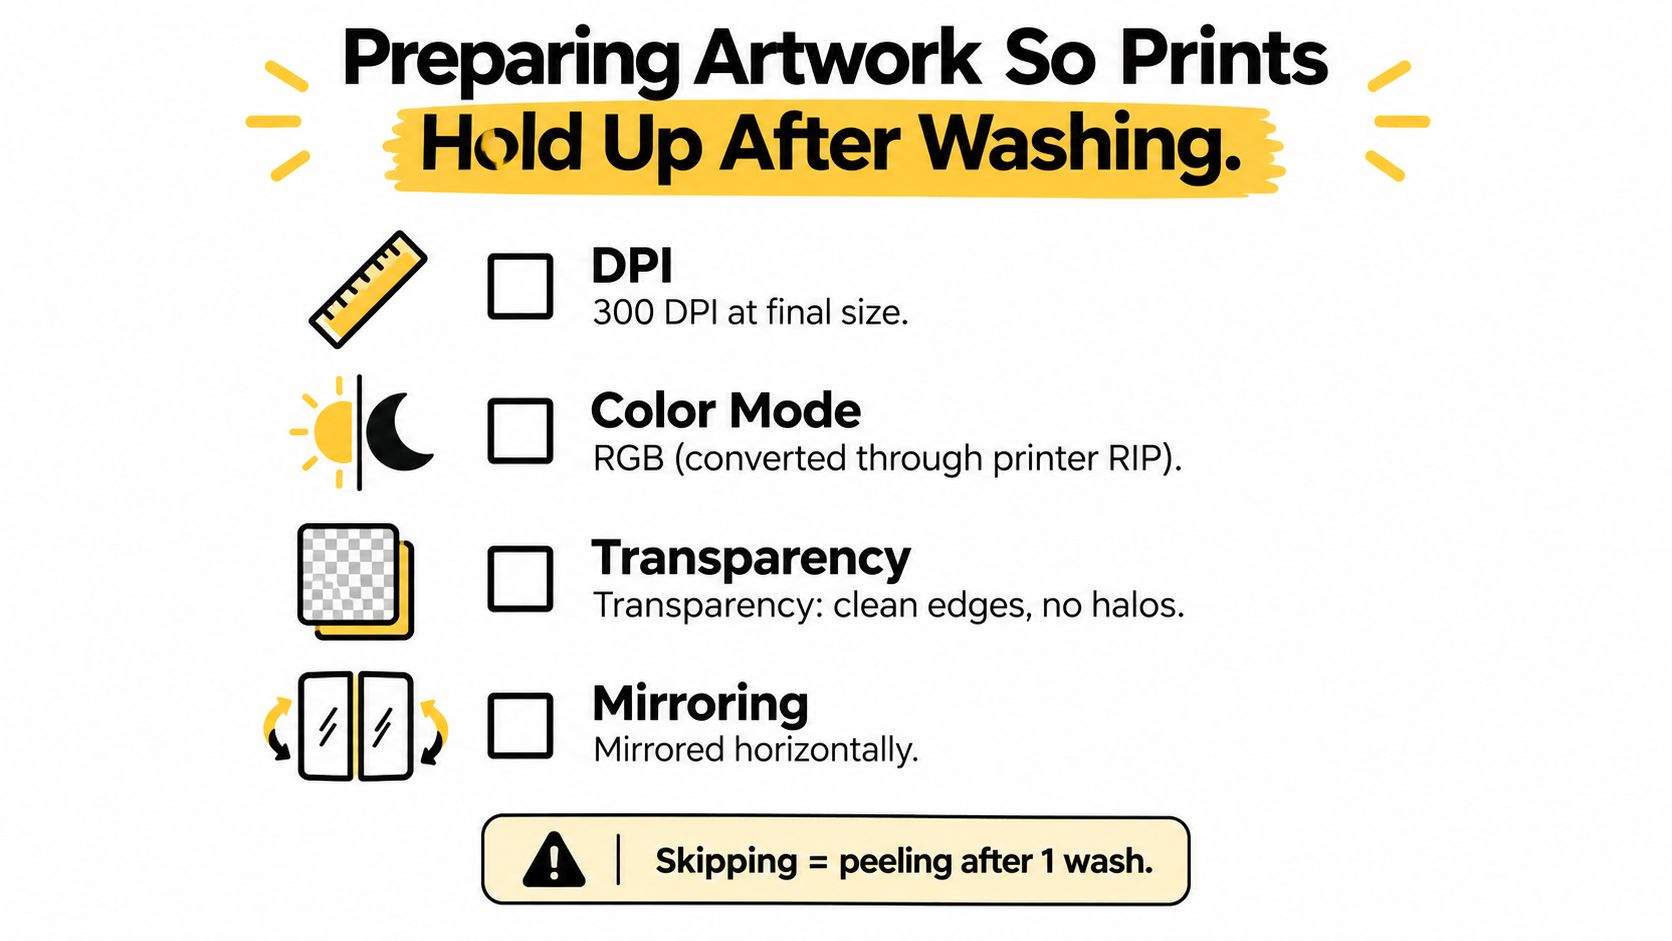
The file stage matters because it feeds both failure modes that ruin DTF work. Bad edge definition and weak detail make powder cling where it should not, or fail to hold where it should. Missed mirroring or unstable effects set up peel problems later, because the transfer never formed a clean, consistent layer in the first place.
The file checks worth doing every time
- Build at 300 DPI at final size: Set the art to 300 DPI at the exact print dimensions. Upscaling a small web image in the RIP usually softens edges and turns clean lines into fuzzy adhesive boundaries.
- Keep artwork in RGB before the RIP: Many standard DTF workflows start in RGB and let the RIP handle output conversion. That usually gives cleaner color handling than forcing an early conversion in the design file.
- Remove transparency leftovers: Soft shadows, partial-opacity glows, hidden layers, and anti-aliased halos often become visible when powder sticks to that faint ink.
- Mirror the design before export: A missed horizontal flip still wastes plenty of film. The print reads correctly on the sheet, then presses backward on the garment.
Small details decide whether a design survives washing or starts failing at the edges.
Thin strokes, tiny text, and distressed gaps need a production check, not just an on-screen check. Wet ink has to hold enough adhesive to create a durable bond. If a line is too fine or too broken up, the transfer may press down cleanly on day one and begin to lose pieces after laundering. I would rather thicken a hairline outline in art than rerun a job because the customer found missing detail after one wash.
If your file mixes image-based art with clean logo elements, it helps to know where each format creates problems. This guide on raster vs. vector artwork for apparel printing is useful when you need to decide whether to rebuild an element or print it as-is.
A strong white pass can support a good file. It cannot rescue muddy edges, hidden transparency, or backward text.
Before sending the job, flatten the artwork, outline fonts, remove unused channels, and export a stable file. In plenty of shops, a clean PNG is safer than a layered PSD full of effects that may rasterize differently at output. The goal is repeatability. Clean art gives you a cleaner powder edge, a more predictable cure, and a peel that behaves the way the transfer was built to behave.
Printing on PET Film and Laying Down White
Printer setup, white underbase logic, and film handling belong together. If you split them apart mentally, you miss how RIP settings turn into a physical transfer.
Recent industry data reported that more than 7.2 billion DTF prints were produced globally in 2024, nearly 30% higher than the previous year. The same market summary cited North America at 35% of global share in 2023 and apparel at 50% of applications, which lines up with what most shops already see: shirts are the main workload, and consistency matters more as output scales (WorldMetrics DTF industry statistics).
Start with the film, not the printer menu
Use coated PET film and load it on the correct print side. The right side accepts ink evenly and gives the powder something dependable to grab. The wrong side usually looks glossier, sheds powder poorly, and creates bonding problems before curing even starts.
If you need a refresher on film types and handling, this overview of DTF transfer film options and use cases is a solid reference point.
White underbase decisions
White ink isn't just there to make colors pop. It creates the base layer that carries the image into the adhesive stage. Weak white coverage often shows up later as dull color, poor opacity, or fragile edges.
Here's a practical starting framework:
| Garment Color | White Coverage | Choke (px) | Notes |
|---|---|---|---|
| Light garments | Lower coverage | Small choke | You can ease back white where fabric color won't distort the image. |
| Mid-tone garments | Medium coverage | Small to moderate choke | Watch for edge halo if the underbase extends too far. |
| Dark garments | Full solid underbase | Moderate choke | Strong white matters most here because color sits on top of it. |
What a dialed-in print looks like
Look at the film before you ever touch powder. You want a solid white laydown, clean edges, and no visible banding. If the white is patchy, the transfer may still press, but it won't be stable.
A good print on film feels boring. That's the point. The more predictable the ink layer is, the easier it is to get a clean powder bond and an even cure later.
Applying Adhesive Powder and Curing It Right
A lot of bad transfers look fine right up until the peel. The print is bright, the white looked solid on film, and then the adhesive lets go because the powder never bonded correctly or the cure never reached the right finish. That is why I treat powdering and curing as the stage where DTF either becomes a usable transfer or scrap.
Right after printing, while the ink is still wet, coat the image with hot-melt adhesive powder and shake off everything that did not stick. The goal is full contact with the printed areas, especially edges and small details, without leaving piles of extra powder in open zones.
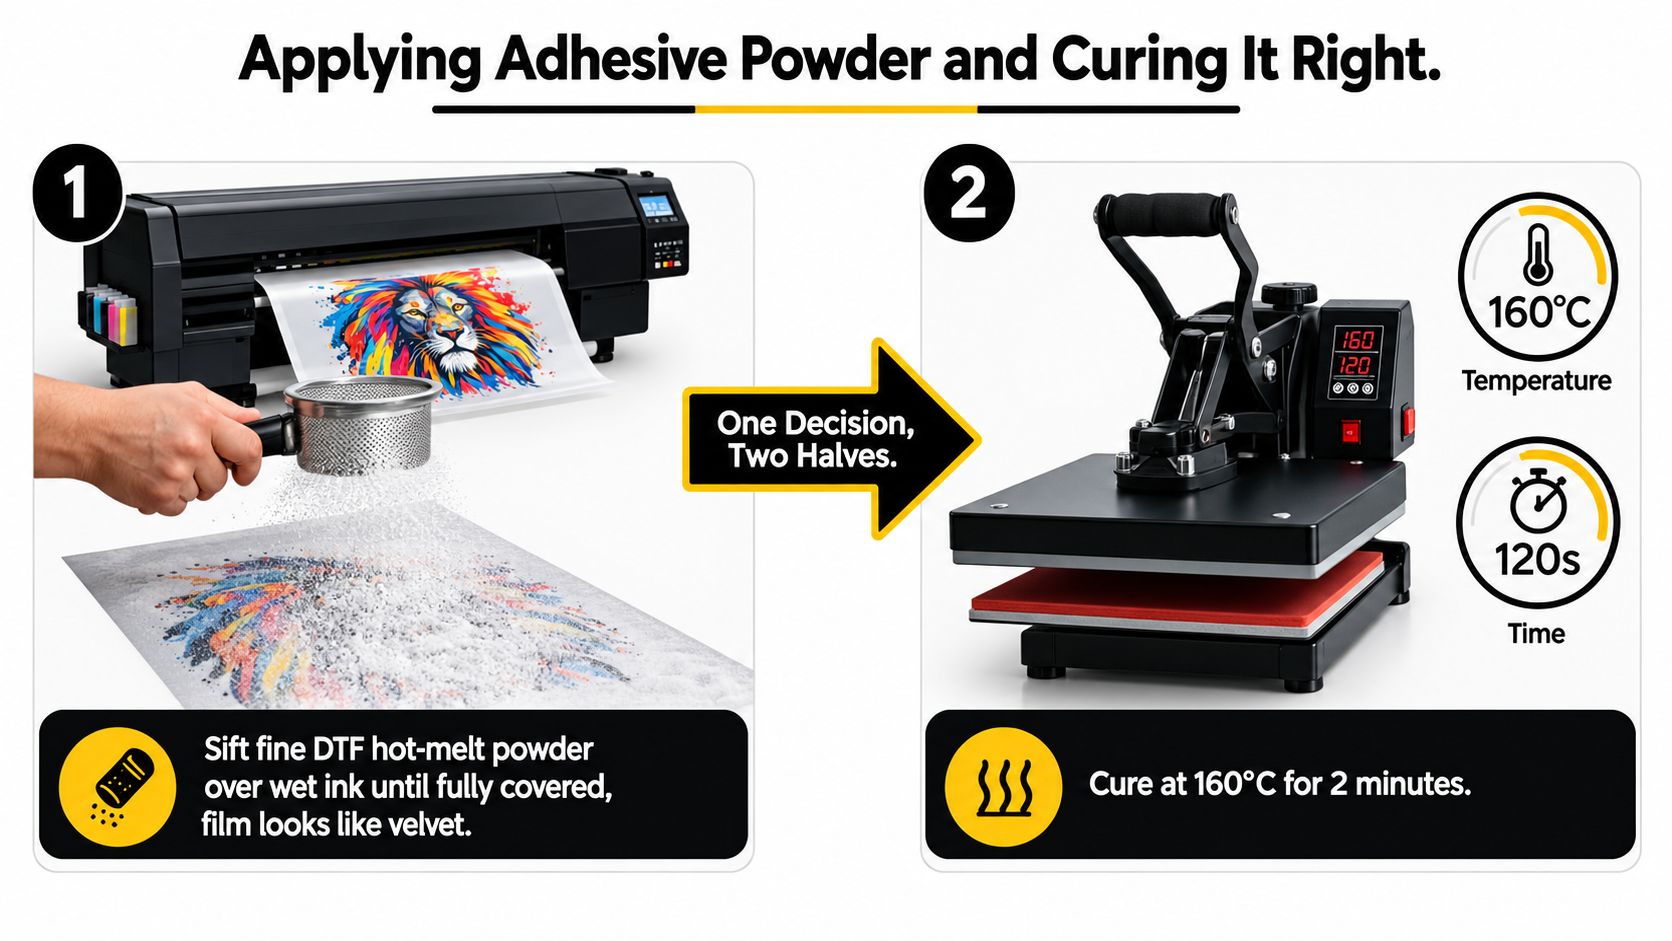
What even powder coverage actually looks like
Good coverage looks boring. Every printed area is dusted, the film is clean around the graphic, and the edges are covered without fuzz hanging off them.
What causes trouble is easy to spot once you know where to look:
- Bare corners and thin linework: Powder missed wet ink, so those spots become early lift points on press.
- Heavy buildup in large filled areas: The adhesive layer gets too thick and the transfer feels stiff or presses with a rough texture.
- Patchy coverage across the sheet: Some areas bond, others do not. That usually shows up later as inconsistent adhesion or edge failure after washing.
A quick habit helps here. Tilt the film and check it under side light before curing. Bare spots usually show up first on fine details and perimeter edges.
Curing to the right finish
Cure settings vary by equipment. A hover setup, drawer cure, and oven do not heat the film the same way, so the target is the melted powder surface, not a timer by itself.
The powder should turn into a smooth matte layer. If it still looks chalky, dusty, or visibly granular, it is under-cured. To confirm it, angle the film under light. Properly melted powder reads as even and matte across the image. Unmelted areas look speckled and dry.
A practical reference for cure behavior across different powder setups is this DTF powder curing guide, but use it as a starting point and match it to what your film is showing you.
What works on the floor
Flat film matters. Even heat matters. Controlled airflow matters.
If one side of the sheet gets more heat than the other, the cure can look finished in the center and still be raw near the edges. If the film buckles, powder can shift before it melts evenly. If the platen or heat source is too close during a hover cure, you can scorch the print surface before the adhesive levels out.
Under-cured powder is still the failure mode that causes the most expensive reruns. It leads to peeling, weak edge hold, cracking, and wash failures that get blamed on the press later. Over-cure happens too, usually as brittle adhesive, damaged coating, or a transfer that loses some print quality before it ever reaches the garment.
Let the cured sheet cool flat before stacking or pressing. Handling it while it is still soft is an easy way to introduce curl, contamination, or uneven contact on the press.
Heat Pressing the Transfer to Different Fabrics
A press can hide mistakes for a few seconds, then expose them after the peel. The print looks fine on the platen, then a corner lifts, small text drags, or the fabric picks up a shine mark. In production, those failures usually trace back to two things. Powder that never finished curing, or a peel done at the wrong temperature for that film.
Start with a usable baseline. For many standard DTF transfers, 160 to 170°C for 15 to 20 seconds with medium pressure will bond cleanly on cotton. Treat that as a setup point, not a rule. Film type, adhesive load, garment finish, and peel spec all change how hard you can press before quality drops.
Press sequence that stays repeatable
Pre-press the garment for a few seconds first. That removes surface moisture, flattens fibers, and gives the transfer a more even contact area. Then place the film, press with consistent pressure, and peel only in the temperature window the film was built for.
Post-pressing helps on many jobs, especially cotton and blends. Use a protective sheet and a short second press to settle the adhesive and reduce surface texture. If the print already feels overly stiff, adding more time here usually makes it worse, not better.
Heat-press settings by substrate
| Fabric | Temperature | Time | Pressure | Peel |
|---|---|---|---|---|
| Cotton | Around 160°C | About 15 to 20 seconds | Medium to firm | Usually cold peel for a clean release |
| Poly-cotton blend | Slightly lower than cotton if the fabric shows stress | Start near cotton dwell, then shorten if needed | Medium | Follow the transfer's peel spec exactly |
| Polyester and performance fabrics | Lower than cotton | Short dwell | Light to medium, just enough for full contact | Match the film's peel method and protect the fabric surface |
Keep a shop-tested reference for heat press settings for DTF transfers, but watch the garment more than the chart. A soft ringspun tee, a heavyweight hoodie, and a performance polo do not react the same way even if the label says they share the same fiber content.
The peel matters as much as the press
Wrong peel ruins good transfers every day.
Cold-peel film needs to cool before release. Peel it early and you can pull adhesive off the shirt, distort fine detail, or lift edges that would have stayed down if you had waited. Hot-peel film behaves the opposite way. Let it sit too long and the release can turn grabby or uneven.
Check the film spec before the run starts, then keep operators consistent across the press line. Shops often blame press temperature for a failed application when the actual mistake was peeling cold-peel film warm.
Polyester needs extra restraint. Lower heat and shorter dwell usually beat brute force because performance fabrics scorch, glaze, and migrate dye faster than cotton. If a polyester shirt needs more than reasonable pressure and heat to bond, stop and inspect the transfer. Pressing harder will not fix under-cured powder.
Troubleshooting the Problems You Will Actually Hit
The fastest way to solve DTF problems is to trace the symptom upstream. Don't change five variables at once. Start with the most likely cause and prove it.
Most transfer failures aren't mysterious. They're just delayed. The print looked acceptable right after pressing, then washing or wear exposed the weak point.
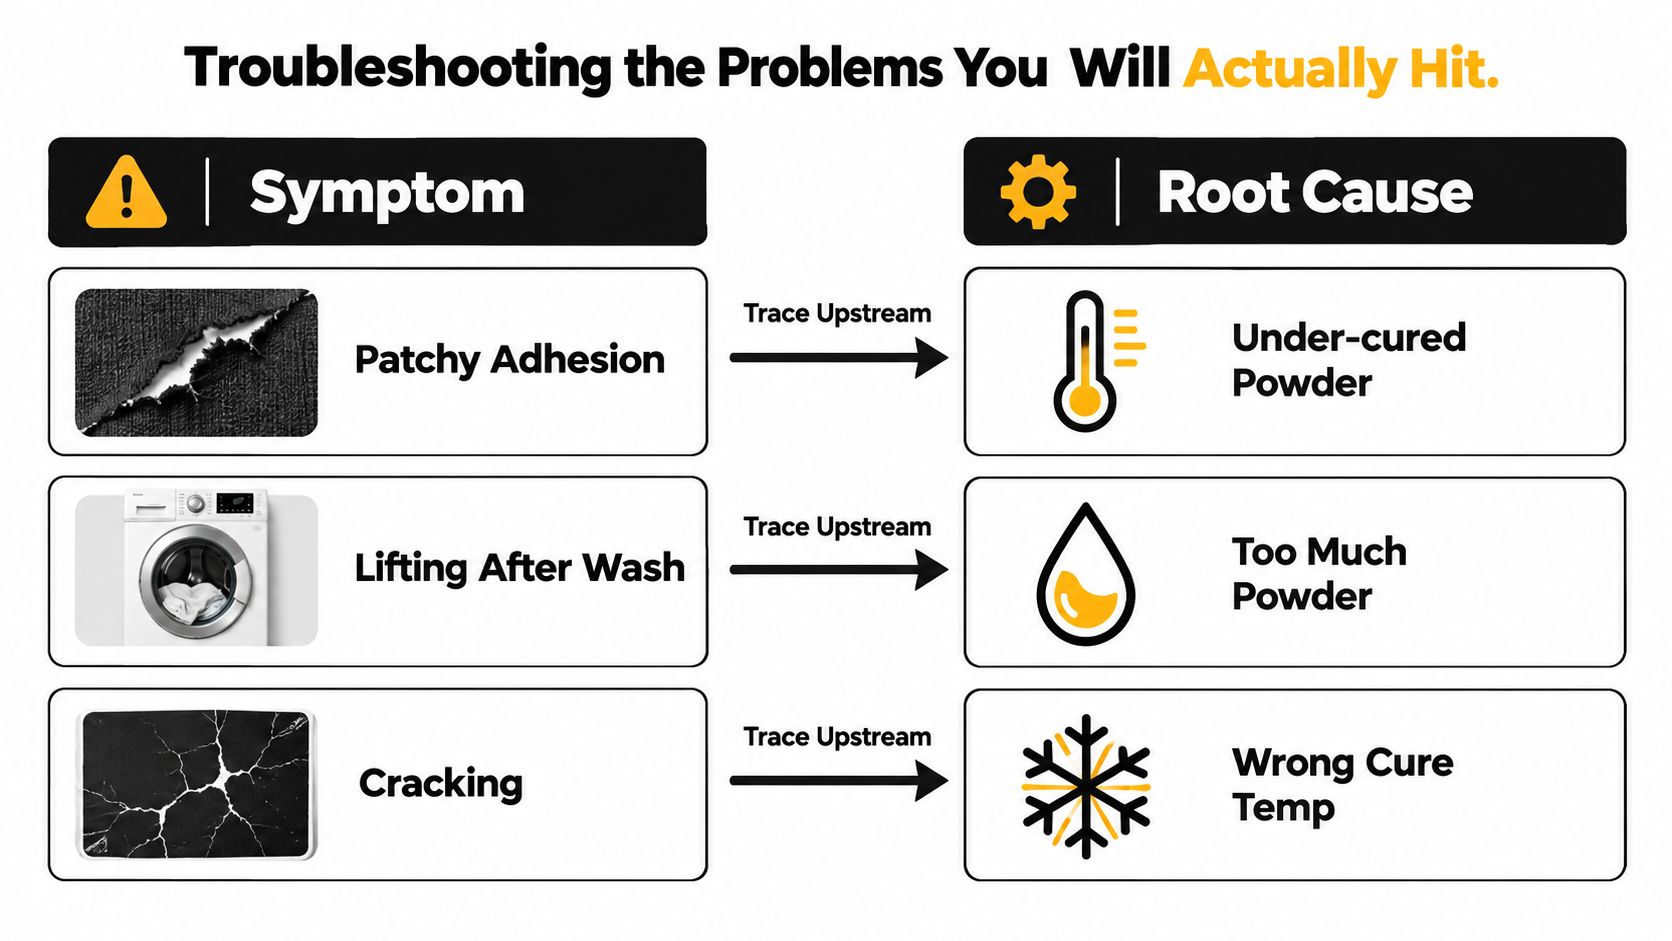
Symptom first, cause second
- Patchy adhesion: Check powder coverage first. If the adhesive wasn't distributed evenly, the press can't create an even bond.
- Lifting after washing: Under-cured powder is the first suspect. Don't blame the shirt before you verify the cure.
- Cracking or brittle feel: Look at cure and adhesive thickness together. A transfer can be technically bonded and still feel overstressed.
- Muted color or weak white: Recheck your white underbase logic and print quality on film before changing press settings.
- Scorching or shine marks: Too much heat, too much dwell, or too much pressure on a sensitive fabric.
A practical order for diagnosis
When a print fails, work through the line in this order:
- Inspect the cured film for matte melt and even texture.
- Check the peel method against the transfer type.
- Review powder coverage around edges and fine detail.
- Inspect the printed film for weak white, banding, or misregistration.
- Only then adjust press settings.
If a transfer lifts at the edges, don't start by increasing heat. First ask whether the adhesive was fully cured and whether the film was peeled at the right temperature.
A bad cure and a bad peel can create similar symptoms. Both can cause lift. Both can make corners fail first. But they need different fixes. More press heat won't correct a carrier that was peeled wrong, and more pressure won't finish melting powder that never fully cured.
The shops that waste the least material aren't the ones with magic settings. They're the ones that isolate one cause at a time.
A Production Checklist and When to Outsource
Owning a DTF setup only helps if you can keep it stable. If you can't, outsourcing the print side and handling only application is often the smarter move.
The pre-press checklist I'd use
- Artwork ready: 300 DPI at final size, cleaned transparency, mirrored correctly
- Film loaded correctly: coated PET on the proper print side
- White layer verified: solid enough to support color and edge detail
- Powder applied evenly: full coverage, excess removed
- Cure confirmed visually: melted matte finish, no chalky areas
- Press matched to fabric: temperature, dwell, pressure, and peel method aligned
When in-house makes sense and when it doesn't
In-house production makes the most sense when you're running repeat jobs, controlling your own queue, and already comfortable managing printer maintenance, white ink behavior, film handling, and cure consistency. If your operation is still irregular, those variables can eat time fast.
For smaller shops, outsourced gang sheets often remove the riskiest part of the process. You still need to press well, but you're not also trying to maintain a printer, tune white ink, and diagnose curing every day. One practical option is ordering ready-to-press sheets from a service like Raccoon Transfers when the workload doesn't justify running a full DTF line yourself.
Color-sensitive art, one-off orders, and tricky polyester jobs are also good candidates for outsourcing. Those are the jobs where production drift gets expensive quickly. Keep the work in-house when volume is predictable and your setup already delivers repeatable films. Outsource when press-only fulfillment gives you a cleaner margin and fewer remakes.
If you want to skip the printer, powder, and cure side of the workflow, Raccoon Transfers offers custom DTF transfers and gang sheets that arrive ready to heat press. That's a practical option when you want to focus on artwork setup and application without taking on the full production line.