

Power Heat Press Instructions for Perfect DTF Transfers
You've just unboxed a powerful heat press, the platen is warming, and a stack of blank shirts is waiting beside a fresh DTF transfer. The excitement is real, but so is the pressure. One poorly bonded design can waste a garment, a transfer, and the customer's confidence in your work.
Good power heat press instructions aren't a temperature chart. They're a repeatable method for controlling temperature, dwell time, pressure, material, and safety together. Transfer printing has been practiced for more than 250 years, beginning in England during the 1750s and spreading across Europe, as documented by Britannica's history of transfer printing. The equipment is modern, but the principle hasn't changed: the right process depends on the surface and transfer type.
From Box to First Press Your Starting Point
A new press often creates two conflicting impulses. You want to make something immediately, but you also want the first item to look good enough to sell. The safest approach is to treat the first garment as a controlled test, not a finished order.
Start by reading the transfer supplier's instructions and identifying the garment composition. Cotton, polyester, blends, leather, plastics, and coated hard surfaces don't respond identically to heat and pressure. A setting that works on cotton may scorch polyester, encourage dye migration, or distort another material.
Practical rule: Never treat one temperature and time combination as universal. The transfer and substrate determine the process.
For DTF apparel, the press activates adhesive on the back of the film. Heat softens the adhesive, pressure brings it into contact with the fibers, and dwell time allows the bond to develop. If one variable is wrong, increasing another can create a different problem rather than fixing the first one.
Before production, prepare a test garment from the same fabric batch as the order. Record the transfer type, garment composition, press setting, peel method, and result. That small record becomes valuable when a repeat order arrives or when a new blank behaves differently from the previous one.
The machine is only as reliable as the routine around it. A clean workspace, measured platen temperature, stable pressure, and a documented test will give you far more consistency than guessing from the controller display.
Preparing Your Press and Workspace
A press should have a permanent, stable home whenever possible. Don't place it on a flimsy table, near loose fabric, or where the operator must reach across the hot platen. Keep enough clearance for the handle or swing arm to move freely, and position the machine so the operator can place garments without twisting into the heating area.
Build the room-level safety setup
Use this checklist before switching on the machine:
- Electrical connection: Check the press nameplate and local requirements. Plug it directly into an appropriately rated, grounded outlet unless the manufacturer explicitly permits another arrangement.
- Cord condition: Don't use a damaged, pinched, or hot power cord. Keep it away from the platen and walkways.
- Workspace clearance: Leave room around the press for loading, unloading, and emergency movement.
- Ventilation: Provide ventilation appropriate to the transfer materials, especially in a small home studio, classroom, or makerspace.
- Fire readiness: Keep a suitable fire extinguisher accessible and make sure everyone using the room knows where it is.
- Supervision: Never leave a powered, heated press unattended, even during a production batch.
These precautions reflect the practical gap in many operating guides. Room-level heat press safety guidance emphasizes grounded power, clearance, ventilation, supervision, and burn awareness. For broader equipment placement principles, getting started with setup offers useful context on preparing a stable work area.
Keep a pressing mat, heat-resistant handling tools, parchment or protective material, and a temperature-testing tool within reach. A relevant heat press accessory guide can help you identify the supporting equipment that belongs at the workstation rather than scattered around the room.
Check actual platen temperature
The controller shows what the machine is trying to achieve, not necessarily what every part of the platen is delivering. Before production, preheat the press fully, then measure the center and four corners with an infrared thermometer or temperature test strips. Record the readings and look for meaningful differences between locations.
A transfer that bonds in the middle but lifts at an edge may indicate a cold spot or incomplete platen contact. Don't immediately raise the temperature. Excessive heat can damage synthetic fabric or change adhesive behavior while leaving the underlying pressure problem unresolved.
If your workflow includes multiple designs, Upload Your DTF Gang Sheet can provide several apparel transfers in one organized layout, but every new garment style still deserves a test press.
Dialing in Core DTF Settings Temperature Time and Pressure
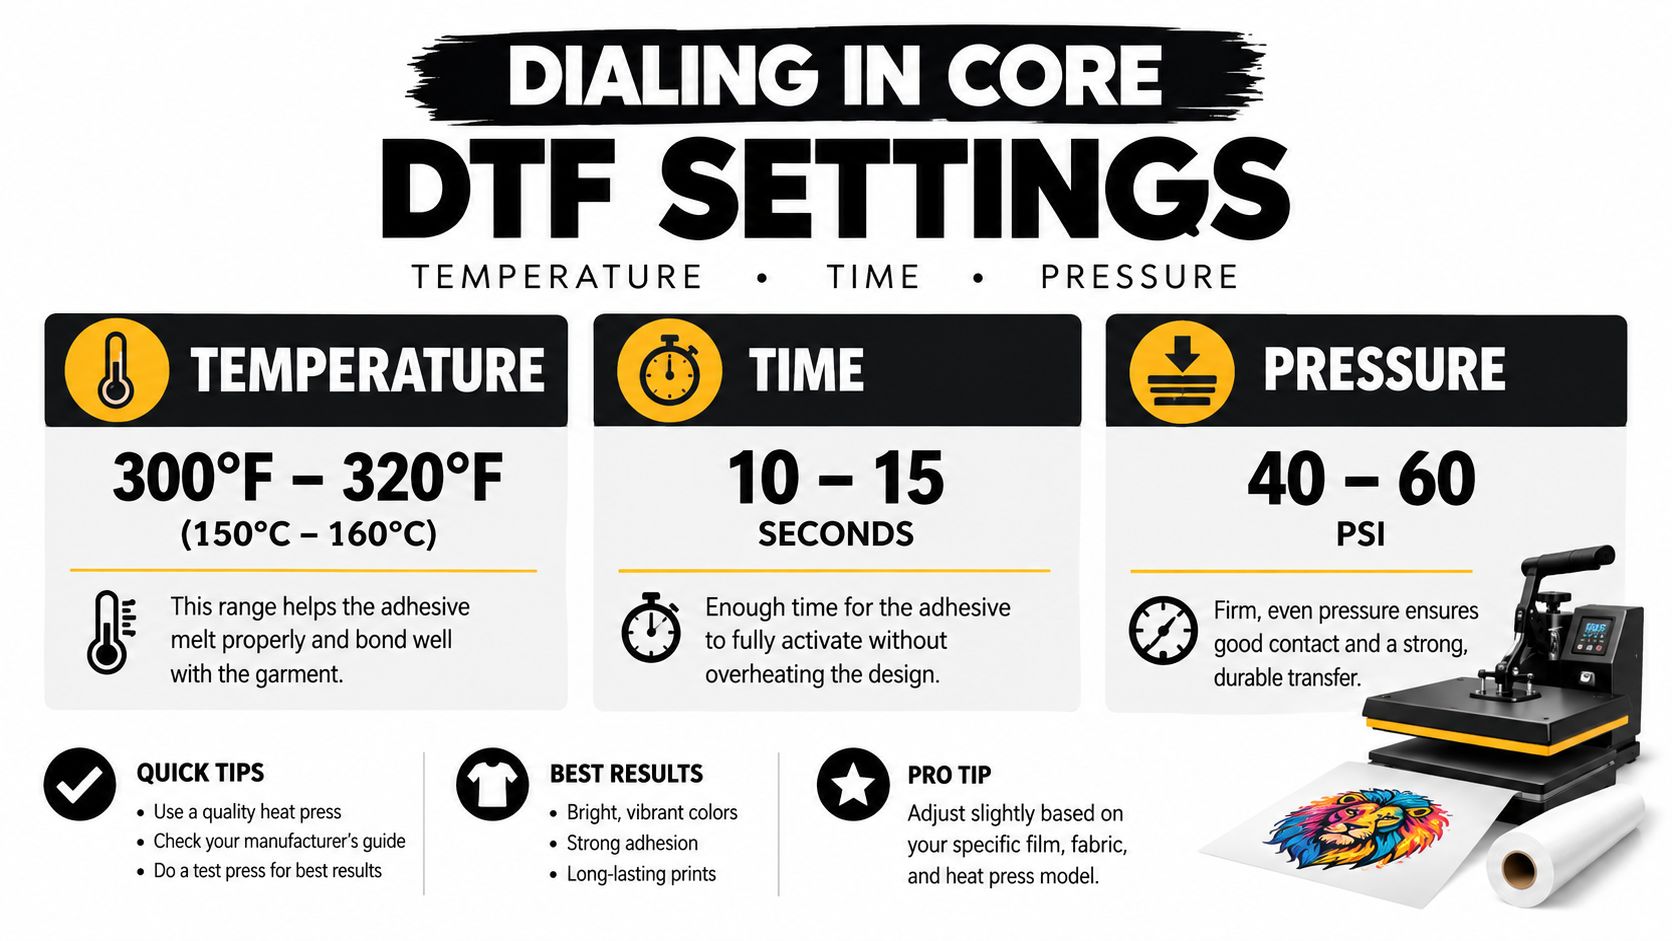
DTF pressing is controlled by three variables. Temperature activates the adhesive, dwell time gives the adhesive enough exposure, and pressure creates contact across the artwork. Treating them as separate dials leads to inconsistent results because a correct temperature cannot compensate for a seam, a damp garment, or weak platen contact.
A practical starting range for DTF apparel is 300–325°F, or 150–163°C, for 10–20 seconds with medium-to-firm pressure, as outlined in xTool's DTF heat press guidance. That range is only a starting point. The transfer manufacturer's specification takes priority because films and adhesive formulations vary.
Understand what pressure is doing
Pressure isn't force applied to the handle. It must be uniform across the complete design. Seams, zippers, collars, pockets, buttons, and uneven folds can hold part of the platen away from the transfer. The center may look perfect while the edge never receives enough contact to bond.
On equipment with a pressure display, a neutral heat-press manual describes medium-to-heavy pressure as approximately 50–60 psi, but the machine's measurement system and the transfer supplier's instructions still matter. On a manual press without a useful display, close the press over the prepared garment and learn the resistance. It should close firmly, without forcing the mechanism or crushing the blank.
Polyester deserves extra caution. If the fabric shows shine, dye migration, or distortion, don't solve the problem by adding pressure or heat. Choose a transfer compatible with a lower-temperature process and test it on the actual garment.
Change one variable at a time
If the first test fails, avoid changing temperature, time, and pressure together. Verify contact and pressure first. Then confirm the platen temperature independently. If those are correct, add a small dwell-time adjustment, such as 2–3 seconds, on a fresh test area. This controlled method makes the cause visible and protects you from overcorrecting.
For transfer-specific instructions and material notes, use the DTF heat press settings guide. A good setting is not the one that produces a single successful shirt. It's the one you can reproduce across the entire order.
The Step-by-Step DTF Pressing Workflow
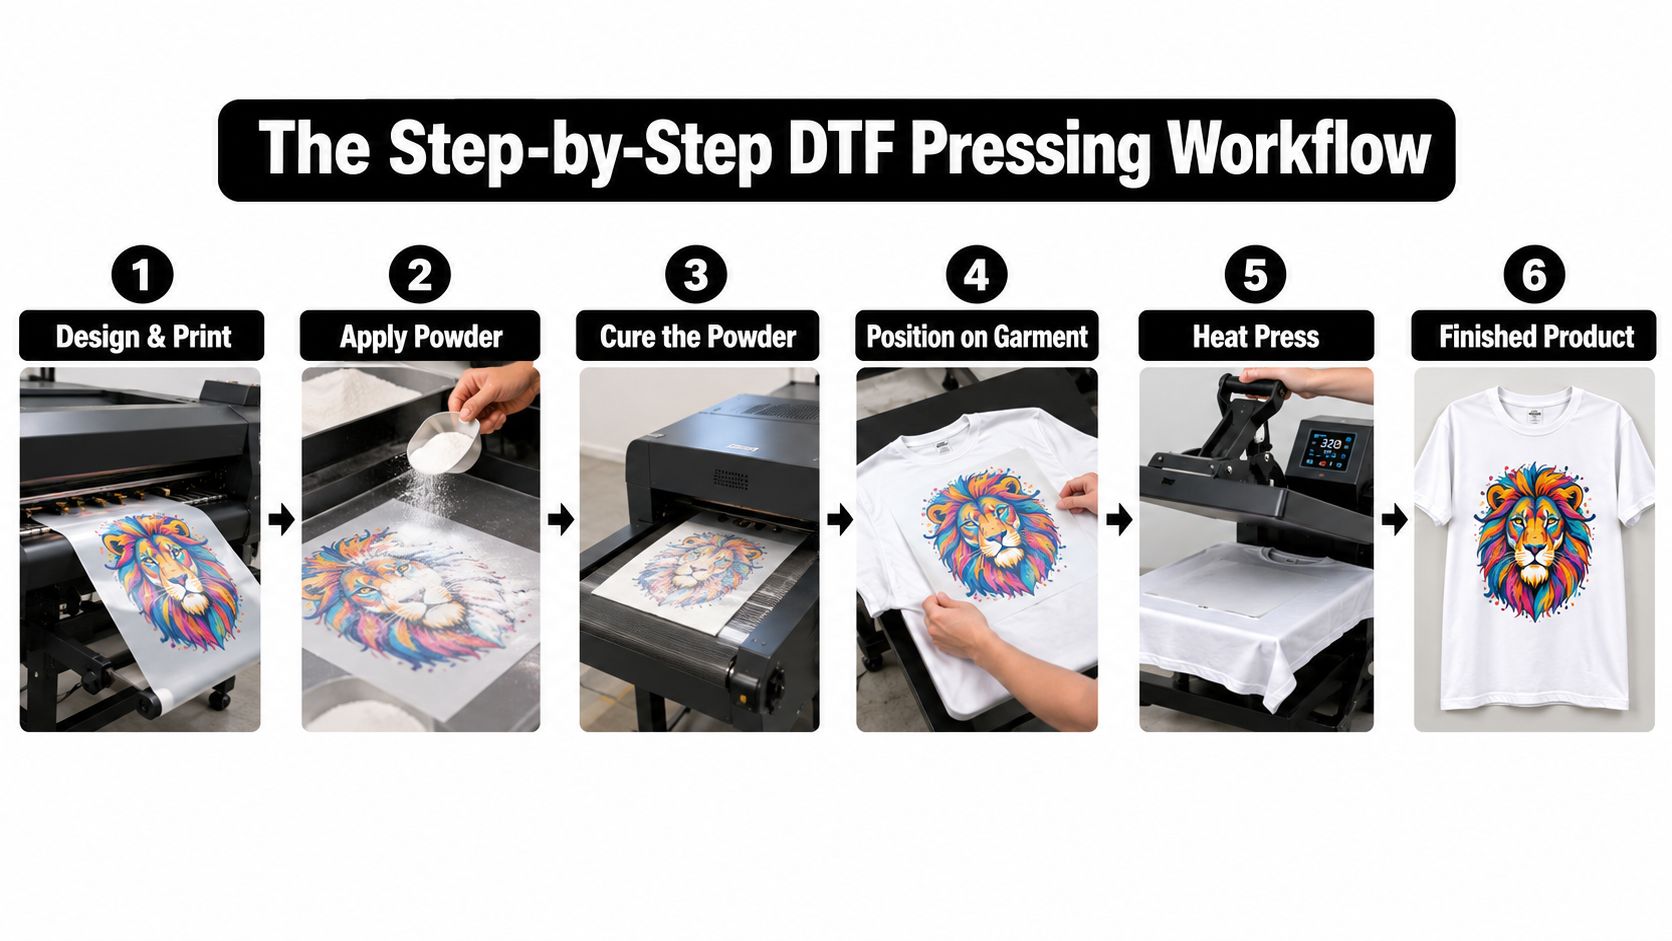
Production quality comes from repeating the same sequence in the same order. Before placing the transfer, inspect the shirt for lint, moisture, folds, and seams. Put a protective sheet inside the garment when pressing one side so adhesive or heat doesn't affect the opposite side.
Prepare the blank
Lay the shirt flat on the lower platen. Smooth the print area, align the garment, and pre-press it for about 5 seconds to remove wrinkles and moisture. Moisture trapped beneath the transfer can interfere with adhesion, while a fold can create an area with almost no contact.
If the shirt has a thick seam beneath the artwork, move the design or use an appropriate pressing setup that brings the print area level. The platen must contact the transfer evenly from edge to edge.
Position and protect the transfer
Place the DTF film accurately with the printed side positioned as specified by the supplier. Check spacing from the collar, side seams, and other design elements before closing the press. Once the platen closes, repositioning isn't an option.
Cover the transfer with the recommended protective sheet. Parchment or another supplier-approved cover can help protect the platen and garment from residue. Don't assume that every transfer uses the same cover or peel method. Follow the product instructions.
Complete the cycle
Set the verified temperature, the specified dwell time, and the pressure that gives uniform contact. Close the press fully and let the timer complete its cycle. Lifting early reduces exposure time across the whole design, even if the transfer appears pressed from the outside.
Open the press carefully and follow the specified peel procedure. A hot peel is removed immediately, a warm peel waits until the film reaches the supplier's recommended temperature, and a cold peel requires cooling before removal. DTF films vary, so the supplied instruction is more reliable than habit.
After peeling, inspect the entire design. Look closely at fine lines, corners, and areas near seams. If the supplier specifies a finishing press, use the recommended protective layer and cycle rather than improvising.
For practical garment placement considerations, the DTF transfers for T-shirts guide is a useful reference. Package the garment only after it has cooled and stabilized.
Troubleshooting Common DTF Pressing Issues
When a transfer fails, start with the physical evidence. A peeling edge, faded area, glossy fabric, or stiff hand feel points to different causes. Don't raise the temperature by default. The correct fix may be better contact, a dry garment, or the right peel timing.
The table below keeps the diagnosis in a practical order.
| Problem | Likely Cause(s) | Solution(s) |
|---|---|---|
| Transfer doesn't stick | Insufficient pressure, damp blank, incomplete platen contact, incorrect temperature or dwell time | Recheck the garment for moisture and wrinkles. Confirm that seams or zippers aren't lifting the design. Verify the platen temperature independently, then test the supplier's specified cycle on a fresh area. |
| Edges lift after pressing | Uneven pressure, cold platen area, design crossing a seam, incorrect peel timing | Measure the platen center and corners. Reposition the design away from the obstruction, improve contact, and use the specified peel method. |
| Color looks weak | Incorrect transfer process, insufficient heat exposure, movement during pressing | Confirm that the transfer type matches the garment. Check temperature and dwell time, secure the film, and prevent movement while the press closes. |
| Fabric is shiny or distorted | Excessive heat or pressure, heat-sensitive synthetic material | Stop increasing temperature. Test a lower-temperature-compatible transfer and reduce exposure only within the supplier's approved range. |
| Print feels unusually stiff | Overheating, excessive dwell, incompatible transfer or substrate | Confirm the material and transfer combination. Return to the supplier's tested settings and avoid compensating for poor pressure with extra heat. |
| Adhesive appears uneven | Wrinkles, lint, moisture, or inconsistent platen contact | Pre-press the blank, clean the surface, flatten the garment, and inspect the platen across its full working area. |
A textile-resistance study using ISO 105-C06:2009 household-wash conditions, including 40°C water, 30-minute cycles, and 800 rpm spin, found DTF samples remained among the most wash-resistant treatments through 20 cycles, with no significant color loss reported after 15 cycles. Those figures come from the published textile study, and they apply to tested conditions, not every garment or pressing setup.
Let the finished item cool and stabilize before packaging. For care, recommend inside-out washing with mild detergent, low or moderate drying heat, and no direct ironing over the print. Allow the garment to cure for 24 hours before washing, as recommended in the same study. If a failure appears, document the fabric, press, settings, peel timing, and wash result before changing the next test.
Essential Safety and Maintenance Routines
A professional operator doesn't treat safety as something separate from production. The press should never run unattended, and the platen remains a burn hazard after the cycle ends. Keep children and untrained visitors away, disconnect power when the machine is safely cool, and never cool the platen with water.
Inspect the cord, plug, outlet, handle, hinges, and pressure mechanism regularly. Stop using the press if the cord is damaged, the plug becomes unusually hot, the platen moves unpredictably, or the machine no longer closes evenly. Clean adhesive residue only with the press disconnected and cooled, using a method approved for the platen's surface.
Keep the surrounding area free from paper scraps, loose fabric, solvents, and clutter. A home studio can become hazardous when the operator batches orders and reaches around a hot machine without noticing what has accumulated nearby.
Shutdown routine: Finish the cycle, open the press safely, remove the garment, switch off the machine, disconnect power when appropriate, and confirm that the platen is no longer an active hazard before leaving the room.
Record maintenance observations alongside your pressing log. Guidance on maintenance insights from Facility Management Insights can help you turn occasional checks into a preventive routine instead of waiting for a failure during a customer order.
The best power heat press instructions produce more than attractive transfers. They give you a safe workspace, measurable heat, controlled pressure, and a process another operator can repeat. That's what turns a powerful machine into dependable production equipment.
Raccoon Transfers provides DTF transfers and gang sheets for apparel applications, giving you ready-to-press designs that fit a controlled workflow. Review the available options at Raccoon Transfers, then test each new garment and transfer combination before starting a customer batch.