
Uv DTF Gang Sheet: uv dtf gang sheet Tips and Tricks
Let’s cut to the chase: a UV DTF gang sheet is a large, sticky sheet that lets you print a bunch of different designs at once. These aren't for t-shirts; they're made specifically for hard, smooth surfaces. Imagine creating top-tier, durable decals for things like tumblers, phone cases, or signs, but without the nightmare of weeding vinyl or layering colors. That's the power of this method. It uses vibrant UV-cured ink and a seriously strong adhesive to give you a premium, permanent finish that looks and feels professional.
What a UV DTF Gang Sheet Really Means for Your Business
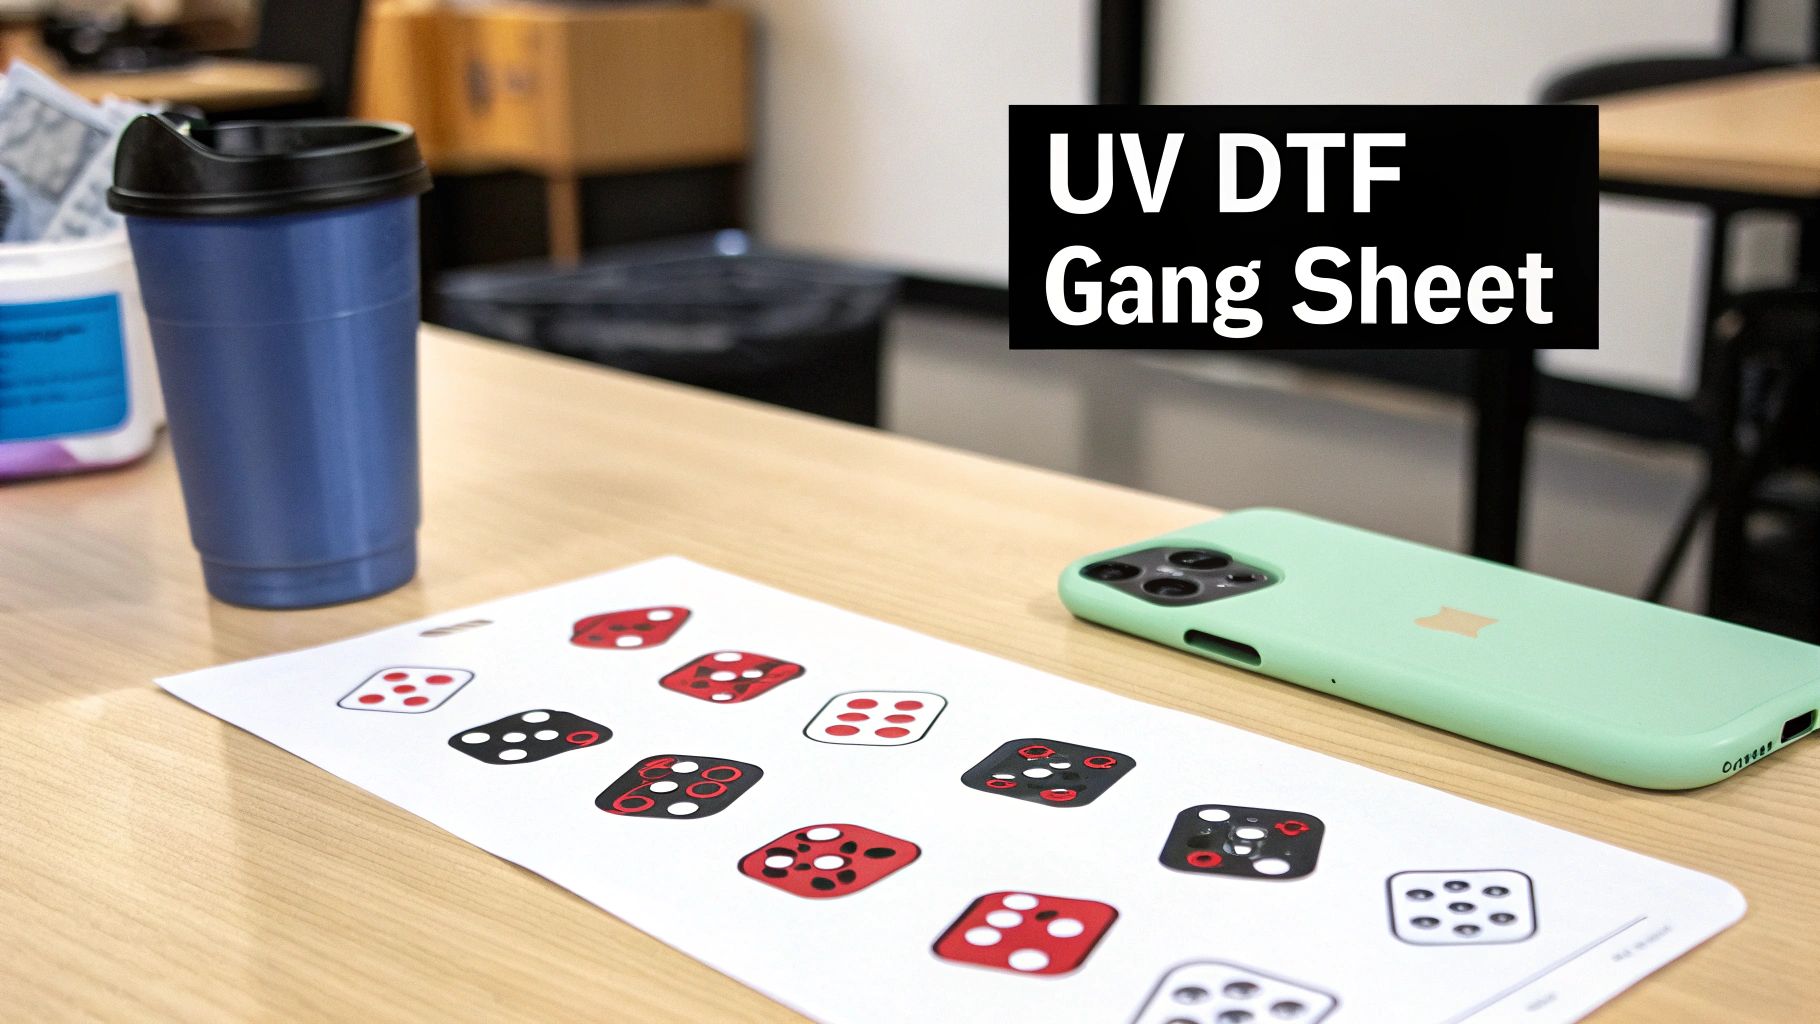
At its heart, a UV DTF gang sheet is all about efficiency. Instead of placing separate orders for dozens of individual stickers, you pack them all onto one big printable sheet. This isn't just a minor cost-saving trick; it completely changes how you can produce customized hard goods, especially when you're dealing with volume.
The secret sauce is in how they're made. These transfers are built differently than the ones for apparel. The process layers full-color UV-curable ink, a backing of white ink for pop, and then a coat of adhesive and varnish onto a special film. What you get is a brilliant, slightly raised decal that looks like it was painted right onto the surface.
When to Use This Powerful Tool
Knowing the right time to use a gang sheet is what separates the pros from the amateurs. It’s your go-to solution any time you need a bunch of different designs or a high quantity of the same design for hard-surface products.
Here’s how it plays out in the real world:
- Small Business Branding: A local coffee shop wants to brand 50 glass mugs, 30 metal thermoses, and 20 acrylic menu holders. Ordering these as one-off stickers would be a mess. With a single UV DTF gang sheet, they can print all their logos in different sizes in one shot, slashing the per-item cost.
- Etsy Seller Production: You run an online shop selling personalized phone cases and laptop decals. By ganging up your best-sellers and custom name orders onto a few large sheets, you can knock out a week's worth of production efficiently, cut costs, and keep your inventory tight.
- Hobbyist and Crafter Projects: Let's say you're making personalized Christmas ornaments or wedding favors. You can fit every unique design for the entire project onto a single sheet. This makes small-batch customization incredibly affordable and gives your projects a polished look without needing expensive equipment.
The real win here is economic scaling. The price to print a 22x60 inch sheet is the same whether you put five huge designs on it or fifty small ones. The more you fit, the less you pay per decal. Simple as that.
Understanding the Key Differences
It's super common for people to mix up UV DTF with the standard DTF used for clothes. The "gang sheet" idea is the same, but the technology and how you use it are completely different. Standard DTF transfers are made for fabric and need a heat press to work.
UV DTF transfers, on the other hand, are basically super-powered stickers. They are permanent, waterproof, and scratch-resistant, which makes them perfect for items that get handled, used, and washed a lot. You don't need a heat press at all. It's a simple peel-and-stick application that creates a bond built to last.
This technology is a game-changer for surfaces where other methods just don't work:
- Glass and Ceramics
- Metal and Stainless Steel
- Wood (as long as it's sealed or painted)
- Plastics and Acrylic
- Leatherette and other hard synthetics
But let's be real—a gang sheet isn't always the answer. If you just need one or two tiny decals for a personal project, ordering a single transfer is probably easier. The true magic of the UV DTF gang sheet is unlocked when you have multiple designs or need to produce in volume. That's when it turns a potentially costly, piece-by-piece chore into a single, efficient, and profitable print run.
Driving Profit with Smart Gang Sheet Layouts
This is where your UV DTF game shifts from just making cool stuff to actually making more money. If you're ordering individual transfers for every single item, you're lighting your budget on fire. The single most effective way to slash your per-unit cost and fatten up your bottom line is by consolidating your designs onto a single sheet.
Let's be real: the price for a full 22x60 inch sheet is fixed. It doesn't matter if you cram five huge designs on there or fifty tiny ones—the cost is the same. This is a volume game, and it directly rewards anyone who gets efficient.
The financial hit for not doing this is massive. A perfect example from a recent 2025 project showed that a 22 × 60 inch sheet held 48 separate designs for a grand total of $45. Had those same 48 transfers been purchased one by one at just $3.00 each, the total would have skyrocketed to $144. That’s an extra $99 in your pocket from one simple move—a 69% reduction in cost.
The Art of Nesting Your Designs
Just plopping files onto a sheet isn’t going to cut it. The real money is made in the art of nesting—arranging your designs like a high-stakes puzzle to kill off every bit of wasted space. Every empty square inch on that film is money you could have made.
Getting this right takes a bit of creative Tetris.
- Rotate and Reorient: Don't be afraid to spin your designs. That long, skinny logo that won't fit horizontally might just slide perfectly into a vertical gap you didn't even see.
- Fill the Gaps: See those awkward little voids between your main designs? That's pure gold. Use them for small, high-value adds like tiny branding logos, QR codes, or even little initials for personalization jobs.
- Vary Your Sizes: When you plan your sheets, think in terms of a mix of large, medium, and small designs. This variety naturally creates more nooks and crannies for smaller pieces to tuck into.
Think of your digital canvas as a piece of expensive real estate. Your job is to develop every last bit of it. Leaving large gaps is like paying for land and then refusing to build on it.
Practical Layout Strategies
Let’s walk through a real-world scenario. Say you run an Etsy shop selling custom tumblers and phone grips. You just landed a big order for 20 tumbler wraps, but you’ve also got your usual trickle of orders for smaller phone grip decals and some branded logo stickers you toss in with every package.
Instead of placing three separate orders, you build one master UV DTF gang sheet. The tumbler wraps are the main tenants, but you strategically nestle all those phone grip designs and logos into the gaps between them. It’s a completely different mindset than printing for apparel, which often demands more rigid, uniform layouts. Our guide on DTF gang sheets for clothing dives deeper into those specific needs.
This approach flips your production process from reactive to proactive. You’re not just filling orders anymore; you're pre-printing your best-sellers and branding materials at a ridiculously low cost. By mastering your layout, you turn what would have been three separate expenses into one smart, cost-effective print run, directly boosting the profit margin on every single thing you sell.
Getting Your Artwork Print-Ready
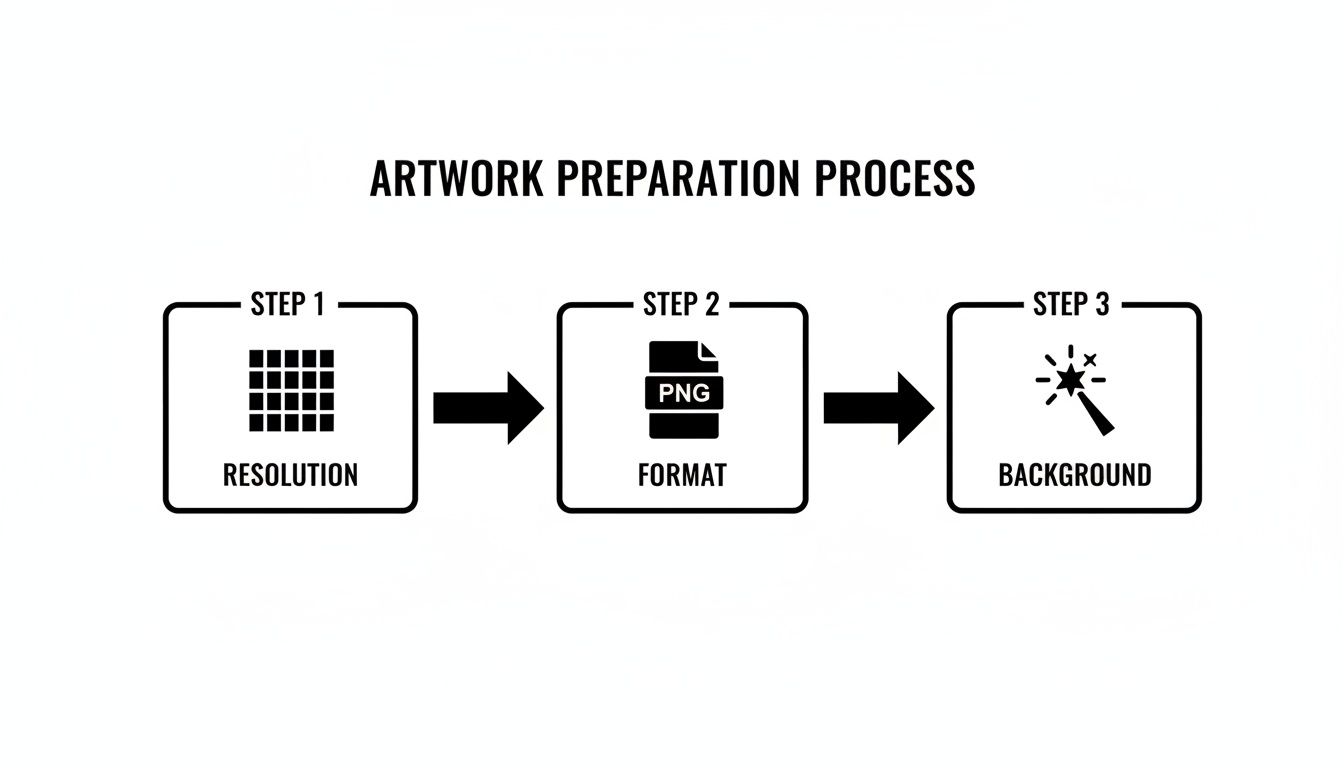
The final quality of your UV DTF transfers is decided long before a drop of ink hits the film. It's all determined the moment you save your artwork file. Getting your designs dialed in isn't just a good idea—it's the single most important step to avoid blurry prints, frustrating reprints, and wasted money.
Think of this as your technical pre-flight checklist. We'll break down the essentials: high resolution, a truly transparent background, and the right file format. Nail these three, and you’re well on your way to creating professional-grade decals every single time.
Resolution: The Secret to Sharp, Crisp Details
Here’s the first rule of print club: design and export everything at 300 DPI (Dots Per Inch). This is the gold standard for high-quality printing, and it’s non-negotiable if you want your designs to look sharp and professional.
You’ve probably seen images online that look fine on a screen but fuzzy when printed. That’s usually because they’re at a web-standard 72 DPI, which just doesn't have enough digital information for a physical print. When a low-res image goes to print, the machine has to guess what to fill the gaps with, leading to pixelation and blurry edges. For a UV DTF gang sheet packed with detailed logos or fine text, 300 DPI ensures every tiny element is rendered perfectly.
Think of DPI like the thread count in a high-end bedsheet. A low thread count sheet feels rough because you can see the gaps between the threads. A high thread count feels smooth and luxurious because everything is packed tightly together. 300 DPI is the high-thread-count version of your artwork.
Why a Transparent Background is Non-Negotiable
For UV DTF transfers, your image background has to be 100% transparent. This is what creates that clean, "die-cut" look, as if the design were printed directly onto the surface. If your file has a white or colored background, guess what? The printer will print that background, and you’ll end up with a clunky square sticker instead of a sleek, custom decal.
This is where your file format becomes critical. Your go-to format should always be PNG (Portable Network Graphics). Unlike JPEGs, which can't handle transparency and automatically flatten your image with a white background, PNGs are built to preserve those transparent pixels perfectly. If you want to dive deeper, there's a great guide on understanding image formats like JPEG vs PNG that explains why this choice is so important.
A common mistake I see is saving a file that looks transparent in the design software but actually isn't. Always double-check your export settings to make sure the transparency option is enabled. Another sneaky issue is stray, semi-transparent pixels around the edges of your art, which can create a faint, hazy outline on the final print. Zoom way in and make sure your edges are clean and hard.
Your Pre-Upload Technical Checklist
Before you upload your designs to a gang sheet builder, run through this quick reference guide. Use this checklist to ensure your design files meet the technical requirements for high-quality UV DTF printing. Catching a mistake here will save you a world of hurt later.
| Artwork File Specification Checklist | | :--- | :--- | | Specification | Requirement | Why It Matters | | Resolution | 300 DPI | Guarantees sharp, crisp details and prevents pixelation, especially in fine lines and small text. | | File Format | PNG | The only format that reliably supports the transparent background needed for die-cut style transfers. | | Background | 100% Transparent | Prevents the printer from adding an unwanted white or colored box around your beautiful design. | | Fonts | Convert to Outlines | Turns text into a vector shape, ensuring your chosen font prints correctly even if the printer doesn't have it installed. | | Artwork Edges | Clean & Hard Edges | Avoids fuzzy or semi-transparent halos around your design, which can result in a messy, cloudy print. |
Getting these technical details right is the secret to producing transfers that look amazing and apply perfectly. It takes the guesswork out of the process and ensures that the vision you created on your screen is exactly what you get in your hands.
How to Build Your Gang Sheet Online
Let's bust a common myth right now: you absolutely do not need a graphic design degree or expensive software to create a killer UV DTF gang sheet. Thanks to modern online tools, anyone can go from a folder of artwork files to a perfectly organized, print-ready sheet in minutes.
This is your guide to doing just that. We'll walk through the entire process, from uploading your first design to arranging, resizing, and duplicating your art on a digital canvas. You'll see how simple it is to get total control over your order, ensuring the layout on your screen is exactly what shows up at your door.
Getting Started with an Online Gang Sheet Builder
First things first, you need to choose your canvas size. Most online builders give you a few standard options to start with, like the popular 22x24 inch sheet or even massive 22x120 inch rolls. The right choice really just depends on how many designs you're trying to print at once.
Once you pick your size, you're dropped into a digital workspace. This is where you’ll do all the work. The interface is usually dead simple, with a clear "Upload" button for your PNG files and a blank canvas that represents your physical UV DTF film.
Think of it as your digital cutting mat. You can add as many designs as you want, and they’ll pop up on the canvas, ready for you to start arranging.
Before you even get to the builder, though, make sure your artwork itself is ready. Getting the resolution, format, and background right from the start is critical.
Nailing these three prep steps will save you from common (and costly) print errors down the line.
Arranging Your Designs for Maximum Efficiency
With your files uploaded, it’s time for the most important part: arranging everything on the sheet. The good news is that it’s all drag-and-drop. Just click a design and move it wherever you want.
You’ll be using a few key functions over and over:
- Resizing: Grab a corner of an image to scale it. Most builders show you the exact dimensions in inches as you adjust, so you can be sure your 3-inch logo is actually 3 inches.
- Rotating: Look for the little rotation handle. This lets you turn your art to fit into those awkward, empty spots—a pro move for efficient nesting.
- Duplicating: Need ten copies of the same logo? Don’t upload it ten times. Just select the design and hit the "Duplicate" button. It’s a huge time-saver.
The goal here is to play a bit of Tetris. Your mission is to fill the canvas as completely as possible, because every empty space is wasted money. Don’t leave big gaps between your designs. Pack them in, rotate them, and use your smaller elements to fill in the nooks and crannies.
My Pro Tip: Always leave a small buffer—about 0.25 inches—between each design. This gives you just enough room to cut them apart later without accidentally slicing into the neighboring transfer.
Leveraging Smart Builder Features
Many online builders have smart features baked in to help you work faster and get more for your money. One of the best is an auto-nesting or "Auto Fill" function. With one click, the software’s algorithm analyzes all your designs and arranges them in the most space-efficient layout it can calculate.
This feature is a game-changer, especially for complex sheets. That said, I always recommend giving the automated layout a quick once-over. Sometimes a little manual nudge or rotation can open up just enough space to squeeze in one more small design. As you figure out how to build your gang sheet online, you’ll find that a smart mix of manual and automated steps gives the best results, a principle that applies across many industries when it comes to automating workflows.
Once you're happy with your layout, you’re ready to check out. The best part of using a tool like the Raccoon Transfers UV DTF gang sheet builder is the confidence it gives you. What you see is precisely what you get, taking all the guesswork out of the equation and ensuring your final prints turn out perfect.
Applying Transfers for a Professional Finish
A perfect print from your UV DTF gang sheet is only half the battle; getting the application right is what separates the pros from the amateurs. You're aiming for that durable, permanent, "painted-on" look, and that comes down to a methodical approach that starts long before the transfer even touches the item.
The entire process hinges on one thing: a perfect bond between the adhesive and the product's surface. From my experience, almost every failed application—peeling, bubbling, or just not lasting—can be traced back to skipping the prep work.
The Critical First Step: Surface Preparation
Before you even think about peeling a transfer, you have to create a perfectly clean, debris-free surface. Your goal is to get rid of any oils from fingerprints, dust, or other residue that could get in the way of the adhesive doing its job.
Your best friend here is isopropyl alcohol (rubbing alcohol) and a lint-free cloth. A quick, thorough wipe-down isn't just a suggestion; it's non-negotiable. This simple step actually increases the surface energy of the item, which allows the transfer's adhesive to grab on and form a much stronger, more permanent bond.
- For glass and metal: A good wipe with at least 70% isopropyl alcohol is perfect.
- For plastics and acrylics: Just be careful. Make sure the alcohol is safe for the material, as some sensitive plastics can cloud up. If you're not sure, test it on a small, hidden spot first.
- For sealed wood: Just make sure the surface is completely dry before you move on.
After cleaning, let the surface air-dry completely. Trapping even a tiny bit of moisture underneath the decal is a recipe for disaster, as it will compromise the bond and cause it to fail down the road. This simple prep work truly is the foundation for a professional, long-lasting application.
Mastering the Peel and Stick Process
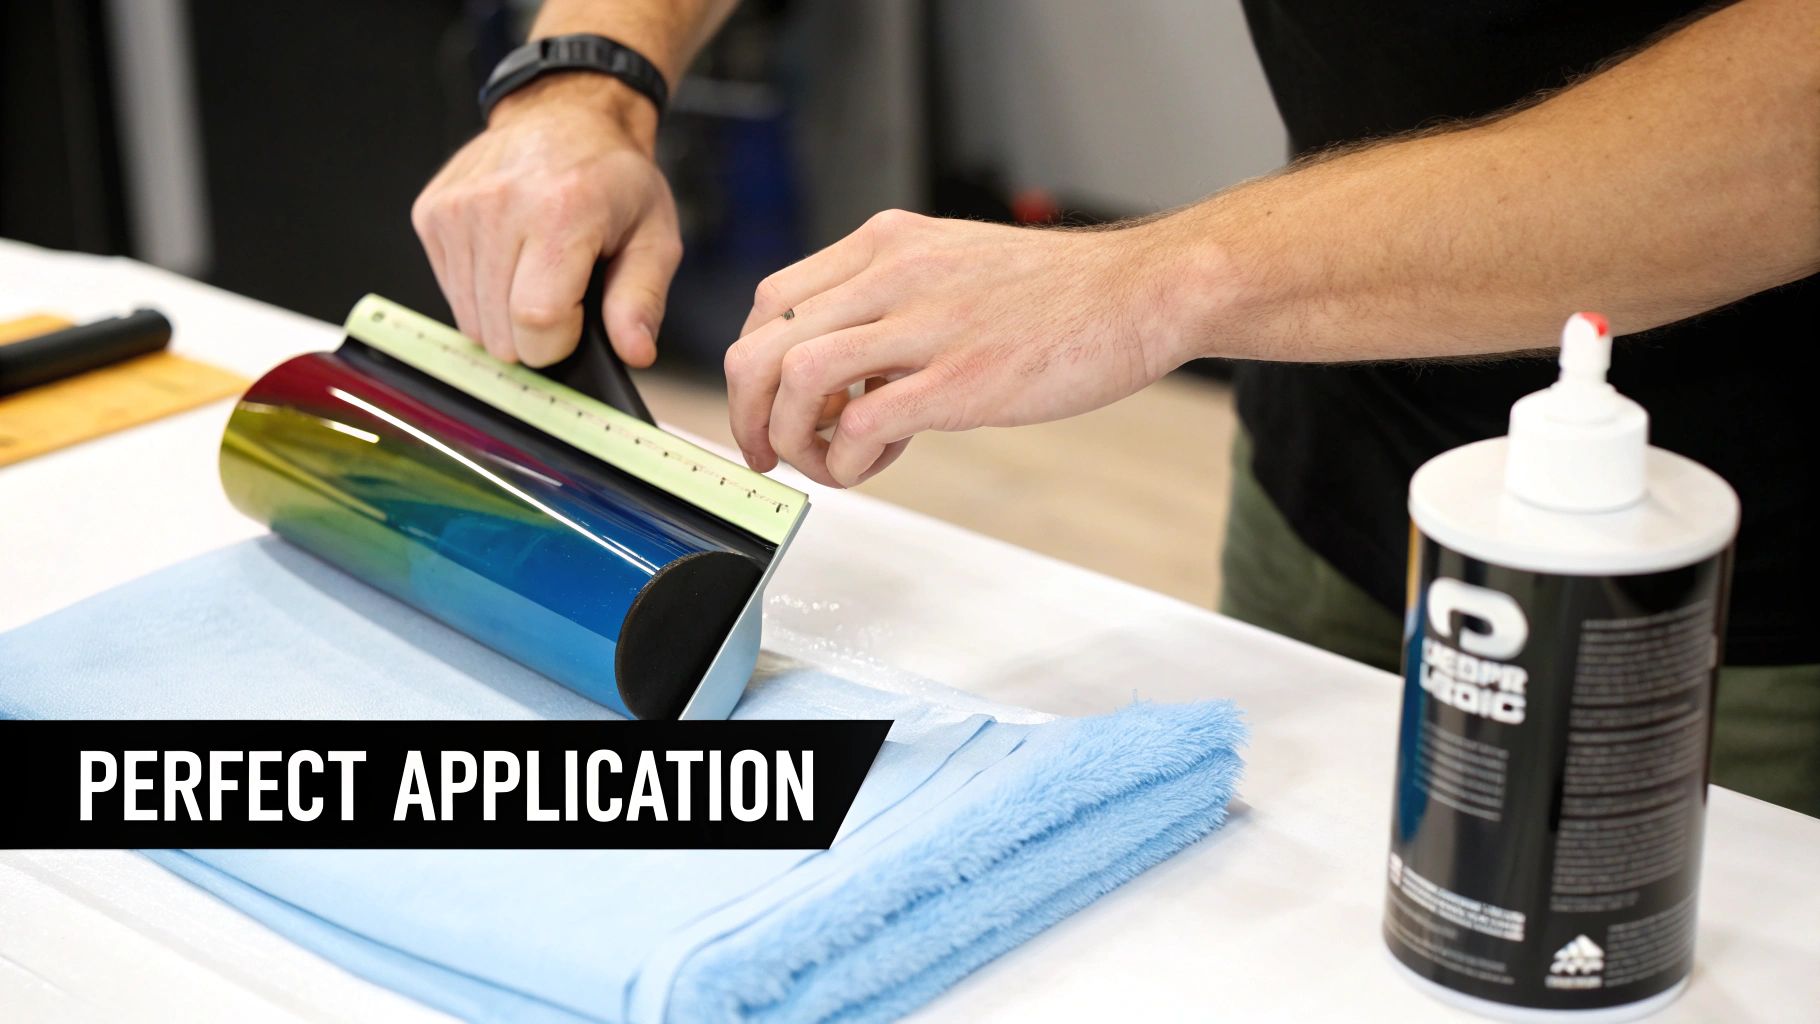
Once your surface is pristine, it’s time for the main event. Applying the transfer from your UV DTF gang sheet takes a little patience and a steady hand, but trust me, the results are worth it.
First, while the transfer is still on its backing, firmly rub the entire design with your finger or a squeegee. This is called burnishing. You're essentially making sure the design is fully stuck to the clear top carrier film before you try to peel it away from the paper.
Next, carefully start peeling the clear carrier film away from the white paper backing. The design should lift off cleanly right along with the clear film. If you see any part of the design trying to stay behind on the paper, just lay the film back down and burnish that specific spot again with a bit more pressure.
Pro Tip: Instead of lifting the clear film straight up, try rolling the paper backing away from the film. I've found this technique really helps release those tiny, detailed designs much more cleanly without stretching or tearing them.
With the design now on the clear film, it's time to position it over your item. This is your one shot to get it right—the adhesive is incredibly strong and definitely not repositionable. Once you're happy with the placement, lay one edge down first. Then, slowly smooth the rest of the transfer onto the surface, pushing from the center outwards to eliminate any air bubbles.
Now, burnish the design one last time, but this time directly onto the product. Use firm, even pressure with a squeegee or your thumb, and really focus on all the edges. This final press activates the pressure-sensitive adhesive and forces out any last bits of trapped air.
Finally, slowly and carefully peel the clear carrier film away, pulling it back at a sharp angle. The vibrant, durable design will remain perfectly bonded to your item, creating that seamless, professional finish that’s built to last. The durability is honestly remarkable; some industry reports show UV DTF prints lasting over two years on outdoor storefronts without fading. While this process is heat-free, understanding curing and application is just as critical as knowing the proper heat press settings for DTF on fabric.
Common Questions About UV DTF Gang Sheets
Jumping into UV DTF printing is exciting, but it's natural to have a few questions. I get asked about everything from durability to design quirks, so it's smart to clear things up before you place your first order. I've put together answers to the most common questions I hear from creators to help you get started on the right foot.
Think of this as your go-to FAQ. My goal is to give you clear, straight-to-the-point answers so you can order your next UV DTF gang sheet with total confidence.
How Durable Are These Transfers Really?
This is usually the first thing people ask, and for a good reason. The short answer? They are extremely durable. These aren't your average stickers; UV DTF transfers are built to last. They’re waterproof, scratch-resistant, and tough enough for high-contact items like tumblers, phone cases, and keychains that get tossed around every day.
The magic is in the combination of UV-cured ink and a seriously strong adhesive, which creates a permanent bond. When you apply them correctly, they’re not going to peel, fade, or wash off. They can even survive the dishwasher, though I always tell people to hand-wash for the absolute best longevity.
Can I Use Any Design or Are There Limitations?
UV DTF is incredibly flexible, but there are a couple of design details you'll want to watch out for to get the best results.
- Fine, Wispy Details: Super thin, feathery lines or tiny, disconnected bits of text can be tricky. The adhesive layer needs a bit of surface area to grab onto, so designs with more solid shapes and lines will always perform better.
- Glows and Gradients: Steer clear of soft, transparent "glow" effects or gradients that fade to nothing. The printer needs a defined, hard edge to know where to lay down the white ink and adhesive. Stick with crisp, clean edges, and your transfers will look flawless.
A good rule of thumb is to think of your designs as die-cut stickers. If you have tiny, floating pieces smaller than a grain of rice, you're probably pushing it. For just about everything else, you'll be fine.
What Is the Typical Turnaround Time?
Getting your prints fast is a huge part of the appeal. The demand for quick turnarounds in the custom product world has exploded. To give you an idea, one industry report that tracked over 5,500 transfer orders found a 39% year-over-year jump in volume, with around 52% of those orders shipping out within just 24 hours. You can dig into more of that data on industry trends in this US DTF transfer company's transparency report.
For a shop like Raccoon Transfers, shipping the next day is the standard. This kind of speed means you can go from a design on your computer to a physical product ready for your customer in record time. That's a game-changer for small businesses trying to manage inventory or take on last-minute custom orders.
This is exactly why learning to build a UV DTF gang sheet correctly is such a valuable skill—it lets you tap directly into this fast and powerful production workflow without hitting any snags.
Ready to create stunning, permanent decals for your hard goods? At Raccoon Transfers, our online gang sheet builder makes it easy to arrange your designs, maximize your value, and get professional-quality prints shipped the next day. Build your custom UV DTF gang sheet now and see the difference for yourself. Visit us at https://raccoontransfers.com to get started.