
Mastering Your Transfers Heat Press for Flawless Results
When you're working with a transfers heat press, success really boils down to three things: time, temperature, and pressure. Getting this trifecta right is the secret sauce for creating custom products that look professional and are built to last, whether you’re pressing on a soft t-shirt or a hard promotional item. It’s the hands-on science of making a digital design a real, tangible thing.
Understanding the Core Principles of Heat Transfer
Before you even think about pressing your first design, you have to get a feel for what makes a heat transfer stick—and stay stuck. It's less about the fancy machine and more about getting that delicate balance of heat, pressure, and time just right. I always tell people to think of it like a recipe. Too much heat scorches the garment, too little pressure means the design will peel right off, and getting the timing wrong leaves you with a faded, amateur-looking print.
Each of these elements does a specific job. Temperature is what melts the adhesive on the back of your transfer so it can bond to the item. Pressure is what physically pushes that melted adhesive into the fibers of the fabric, ensuring a solid, even connection. And finally, time is simply how long you let those two forces do their work to create a permanent bond. Nail these fundamentals, and you'll get consistent, quality results every single time.
There’s no doubt this method of customization is booming. The global heat press market was valued at around USD 1.2 billion and is on track to nearly double, hitting USD 2.3 billion by 2033. That growth is being driven by huge demand from industries like textiles, ceramics, and all sorts of promotional products. You can dig into the specifics of these trends in the full report.
Key Transfer Technologies
While the core principles are always the same, the type of transfer you're using will definitely change your approach. The two big players you'll run into most often are Direct to Film (DTF) and UV-DTF. Each has its own sweet spot.
-
Direct to Film (DTF): This is your workhorse for textiles—think cotton, polyester, and blends. The process involves printing a design onto a special film, covering it with an adhesive powder, and curing it. You then use a transfers heat press to apply it to the fabric. The end result is a vibrant, super flexible print that feels great and holds up incredibly well in the wash.
-
UV-DTF: This one is made for hard, smooth surfaces. It’s perfect for customizing things like glass, metal, plastic, and wood. UV-DTF uses UV-curable ink and a strong adhesive backing. While it doesn't strictly need heat, a good press ensures a solid application. The final product is a tough, scratch-resistant decal that looks like it was printed directly on the object.
Getting the settings right for your specific transfer type isn't just a suggestion—it's essential. Using the wrong settings for a DTF transfer can instantly ruin a good shirt, and a botched UV-DTF application means wasting a perfectly good product and transfer.
Knowing which technology to use is half the battle. If a local band wants tour t-shirts, you’ll be reaching for your DTF supplies. But if they also want their logo on pint glasses or laptop stickers, you'll need to switch over to UV-DTF to get it done right. Once you get a handle on these basics, you’ll have the confidence to tackle just about any material and troubleshoot problems like a seasoned pro.
Getting Your Garment Ready for a Flawless Transfer
The difference between a crisp, professional-looking transfer and one that peels or fades almost always comes down to the prep work. What you do before the heat platen ever touches the garment is arguably the most important part of the process. Rushing this stage is a classic mistake that leads to wasted materials and a lot of frustration.
Think of proper preparation as your insurance policy for a perfect application.
It all starts with the garment itself. You can't just use a one-size-fits-all approach because different fabrics react uniquely to heat and pressure. A 100% cotton tee is pretty forgiving, but a delicate polyester blend can scorch in an instant if your temperature is even slightly too high. Always double-check the manufacturer's recommendations for both your transfer film and the blank item you're pressing on.
This image shows just how popular different transfer methods have become.
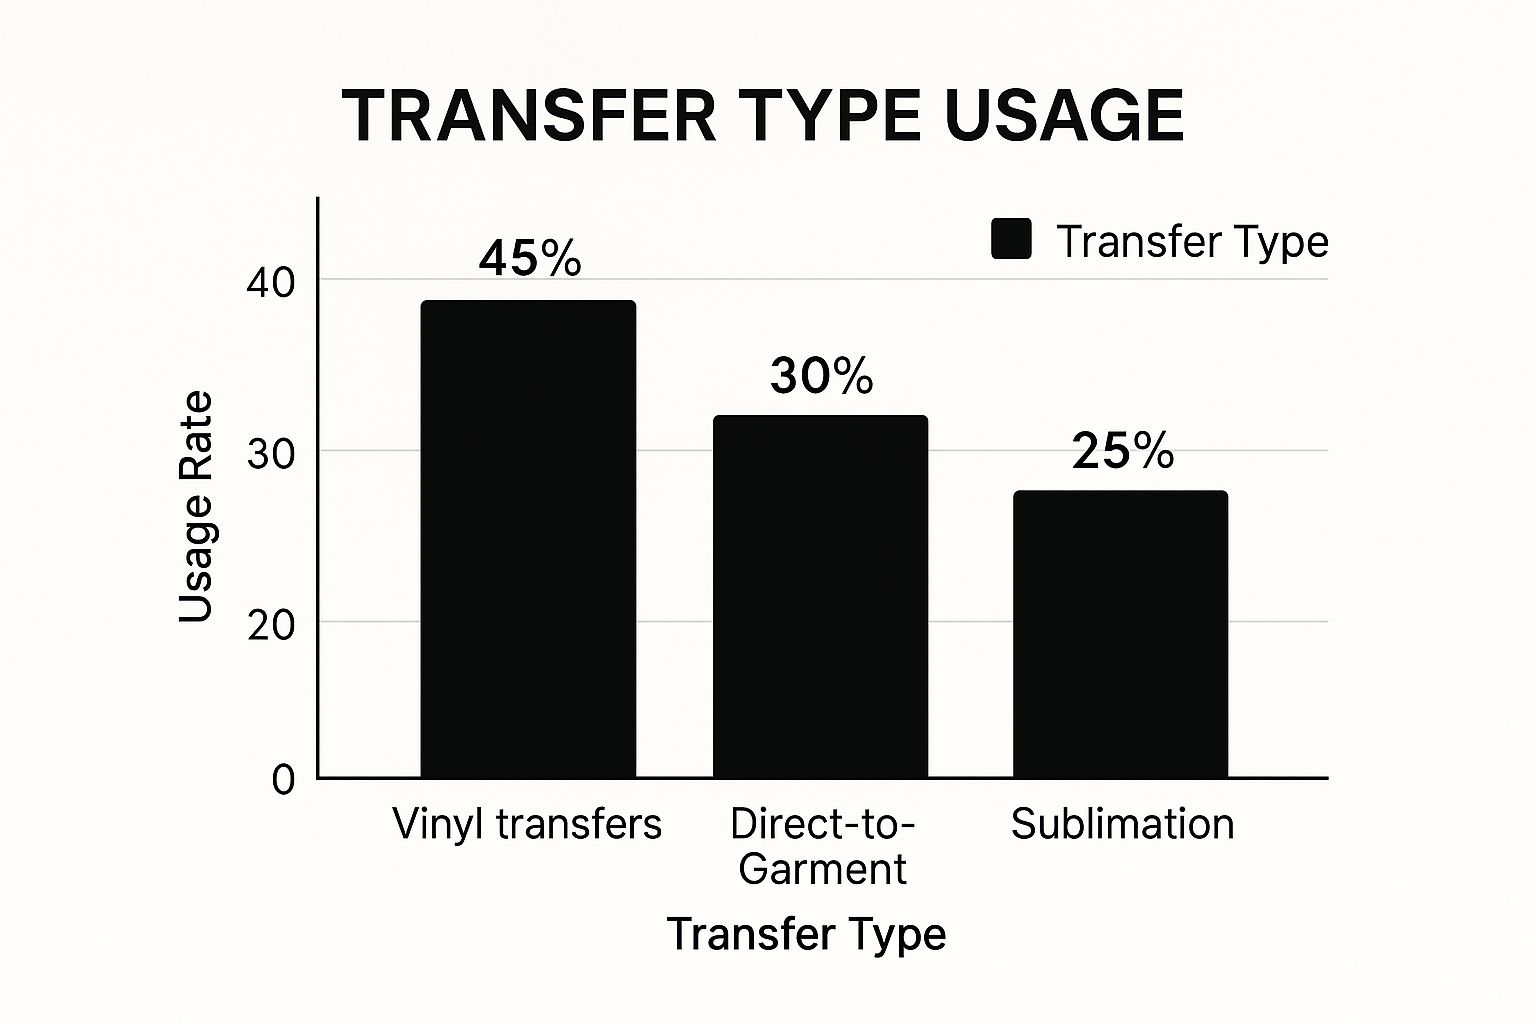
As you can see, vinyl is still a major player, which makes sense given how accessible it is for hobbyists and small businesses starting out.
The All-Important Pre-Press
If there's one step you absolutely cannot skip, it's the pre-press. Garments, especially cotton ones, hold a surprising amount of moisture, even when they feel bone dry to the touch. When that hidden moisture hits the heat press, it turns to steam, which gets in the way of the transfer's adhesive and prevents a strong bond.
To pre-press, just lay your garment on the press, lower the platen, and heat it for about 5-10 seconds. This quick step accomplishes two critical things:
- It zaps any trapped moisture out of the fabric.
- It gives you a perfectly smooth, wrinkle-free surface to work with.
Skipping this can cause your design to bubble up or start peeling after the very first wash. It’s a tiny action that makes a huge difference in the durability of your finished product. There's a reason the manual heat press market, valued at around USD 1.1 billion in 2025 and projected to nearly double by 2032, is so popular—mastering these fundamental techniques delivers reliable results every time. You can dig into more data on the manual heat press market if you're curious.
I like to think of the garment as a canvas. You wouldn't start a painting on a crumpled, damp piece of paper, right? The pre-press prepares your canvas so the "paint"—your transfer—sticks perfectly.
To help you get started, here's a quick reference table I use for common fabrics.
Heat Press Settings by Fabric Type
This table is a great starting point for dialing in your heat press. Always do a test press if you're working with a new fabric or transfer type, as settings can vary slightly based on your specific equipment and environment.
| Fabric Type | Recommended Temperature (°F/°C) | Press Time (Seconds) | Pressure Level |
|---|---|---|---|
| 100% Cotton | 300-320°F / 150-160°C | 10-15 | Medium to Firm |
| Polyester | 270-290°F / 130-145°C | 8-12 | Medium |
| 50/50 Cotton/Poly | 280-300°F / 140-150°C | 10-12 | Medium |
| Tri-Blends | 260-280°F / 125-140°C | 8-10 | Light to Medium |
Remember to adjust as needed based on your results. Consistent, high-quality output is all about knowing your materials and your machine.
Nailing Your Design Alignment
Nothing screams "homemade" like a crooked design. Perfect alignment is what separates amateur work from a professional-grade product. Whether you're centering a logo on a chest or placing a graphic on a sleeve, precision is everything.
Don't just eyeball it, especially if you're running a bulk order. Grab a tool to ensure consistency.
- A clear acrylic t-shirt ruler is a fantastic, low-cost option.
- A laser alignment system is a game-changer for high-volume shops.
As a rule of thumb for a standard chest placement, I usually place the top of the design about three to four inches down from the collar. For a deeper dive into the application process, our guide on how to use heat transfer paper is a great resource. This careful approach is what minimizes costly mistakes and sets every single project up for success.
Executing the Perfect Press

Alright, your garment is prepped and the design is sitting exactly where you want it. This is the moment of truth where all that careful work pays off. The press itself is quick, but getting the details right is what separates an amateur job from a flawless, professional finish.
This is all about controlling the environment under that hot platen. Your settings are everything. For a standard DTF print on a cotton shirt, you'll probably be somewhere around 300-320°F with medium pressure for 10-15 seconds. But if you're working with a holographic transfer on a delicate poly-blend, you'll need a totally different recipe—usually lower heat and less time to avoid damaging the fabric or the effect.
Always, always check the specific instructions that came with your transfers.
Protect Your Work (And Your Gear)
A protective sheet is your best friend here. Whether it's a Teflon sheet or just a simple piece of parchment paper, laying it between the heated platen and your transfer film does two crucial things. First, it's cheap insurance against scorching the garment. Second, it helps distribute the heat evenly across the entire design, getting rid of any hot spots that might mess with the adhesion.
Think of it this way: a protective sheet costs pennies, but it can save you from trashing a $20 hoodie and a $5 transfer. It's a simple, non-negotiable step for getting consistent results. For a full rundown on the whole process, our complete guide on how to heat press is a great resource.
Understanding the Peel
The moment the press pops open is just as important as the press itself. This is where the "peel" comes in, and it can make or break your final product. Different transfers require you to remove the carrier film at different temperatures.
- Hot Peel: Just like it sounds. You peel the film off immediately after the press opens while everything is still piping hot. This technique often gives the design a softer feel because the ink has a chance to sink deeper into the fabric's fibers.
- Warm Peel: Here, you give it a moment to breathe. Wait about 5-10 seconds for the transfer to cool down just a bit before peeling. This usually gives you a nice balance between a soft finish and a crisp, sharp design.
- Cold Peel: Patience is key for this one. You have to wait until both the garment and the transfer are completely cool to the touch. If you get impatient and peel too early, you'll pull the design right off with the film. This method is common for specialty transfers where the adhesive needs to fully cure before the carrier is removed.
When you do peel, commit to it. Use one smooth, continuous motion. If you hesitate or stop halfway through, you can leave ugly lines or imperfections in the print. If you see any part of the design starting to lift with the film, stop, lay it back down, cover it, and give it another few seconds under the press.
For smaller, more intricate jobs, some pros swear by specialized tools. For example, some have found great success using items like the OLISO M3 Pro Project Iron to get into tight spots.
Tackling Tricky Placements
So, what happens when you need to press over a seam, near a zipper, or around a button? Applying a transfers heat press to any uneven surface is a classic problem, but the solution is pretty simple: you need to create a flat, even surface for the platen to press against.
The easiest way to do this is with a heat press pillow or even a Teflon-wrapped mousepad. Just slide the pillow inside the shirt. This raises the printing area up, allowing the thick seams, zippers, or buttons to drop down and out of the way. This ensures the platen makes solid, even contact only with the transfer area, giving you a perfect application every single time.
Don't make the rookie mistake of thinking you're done once you peel off that carrier film. What you do next is what really separates a decent print from a professional one that lasts. These final steps are critical for durability and getting that perfect finish.
The most important part of this process is what we call the finishing press. This is just a quick, second press that really pushes the ink down into the fibers of the garment. It's the secret to making the design more washable and giving it a much softer feel. You'll notice it knocks out that plasticky shine and makes the transfer feel like it's truly part of the shirt. Trust me, this is a step the pros never, ever skip.
The Finishing Press Technique
For this quick follow-up press, you'll need to tweak your settings slightly. The idea here isn't to cook the transfer again; it's to meld it seamlessly with the fabric.
Grab a protective sheet—parchment paper or a Teflon sheet works perfectly—and lay it over the design. Now, press it again for just 5-7 seconds. You can use the same temperature as before but back off the pressure just a little bit. That's all it takes. This simple action locks the design in and preps it for the long haul.
Getting your heat settings just right is a huge part of the game. For a deeper dive, our heat press temperature guide is a great resource for different kinds of fabrics.
A finishing press is your secret weapon for durability. It’s a simple action that transforms the feel of the transfer from something sitting on the shirt to something that's truly a part of it, ensuring it survives dozens of wash cycles.
Long-Term Care Instructions for Your Clients
Passing on some simple care instructions is a pro move. It shows you care about the final product and helps your customers keep their new gear looking great. More importantly, it prevents those frustrating emails about prints peeling or fading, which almost always comes down to bad washing habits.
Here are the key points to share with every customer:
- Give it a Day: Tell them to wait at least 24 hours before that first wash. The adhesive needs this time to fully cure and create a permanent bond with the fabric.
- Inside Out is Best: Washing the garment inside out protects the design from getting roughed up by other clothes or the inside of the washing machine.
- Cold Water Only: Always recommend a cold, gentle cycle. Hot water is the enemy; it can weaken the adhesive over time and dull the colors.
- Low Heat or No Heat: High heat from a dryer will destroy a heat transfer. Tumble dry on the lowest possible setting, or even better, just hang it up to air dry.
- Avoid Harsh Chemicals: Bleach and fabric softeners will break down the print. It's a hard no on those.
- Iron with Care: If they must iron the item, it has to be inside out and on a low heat setting. Never, ever let a hot iron touch the transfer directly.
Once your transfers are perfectly pressed and you've armed your clients with the right care info, you'll want to show off your work. For some great ideas on presentation, check out these tips on displaying your custom-made apparel with professional clothing display racks. Little details like this elevate your brand and make sure your hard work gets the spotlight it deserves.
Troubleshooting Common Heat Press Problems
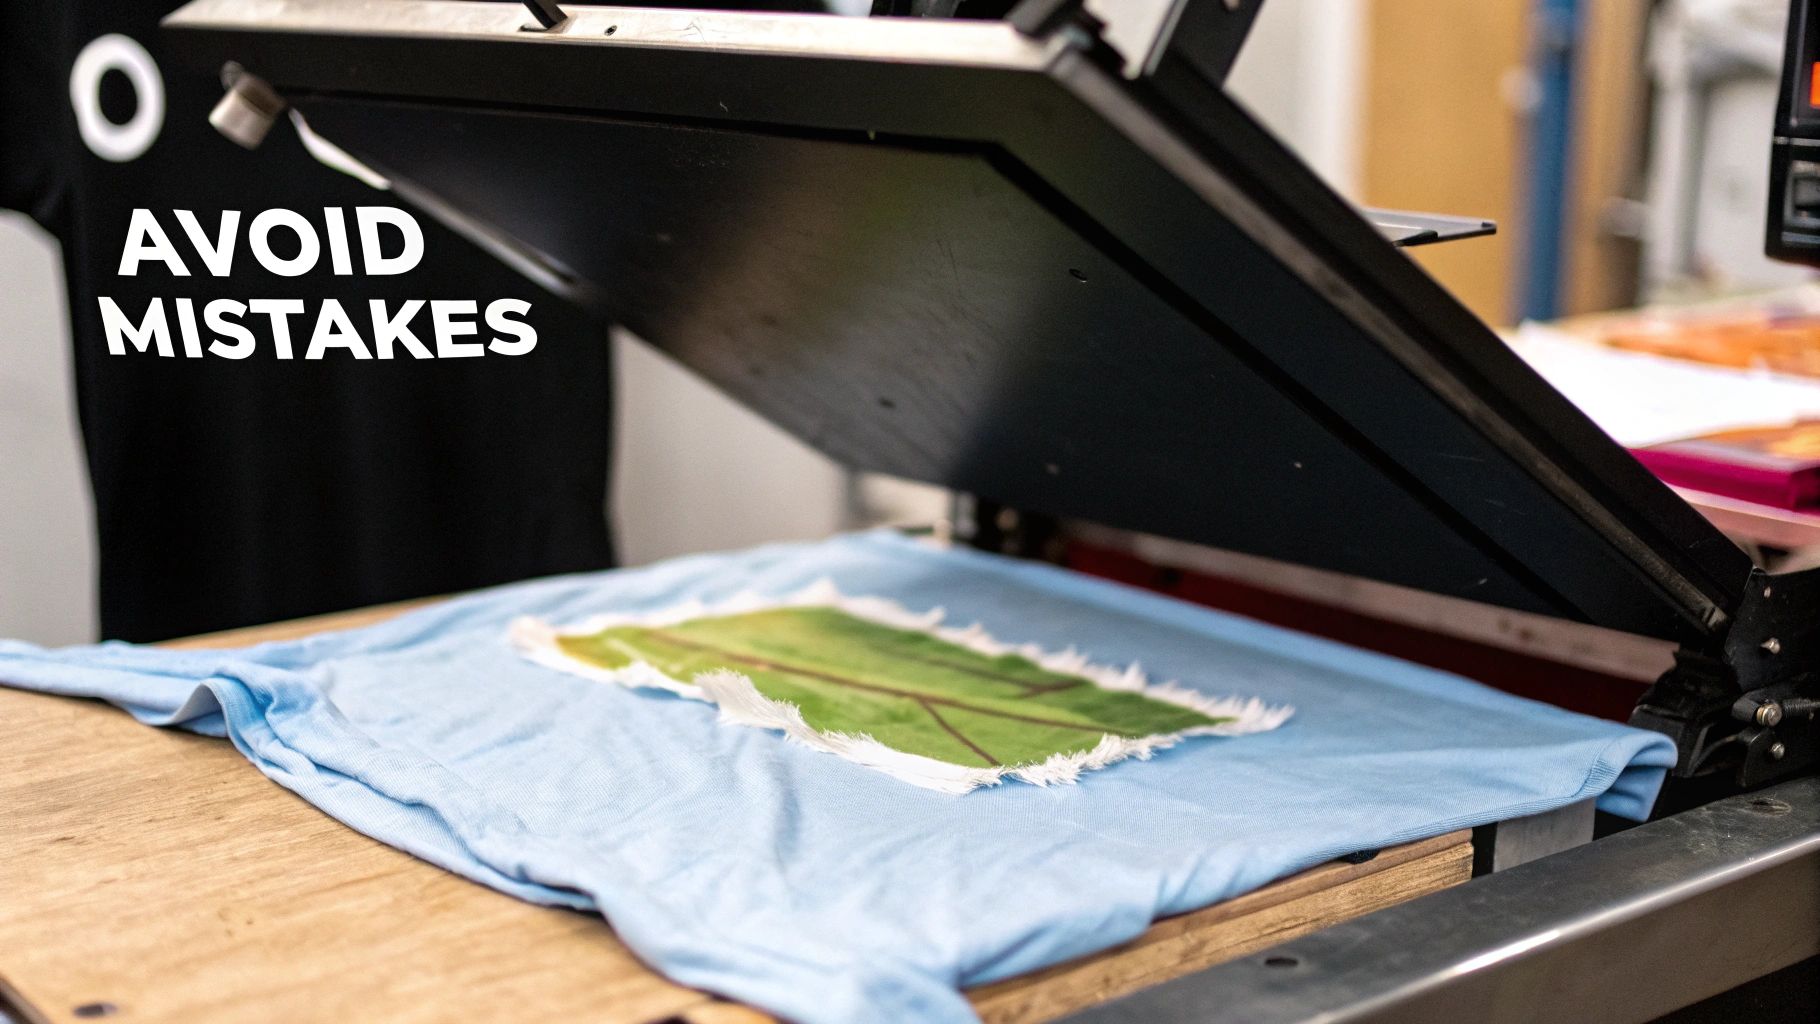
Even when you do everything by the book, you'll eventually hit a snag. A transfer that refuses to stick, a color that looks off—it happens to all of us. The key is knowing how to read the signs and fix the problem. Think of it less as a failure and more as a learning experience.
Nearly every heat press issue I've ever encountered boils down to the same three things: time, temperature, or pressure. Getting that trio perfectly balanced is the secret sauce.
For instance, if you've got a design that's peeling up at the edges right after you press it, or worse, after its first wash, your pressure is almost certainly too low. I can't stress this enough—it's the most common reason for adhesion failure. The adhesive simply didn't get pushed deep enough into the fabric's fibers to form a strong bond.
On the flip side, are your colors looking dull, or do you see a slight brownish, scorched look? Your heat is probably too high. This is a classic mistake, especially on delicate fabrics like polyester, which can get permanently damaged from too much heat.
Pinpointing the Exact Cause
Let's get into the detective work. When a press goes wrong, you need a systematic way to figure out why, instead of just randomly tweaking settings and wasting good transfers.
Here’s a quick cheat sheet based on what I see most often:
- Peeling or Cracking: My first guess is always pressure—it just wasn't firm enough. But also consider your peel timing. Are you peeling a cold-peel transfer while it's still hot? And don't forget the basics: did you do a solid pre-press to get all the moisture out?
- Dull or Faded Colors: This is usually a sign that the ink didn't get what it needed. Either the press wasn't hot enough, or it didn't have enough dwell time to fully cure and pop with vibrancy.
- Sticky Residue or Scorching: This one’s a dead giveaway for too much heat. The adhesive is over-melting and leaving a mess, or you're actually burning the garment. Back the temperature down by 10-15 degrees right away and try again.
A quick pro-tip: Don't automatically blame your settings. Sometimes it's the press itself. Uneven heating across the platen can make one side of your design stick perfectly while the other peels right off. An inexpensive infrared temp gun is a lifesaver for finding these cold spots.
Fixing Issues and Moving Forward
Once you've zeroed in on the likely problem, the fix is usually pretty simple. For pressure problems, crank it up. If you're not sure what "firm" feels like, try the "dollar bill test." Tuck a dollar bill into each of the four corners of your closed press. If you can pull them out easily, your pressure is too light. You should feel some serious resistance.
It's also worth noting that problems can start before the press even gets to your workshop. According to one study, 81.2% of negative reviews for heat presses mentioned poor packaging, and another 6.2% pointed to missing safety instructions. This can mean you're starting with damaged or improperly calibrated equipment from day one. You can read more about these heat press market trends to get a better sense of what to look for.
At the end of the day, troubleshooting is just part of the craft. I highly recommend keeping a small notebook next to your press. Jot down the garment type, the transfer type, and the settings you used. This little logbook will quickly become your go-to guide, helping you nail consistency and solve problems in a flash.
Got Questions About Heat Pressing? Let's Clear Things Up.
Even when you follow the steps, a few questions always seem to pop up. It happens to everyone, from total beginners to seasoned pros. Here are some of the most common things people ask, with straightforward answers to help you press like you’ve been doing it for years.
What’s the Magic Temperature for a Heat Press?
I wish I could give you one magic number, but the truth is, there isn't one. The "best" temperature is all about the specific transfer you're using and what you're pressing it on.
For a standard DTF transfer going onto a 100% cotton shirt, a good starting point is usually somewhere between 300-320°F (150-160°C). But if you switch to a sensitive polyester garment, you'll want to drop that temperature way down to around 270°F (130°C) to keep from scorching the fabric.
Your transfer provider's instructions are your single best source of truth. Always, always check those first.
Can I Just Use My Home Iron Instead?
Technically, for some simple heat transfer vinyl, you could try it. But for a professional DTF transfer? I’d strongly advise against it. A household iron just isn't built for the job; it can't deliver the consistent, even pressure and steady temperature that DTF adhesive needs to properly cure into the fabric.
Irons have notorious hot and cool spots. This means you’ll get an uneven press where one part of your design is perfectly bonded while another corner starts peeling up after the very first wash. A heat press is designed to eliminate that problem by providing uniform heat and pressure, which is absolutely critical for a print that lasts.
I like to put it this way: using an iron for a DTF transfer is like trying to bake a cake with a hairdryer. You've got heat, sure, but you'll never get the consistent, reliable results needed for a quality finish.
Why Is My Design Peeling Off After I Wash It?
This is easily the number one problem people run into, and my experience shows it almost always boils down to one of three things: not enough pressure, the wrong temperature, or skipping the pre-press.
- Pressure: You need firm, even pressure to physically push the melted adhesive deep into the fabric's fibers. If your press is too light, you'll get a weak bond that sits on top of the shirt instead of becoming part of it.
- Temperature: Too low, and the adhesive never fully melts. Too high, and you can burn the adhesive or the garment, weakening the bond.
- Moisture: This one is sneaky. If you don't pre-press the garment to get rid of any lingering moisture, it turns to steam during the press. That steam creates a barrier and stops the transfer from adhering properly.
When troubleshooting a peeling transfer, check your pressure first. More often than not, that’s where the problem lies.
Ready to create stunning, durable custom products with ease? At Raccoon Transfers, we provide premium DTF and UV-DTF transfers with next-day shipping, ensuring you get professional-quality results every time. Upload your design and start pressing today!