
A Crafter's Guide To Perfect UV DTF Cup Wraps
If you’ve ever wanted to create stunning, professional-looking custom cups without the hassle of a heat press, you’re in the right place. UV DTF cup wraps are essentially high-end, permanent decals that use ultraviolet-cured ink to produce incredibly vibrant and durable designs. They stick to hard surfaces like glass, metal, and plastic, making them a fantastic tool for crafters and small businesses alike.
Why UV DTF Cup Wraps Are a Game Changer
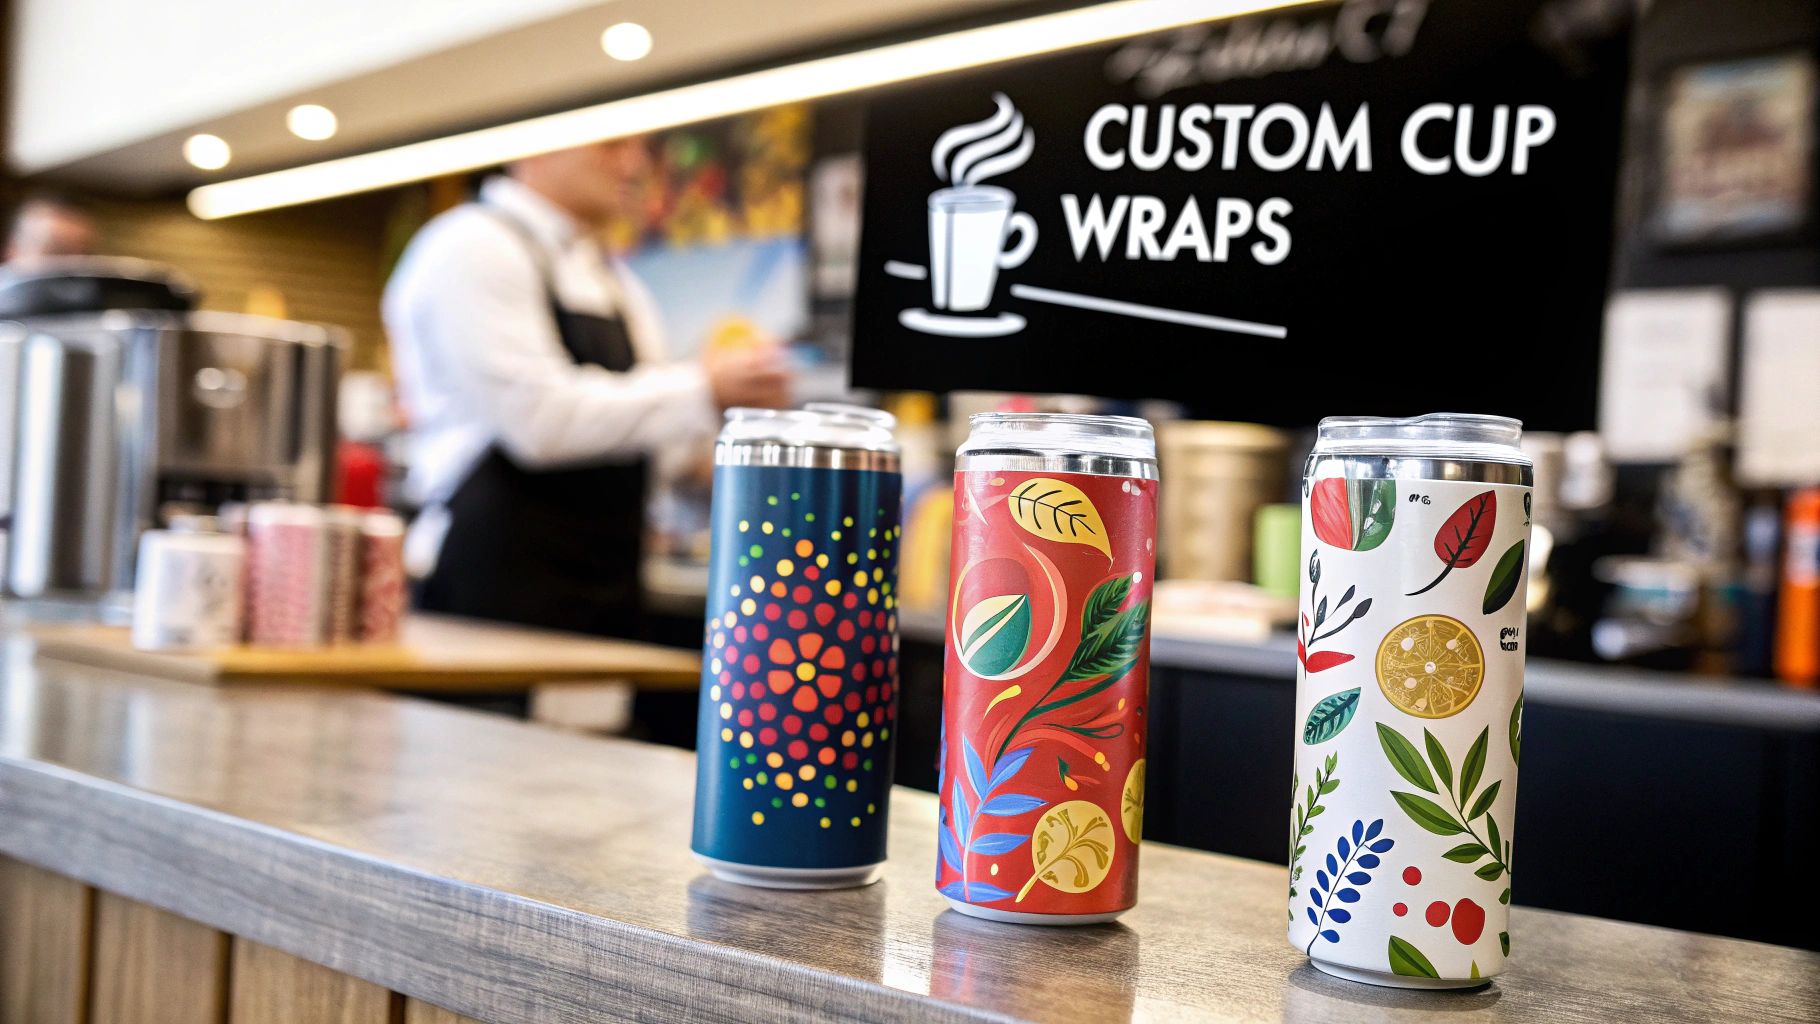
Welcome to the exciting world of custom drinkware, where creating products that look professionally made is now easier than ever. For anyone running an Etsy shop, a small business, or just crafting for fun, UV DTF cup wraps are quickly becoming the go-to for decorating tumblers, glass cans, and mugs. This technology gives you brilliant, long-lasting prints with an application process that’s surprisingly straightforward.
Forget about needing a ton of expensive equipment. These wraps work just like a premium decal—you simply peel, stick, and smooth them onto a clean surface. This opens up a world of creative and commercial possibilities, letting anyone produce high-quality merchandise right from their own workspace. For businesses thinking about this, understanding the importance of premium disposable cups for branding can really put into perspective how much a great-looking cup can elevate your customer's experience.
The Growing Demand for Custom Drinkware
The appetite for custom products is absolutely soaring. In fact, the market for UV DTF cup wraps is on track to hit $389 million by 2026. This boom is largely driven by small coffee shops and independent cafes who’ve seen what a difference these wraps can make.
A whopping 62% of small brands have reported a major boost in sales after making the switch, pointing to the superior color quality and eco-friendly ink curing as key factors.
This trend shows a clear shift in what people want. Consumers are looking for unique, personalized items, and businesses need an efficient way to make that happen. UV DTF technology is the perfect bridge between those two needs.
Key Advantages for Creators and Businesses
So, what’s all the fuss about? It really boils down to a few core benefits that solve some of the most common headaches for creators.
- No Weeding or Layering: Finally, you can forget the painstaking process of weeding vinyl. Every design is printed in full, vibrant color on a single, ready-to-apply sheet.
- Vibrant and Textured Finish: The UV-cured ink doesn't just look good; it feels premium. It creates a slightly raised, glossy finish that adds a tactile quality to your designs.
- Durability and Longevity: These prints are built to last. They’re scratch-resistant, waterproof, and stick firmly to a whole range of hard surfaces.
- Cost-Effective Production: You don't need to invest thousands in a printer setup. Ordering your wraps from a service like Raccoon Transfers lets you get started without the massive upfront cost.
By taking advantage of these benefits, you can transform ordinary glasses and tumblers into highly sought-after products with surprisingly little effort. To dive a bit deeper, check out our guide on exploring UV DTF printing innovations and see what else this technology can do.
Getting Your Artwork Ready for Flawless Wraps
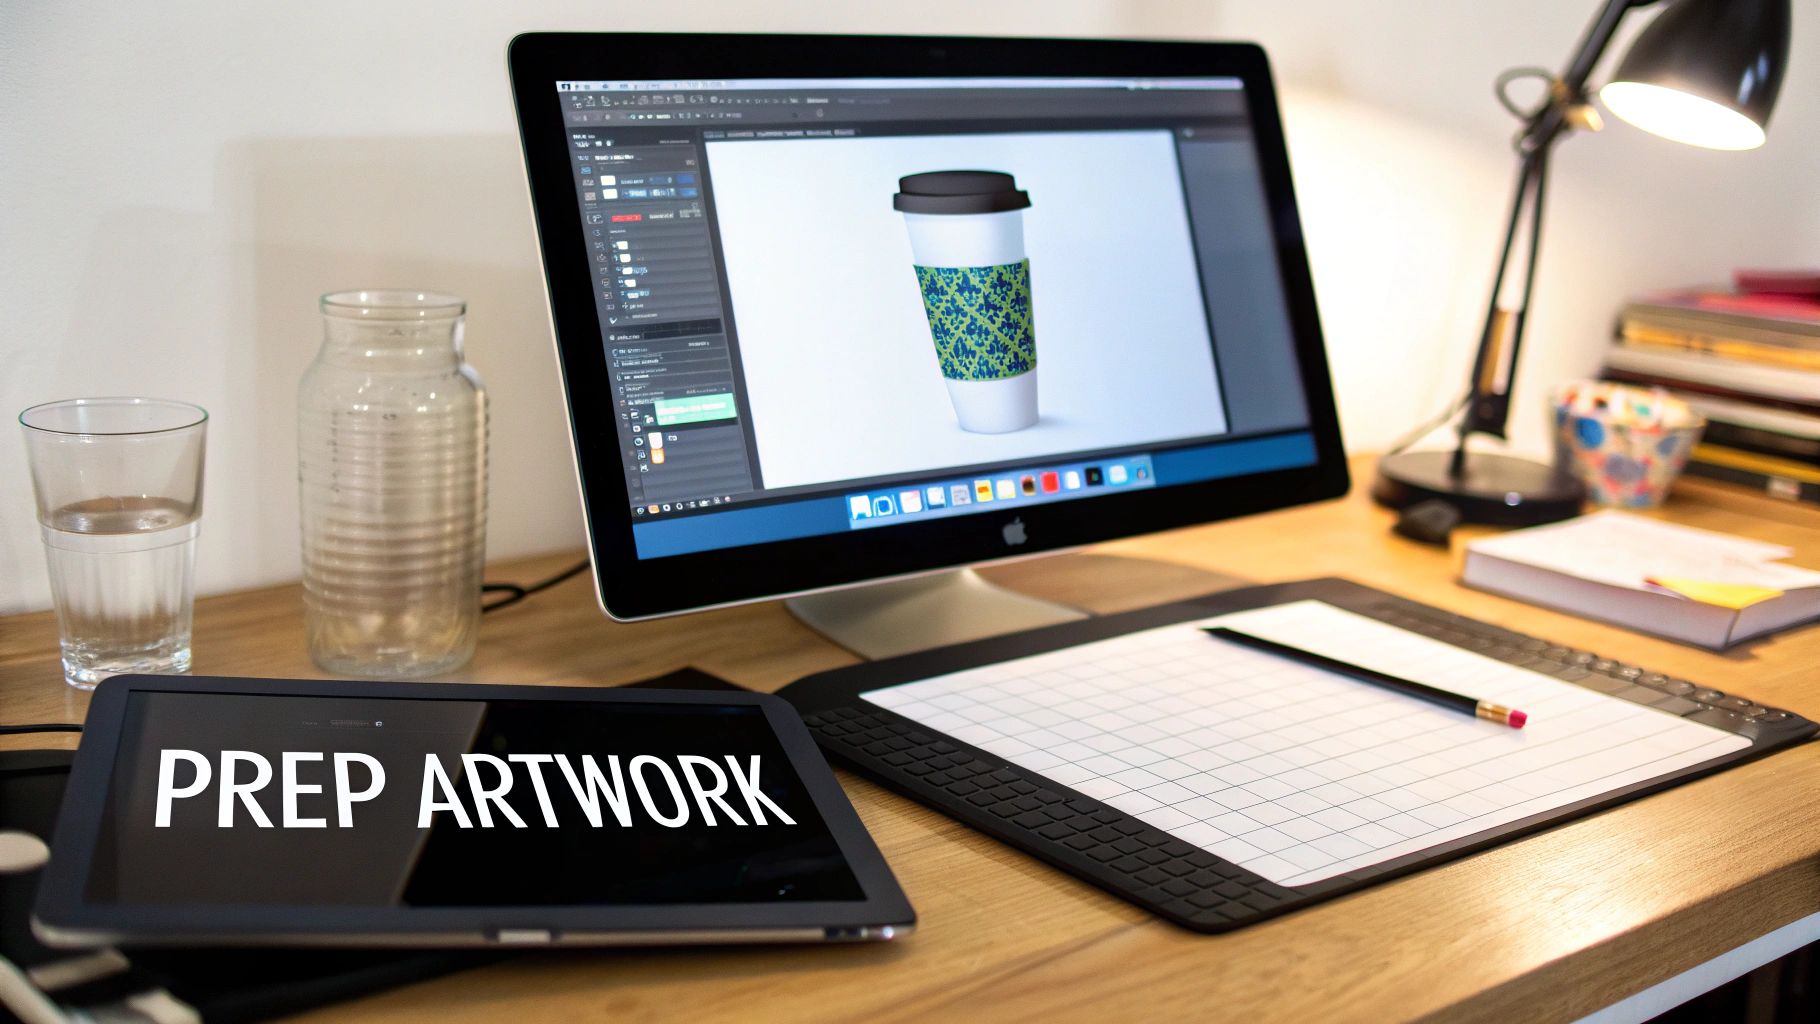
A killer UV DTF cup wrap starts on your screen, long before you even think about peeling and sticking. The truth is, the quality of your final product is a direct reflection of how well you prepare your digital design file. Let's get past the basic advice and dig into the nitty-gritty details that’ll make sure the design you see in your software is exactly what ends up in your hands.
Everything starts with the canvas. Your first move should always be to physically measure your cup's height and circumference with a flexible measuring tape. For a standard 16oz Libbey glass can, you're often looking at a canvas size around 9.3 inches wide by 4.3 inches high, but don't just guess—measure your specific blank to guarantee a perfect fit.
Once you have those dimensions, it's time to set up your file in a program like Adobe Illustrator or Canva. Here's a non-negotiable rule: your resolution must be 300 DPI (dots per inch). If you use a lower resolution, like the 72 DPI standard for websites, you're going to get blurry, pixelated prints that look amateur.
Vector vs. Raster: Why It Really Matters
When you’re creating the artwork itself, you have to know the difference between vector and raster files. It’s a game-changer. Raster images, like JPEGs or PNGs, are built from tiny squares called pixels. Try to make them bigger, and they just get fuzzy and lose all their sharpness.
Vector files (think AI, EPS, or SVG formats) are different; they're based on mathematical paths and points. This means you can scale them up or down as much as you want with absolutely zero loss in quality. This is exactly what you need for those crisp, clean lines in text and logos on your UV DTF cup wraps.
A good rule of thumb I always follow: If the design has text, logos, or any sharp-edged graphics, go with vector. For photos or complex gradients, a high-resolution raster image is fine, but you have to make sure it's sized correctly from the get-go.
Mastering Your Colors and Layers for a Pro Finish
Getting your colors right is another area where the details make all the difference. For instance, did you know that not all blacks are created equal? Instead of using a standard, flat black (100% K), I always recommend a "rich black" composite (something like 60% Cyan, 40% Magenta, 40% Yellow, and 100% Black). This simple tweak gives you a much deeper, more saturated black that won't look washed out after printing.
Just as important is setting up your white ink layer properly. UV DTF printers print a base layer of white ink under the colors. This is what makes your design vibrant and opaque, especially when you're applying it to a clear or dark-colored cup.
Here’s the right way to prepare your file for that white ink base:
- Create a Spot Color: In your design program, make a new spot color swatch. Your print provider will have a specific name for it (like "White" or "Spot_White"), so be sure to use their exact naming convention.
- Put It on Its Own Layer: Make a new layer that sits directly underneath your main artwork. Apply that new spot color to all the parts of your design where you want the white ink to print.
- Double-Check for Transparency: Finally, make sure the background of your file is transparent. Saving your design as a PNG or a layered vector file (like an AI or EPS) will preserve that transparency, which is essential for the printer to know where not to print.
Taking a few extra minutes to get these file prep steps right will save you a world of frustration and disappointing prints down the line.
How to Maximize Your Gang Sheet and Save Money
In any craft business, getting smart about efficiency is how you boost your bottom line. When it comes to ordering UV DTF cup wraps, mastering the gang sheet is one of the easiest wins for managing your costs. Instead of paying for each design one by one, a gang sheet lets you pack multiple graphics onto a single large film, which can seriously slash your cost per print.
Think of it like playing a game of Tetris with your artwork. The goal is to fill every available inch of film with designs, leaving as little white space as possible. This is a game-changer when you're prepping for a big project or event with varied needs. For example, if you're making items for a local market, you could fit two full 16oz cup wraps, a handful of smaller logos for phone grips, and even your business name in a cool font—all on one sheet.
By bundling all these different pieces together, you're paying for the whole sheet, not for each sticker. It's a small change in your workflow that can lead to some pretty significant savings over time.
The Art of Nesting and Spacing
One of the best techniques for this is called "nesting." It’s all about tucking your smaller designs—little logos, text, or accent graphics—into the empty areas around your larger cup wraps. Get creative! Look for the natural gaps and curves in your main designs and see what you can squeeze in there. This kind of smart placement makes sure you’re getting every penny's worth out of the sheet.
While you want to pack it tight, don't forget to leave yourself some room to work. A good rule of thumb is to keep at least a 0.25-inch margin around each individual graphic. That little buffer is a lifesaver when it comes time to cut the transfers apart with scissors or a craft knife. If things are too close, you risk nicking an adjacent design, and nobody wants that.
The market for Direct-to-Film, the technology behind UV DTF, is absolutely booming and is projected to hit $3.92 billion by 2030. For small businesses, using gang sheets isn't just a neat trick; it can cut bulk order costs by up to 35%. That's a huge saving that goes straight back into your pocket.
Building Your Sheet for Success
Tools like the Raccoon Transfers online gang sheet builder make this whole process a breeze. You just upload your PNG files and drag them around a digital canvas, rotating and rearranging them until you've got the perfect, space-saving layout. It puts you in complete control. For a closer look, we've put together a guide on how you can use our builder to your advantage right here: https://raccoontransfers.com/blogs/guides/uv-dtf-gang-sheets.
Getting your gang sheets right is a fantastic first step. If you’re really serious about growing your craft business, you might also want to look into broader strategies to reduce overall operational costs to improve your profitability even more. At the end of the day, spending a little extra time planning your layout is a small investment that pays off big with lower costs, less waste, and a much bigger inventory of designs ready to go.
Applying Your Wrap for a Professional Finish
This is where all your prep work pays off—the moment you turn a printed design into a stunning, finished product. The application process for UV DTF cup wraps is pretty straightforward, but the secret to a professional result is all in the details. Nailing these small steps is what makes the difference between a homemade-looking cup and a piece of merchandise you can be proud to sell.
Start with a Squeaky Clean Surface
Before you even think about touching the wrap, you need to prep your cup. Grab some isopropyl alcohol (a 70% solution is perfect) and a lint-free cloth. Give the entire application area a thorough wipe-down. This simple move gets rid of any hidden oils, dust, or fingerprints that could weaken the adhesive and ruin the bond.
Let the surface air dry completely. Don't rush it! Any lingering moisture can cause major headaches later.
The Peel and Align Method
With your cup prepped and ready, it's time to handle the wrap itself. Carefully peel the carrier film away from the white backing to expose that sticky design. Try your best not to touch the adhesive with your fingers—the oils from your skin are its worst enemy and can compromise the grip.
Now, take a deep breath. This part is crucial. Hold the wrap by its edges and gently position it on the cup. My go-to trick for full wraps is to line up one of the vertical edges first. Just lightly tack it down, then step back and check if it's straight. If it's a bit crooked, you can usually lift and reposition it, but it's always best to aim for a perfect placement on the first try.
Squeegee Techniques for a Flawless Bond
Once the wrap is in place, your mission is to hunt down and eliminate every single air bubble. Start from the center of the design and work your way to the edges. Using a felt-tipped squeegee (or even a credit card wrapped in a microfiber cloth) will help you apply firm, even pressure across the entire surface.
This technique pushes trapped air out and ensures every millimeter of your design makes solid contact with the cup. On curved surfaces like tumblers, you have to be extra methodical. I find that using short, overlapping strokes that follow the cup's contour works wonders. Patience here is key; rushing is a surefire way to end up with wrinkles and bubbles.
Pro Tip: After the initial placement, spend at least 30-60 seconds rubbing over the entire design with your squeegee or thumb. Give extra attention to any fine details and the outer edges. This step activates the pressure-sensitive adhesive, which is vital for getting the design to transfer completely from the carrier film.
This workflow diagram shows how smart file arrangement from the start makes the whole process smoother.
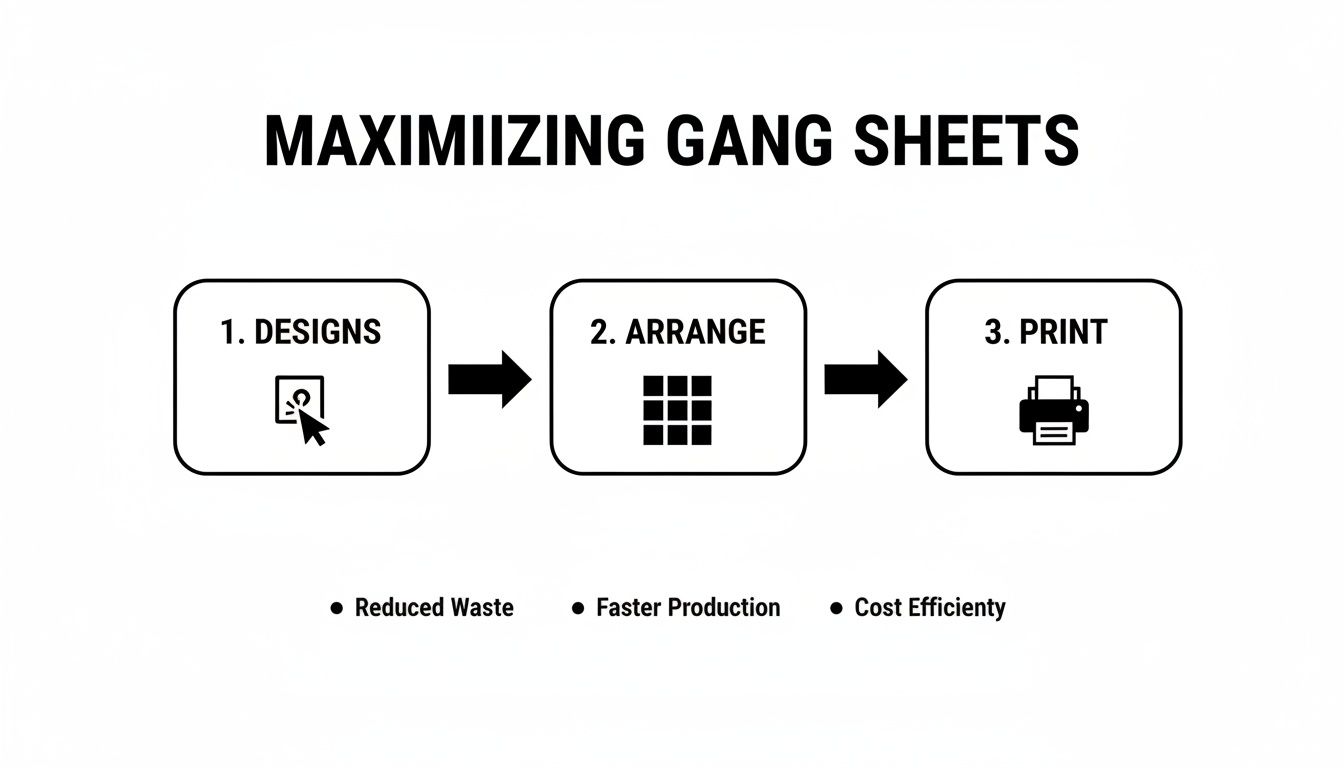
Thinking about how to maximize your gang sheet with well-arranged designs is the first step toward a more efficient and professional workflow.
The Final Peel and Cure
Here comes the best part—the big reveal! Start at a corner and slowly peel the clear carrier film away. The trick is to pull it back at a low, sharp angle, keeping it almost flat against the cup's surface.
If you see any part of the design trying to lift up with the film, don't panic. Just lay the film back down, give that spot another good, firm rub, and then continue peeling.
Once the film is off, your design is officially on the cup! But hold on, you're not quite finished. To get that maximum, long-lasting durability, you need to let the cup sit and cure for at least 24 hours before its first wash or use. This waiting period gives the adhesive time to fully set, creating a bond that’s built to last.
The durability is why the UV DTF market is now valued at over $215 million. These wraps have shown 99% wash resistance after 50 cycles and can keep 95% of their vibrancy after 1,000 hours of UV exposure. That's a professional-grade product. You can learn more about the durability and market growth of UV DTF in industry reports.
UV DTF Wrap Application Troubleshooting
Even with careful prep, you can run into a few snags. This quick reference guide helps you solve common issues during the application process, helping you achieve a flawless finish every time.
| Common Problem | Potential Cause | Quick Solution |
|---|---|---|
| Bubbles or Wrinkles | Air trapped during application; uneven pressure with the squeegee. | Use a pin to poke a tiny hole in the center of the bubble, then press the air out with your finger. For wrinkles, gently lift the edge and re-apply with smooth, overlapping squeegee strokes from the center out. |
| Design Won't Stick | Surface wasn't cleaned properly; adhesive was touched by fingers. | Thoroughly clean the surface again with 70% isopropyl alcohol. Unfortunately, if the adhesive is compromised, the wrap may not be salvageable. Always handle by the edges. |
| Edges Are Peeling/Lifting | Insufficient pressure applied to the edges during application. | Before removing the carrier film, go back and firmly rub all edges with your squeegee or the back of your nail. If peeling after curing, it's often too late to fix permanently. |
| Design Lifts with Carrier Film | Not enough pressure/rubbing before the peel; peeling too fast or at a high angle. | Lay the film back down and rub the lifting area firmly for another 15-20 seconds. Peel very slowly at a low, sharp angle (close to 180 degrees). |
Getting the hang of these little fixes will save you a lot of frustration and wasted materials, turning you into a wrap application pro in no time.
Making Your Custom Cups Last
You've done the hard work of creating a gorgeous, custom-wrapped cup. Now, how do you make sure it stays that way? The secret to a long-lasting design isn't a secret at all—it's all about proper care.
Giving your customers a simple rundown of these care instructions is a game-changer. It sets clear expectations and shows them you're serious about the quality of your work.
The first question you'll always get is, "Can I put it in the dishwasher?" The answer is a hard no. Dishwashers are just too much for these wraps. The intense heat, aggressive detergents, and high-pressure water jets will eventually break down the adhesive and strip away that beautiful glossy finish. To keep the design looking brand new, it has to be hand-washed.
What Makes Them So Tough?
So, why are these wraps so durable in the first place? It all comes down to the UV-cured ink. As the wrap is printed, powerful UV lights hit the ink and instantly harden it into a tough, almost plastic-like layer. This isn't just surface-level; it's a chemical bond that makes the design inherently waterproof and scratch-resistant enough for daily bumps and scrapes.
But "tough" doesn't mean indestructible. I like to compare it to the clear coat on a car—it’s designed to protect, but you wouldn’t take a steel wool pad to it. It’s the same idea here. Scrubbing with an abrasive sponge will inevitably create tiny scratches that dull the finish and could even cause the edges to start peeling back.
The best advice you can give a customer is this: treat it like you would any hand-painted keepsake. Gentle care is what keeps the design flawless and ensures the cup will be a favorite for a long, long time.
Simple Rules for a Long Life
To make it easy for your customers (and for yourself!), a clear set of care instructions is essential. This little extra step can save you a ton of headaches and prevent customer disappointment from accidental damage.
Here are the non-negotiables for taking care of UV DTF cup wraps:
- Hand Wash Only. Always use a soft cloth or sponge with some mild dish soap and warm water.
- Don't Let It Soak. Leaving the cup submerged in a sink full of water for hours can slowly weaken the adhesive.
- No Harsh Chemicals. Keep it away from anything with bleach, alcohol, or other harsh cleaners. Stick to soap and water.
- Not Microwave Safe. The materials used in the wrap simply aren't meant for a trip to the microwave.
Following these simple rules will keep those vibrant, detailed designs looking sharp and professional. If you want to dive deeper into the resilience of these products on other items, our guide on UV DTF stickers is a great resource that covers their durability on all sorts of surfaces.
Common Questions About UV DTF Cup Wraps
When you're first diving into UV DTF cup wraps, a few questions are bound to pop up. It's a pretty straightforward process, but getting some common queries sorted out from the start can save you a ton of time, materials, and headaches. Let's tackle some of the things people ask us most often.
Are UV DTF Cup Wraps Permanent?
Yes, for all intents and purposes, they are. When you apply them correctly, the bond is incredibly strong and designed to last on hard, smooth surfaces.
Of course, "permanent" doesn't mean indestructible. If you take a knife to it, you can definitely scratch or peel the design off. But for normal, everyday use and proper care (think hand washing), that wrap is going to stay right where you put it. The secret sauce is a perfectly clean surface and letting the adhesive cure for a solid 24 hours after application.
Can I Use These Wraps on Any Type of Cup?
You'd be surprised how versatile these wraps are. They work beautifully on a huge variety of common drinkware materials.
- Glass: A perfect match for things like the super popular Libbey glass cans, beer mugs, and wine glasses.
- Metal: Stainless steel tumblers, powder-coated water bottles, and metal mugs are all fair game.
- Ceramics: As long as the ceramic mug is glazed and smooth, the wrap will adhere beautifully.
- Hard Plastics: Things like acrylic tumblers and other rigid, non-porous plastics work great.
The main thing to watch out for is any surface with a silicone or rubbery, "soft-touch" feel. The adhesive just can't get a good grip on those materials, so you'll want to steer clear.
It really all comes down to the surface texture. If it's hard, smooth, and non-porous, you’re probably in good shape. My pro tip? A quick wipe-down with isopropyl alcohol before you apply anything is the key to a flawless stick.
Do I Need a Heat Press for Application?
Nope! And honestly, that's one of the best parts about working with UV DTF cup wraps. Forget about heat presses, mug presses, or convection ovens—you don't need any of it.
This is a true peel-and-stick application. All you need is your clean cup, a squeegee to get firm and even pressure, and your hands. This makes it an amazing choice for crafters who might not have the space or budget for big, bulky equipment. It’s a completely heat-free process.
Why Is My Design Bubbling or Wrinkling?
Ah, the most common frustration I hear about. This almost always boils down to your application technique. Bubbles are just trapped air, and wrinkles happen when the wrap doesn't lay down evenly on a curved surface.
The trick is to always work from the center outward. Tack down the middle of your design first, then use your squeegee to slowly and firmly smooth the wrap down toward the edges. This method pushes the air out as you go instead of trapping it under the design. If a small bubble still sneaks in, you can usually pierce it with a pin and smooth it down.
Ready to create your own professional-grade custom cups? Raccoon Transfers makes it easy to bring your designs to life with vibrant, durable, and easy-to-apply UV DTF cup wraps. Upload your artwork, build a gang sheet, and see the difference quality makes. Get started on your next project at https://raccoontransfers.com.