
A Practical Guide to UV DTF Gang Sheets
If you've ever felt the frustration of wasting material on small, one-off print jobs, then UV DTF gang sheets are about to become your new best friend. Simply put, they're a way to print multiple designs on a single, large sheet. It’s the printing equivalent of carpooling—grouping everything together to save time, resources, and money.
This method is a game-changer for anyone in the custom printing world, whether you're a small Etsy shop owner or a large-scale business.
Unlocking Efficiency with UV DTF Gang Sheets

Think about baking a batch of cookies. You wouldn't just bake one cookie at a time on a massive baking sheet, right? Of course not. You’d fill that sheet with as many different cookies as you could fit to make the most of your oven space and time. That’s the exact idea behind UV DTF gang sheets. They let you combine all sorts of different designs—logos, labels, detailed graphics, you name it—onto one big transfer film.
This incredibly practical approach has shaken up the custom printing and labeling industry. Instead of the tedious process of setting up the printer for every single small design, you run everything in one go. This shift to a single, efficient operation is a massive win for everyone involved.
The Power of Consolidation
At its core, using a gang sheet is just smart resource management. Every square inch of that transfer film costs money, and any blank space is essentially money down the drain. By packing your designs closely together, you can slash your material waste.
The magic really happens when you optimize every bit of printable area. A well-planned layout can cut your material waste by a staggering 30%-50%. The exact amount depends on your designs, but the savings are always significant.
This reduction in waste has been a huge deal for the labeling and custom printing world, making it possible for businesses of all sizes to operate more efficiently and profitably. You can learn more about how this approach optimizes material usage in the printing industry.
Immediate Benefits You Can See
Switching to gang sheets isn't some abstract, long-term strategy; you'll see the difference right away. It’s not just about pinching pennies on materials, either. It fundamentally changes your entire production workflow for the better.
Here’s a quick rundown of what you can expect when you start using UV DTF gang sheets.
Key Benefits of UV DTF Gang Sheets at a Glance
| Benefit | Impact on Your Business |
|---|---|
| Cost Savings | Slashes the per-sticker cost by printing more designs on the same amount of film. |
| Time Efficiency | One print setup for many designs means you get more jobs done, faster. |
| Reduced Waste | Less unused film makes your process greener and boosts your bottom line. |
| Increased Flexibility | Print a mix of different designs and sizes in one go, perfect for fulfilling varied orders. |
Once you grasp this core concept, you're ready to dive into the more advanced techniques that make UV DTF gang sheets such an essential tool in modern custom printing.
Why Gang Sheets Are a Smarter Way to Print
Making the switch from printing designs one-by-one to using UV DTF gang sheets isn’t just a small tweak to your process—it’s a complete overhaul of your production strategy. The whole idea is to get smarter about how you use your time, money, and materials. By grouping multiple designs onto a single sheet, you fundamentally change the math behind every print job.
Think about it: instead of running the printer for every single sticker or logo, a gang sheet bundles them into one efficient run. This simple shift gives any business, big or small, the kind of production power that used to be reserved for huge operations. It makes custom printing more profitable and accessible than ever.
Drastically Lower Your Production Costs
The first thing you’ll notice with gang sheets is how much money you save. It’s an immediate and powerful benefit. Every time you print a single design, you’re paying for the film, the ink, and the printer's time. A big chunk of that cost is literally thrown away—it's the unused material around your design.
Gang sheets get rid of that waste. By packing a large sheet with dozens or even hundreds of different designs, you spread the cost of the film and a single print run across all of them. Suddenly, the price for each individual transfer drops dramatically, which goes straight to your bottom line.
This efficiency is a huge reason the custom printing world is growing so fast. By grouping designs, businesses can slash their material consumption by up to 40%. That’s a massive saving.
Accelerate Your Production Workflow
In this business, time is money. Gang sheets are one of the best time-saving tools you can have. Just picture the old way: get an order, set up the printer, print one design, then stop and repeat the whole thing for the next customer. That stop-and-start workflow creates massive bottlenecks and caps what you can produce in a day.
Gang sheets turn that choppy process into a smooth, continuous flow. You can prep and print a huge sheet filled with designs for multiple different orders all in one go. This cuts machine setup time to almost nothing and keeps your printer doing what it does best: printing.
Printing in batches on a single sheet means you can get more orders out the door, faster. This lets you grow your capacity without buying more equipment, making your business far more scalable and ready to handle whatever demand comes your way.
This workflow is a clear step up from older methods. To really see the difference, check out our guide comparing UV DTF vs. traditional UV printing for a deep dive into their workflows and efficiency.
Minimize Waste and Boost Sustainability
Being sustainable isn't just a buzzword anymore; it's smart business. Wasted material is wasted money, period. The entire concept of UV DTF gang sheets is designed around cutting waste, making your operation leaner and greener.
By carefully arranging your designs to use every possible inch of the film, you dramatically reduce how much material ends up in the trash. This isn't just about being tidy—it's about getting the most value out of every single sheet you buy.
This approach gives you two key advantages:
- Financial Savings: You buy less raw material because you're using what you have more effectively.
- Environmental Responsibility: A smaller footprint means less plastic and chemical waste, which is a big deal for today's eco-conscious customers.
At the end of the day, using gang sheets helps you build a smarter, more profitable, and more sustainable printing business from the ground up.
How to Prepare a Flawless Gang Sheet File
Putting together the perfect UV DTF gang sheet file isn't so much about artistic genius as it is about smart, technical setup. Think of it like a blueprint. If the architect's plans are off, the building will have problems. The same thing happens here—a well-prepped file is the bedrock of a great print run.
Getting this right from the start saves you a world of headaches, like paying for reprints, throwing away materials, and dealing with frustrating delays. Let's walk through the essential settings and layout tricks that turn a bunch of separate designs into a single, print-ready masterpiece.
Nail the Technical Specifications First
Before you even start arranging your designs, you absolutely have to get your file settings dialed in. These aren't just suggestions; they're non-negotiable rules for professional printing that directly control the sharpness, color accuracy, and overall quality of your transfers.
Here are the three big ones you have to get right:
- Resolution: Your file needs to be 300 DPI (dots per inch). Period. This is the gold standard for high-quality printing. Anything lower, like the 72 DPI often used for websites, will give you blurry, pixelated transfers that just look amateur.
- Color Mode: Set your file to CMYK (Cyan, Magenta, Yellow, Key/Black). Your computer screen shows colors in RGB (Red, Green, Blue), but printers physically mix CMYK inks to make colors. If you design in RGB, you’re in for a surprise when the printed colors don't match what you saw on screen. Designing in CMYK avoids this.
- Background: The background of your file must be 100% transparent. This is critical. Any color, even plain white, will get printed. A transparent background is the only way to ensure just your designs are printed, giving you those clean, die-cut style decals.
Choose the Right File Format
Once your technical settings are locked in, you need to save your file in a format that actually protects all that careful work. When it comes to printing, not all file types are created equal.
For gang sheets, these are your best bets:
- PNG: This is a fantastic go-to. It handles high resolutions perfectly and, most importantly, fully supports a transparent background.
- TIFF: Print pros often lean on TIFF files because they are "lossless"—meaning the quality never degrades, no matter how many times you open and save them. They also handle transparency and CMYK color without a problem.
- PSD (Photoshop): If you're working in Adobe Photoshop, saving a layered PSD file with a transparent background is also an excellent choice.
Steer clear of formats like JPG. They don't support transparency and use compression that can make your beautiful designs look grainy and soft.
Optimize Your Layout Like a Pro
Alright, now for the fun part: arranging your designs on the sheet. The goal here is to use every last inch of that film. Think of it as a game of Tetris where every empty spot is wasted money. A tightly packed UV DTF gang sheet slashes waste and brings down your cost for each individual transfer.
This image shows how a prepared sheet goes through the printing process, which really drives home why a good layout is so important.
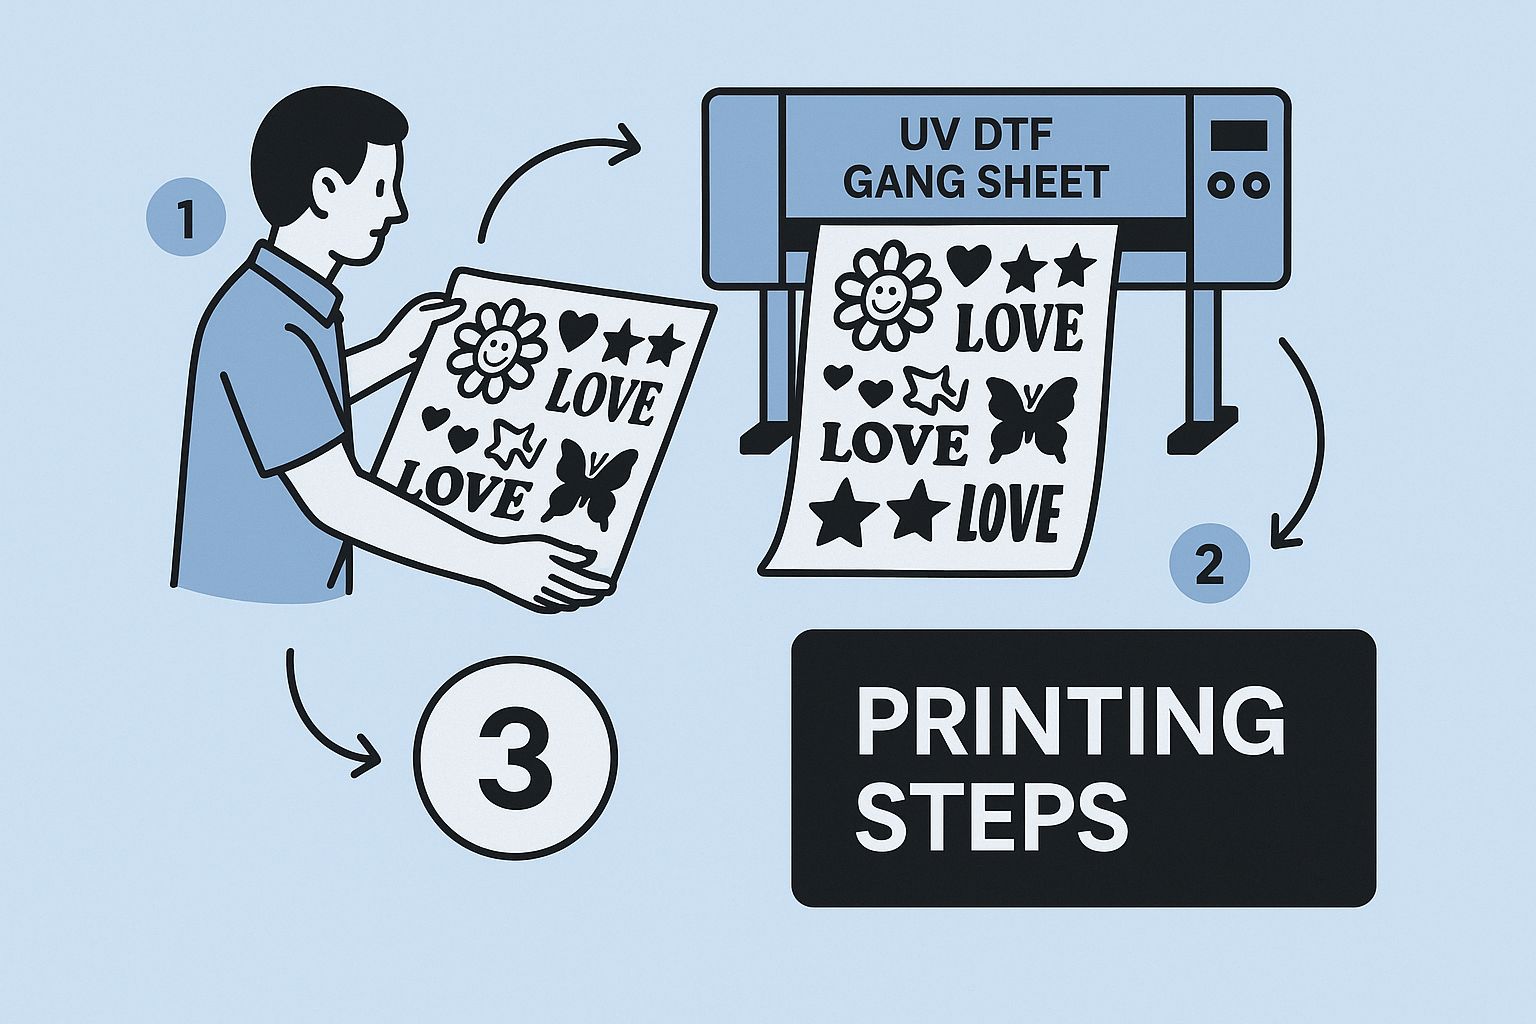
As you can see, the whole sheet prints as one unit. Maximizing that surface area is the key to an efficient and profitable operation.
Here’s how to create a killer layout:
- Group by Size: Always start by placing your largest designs first. This creates a solid foundation and leaves you with smaller, more manageable gaps to fill in later.
- Nest Smaller Designs: This is where the real magic happens. Tuck your smaller logos, text, or little icons into the empty spaces around and even inside your bigger graphics. Got a design shaped like a "C"? That empty space in the middle is prime real estate for a small, circular logo.
- Rotate and Flip: Don't be shy about spinning your designs around. Sometimes turning an image 90 or 180 degrees is all it takes to make it fit snugly and open up a surprising amount of space.
Pro Tip: Always leave a small buffer—a "safe margin" of at least 0.25 inches—around each individual design. This gives you enough room to comfortably cut them apart after printing without the risk of nicking an adjacent transfer.
Tools like the Raccoon Transfers gang sheet builder make this whole process way easier. You can visually drag, drop, and rotate your images to get the perfect fit without needing to be a graphic design wizard.
Master these file prep steps, and you'll be on your way to producing flawless UV DTF gang sheets every single time.
Using a Gang Sheet Builder to Place Your Order
Got your design files ready to go? Awesome. Now it's time to arrange them for printing, and this is where a gang sheet builder becomes your best friend. Forget wrestling with complex design software or hiring a graphic designer; this tool turns the whole layout process into a simple, visual, and honestly, kind of fun, drag-and-drop experience.
Think of it as a virtual canvas. Online builders, like the one we have here at Raccoon Transfers, let you see exactly how your designs will look on the final UV DTF gang sheet before you spend a dime. You’re in the driver's seat, arranging everything perfectly to get the most bang for your buck.
Step 1: Upload Your Designs
First things first, let's get your artwork onto the canvas. This part is a breeze. A good builder will happily accept standard file formats like PNG, TIFF, or PSD, which are ideal for keeping those crisp details and transparent backgrounds intact.
You can typically upload all your files at once. They’ll pop up in a neat little gallery on the side, ready for you to start placing them on the sheet. It keeps everything tidy so you can focus on the creative part: the layout.
Step 2: Arrange and Optimize Your Layout
This is where the magic really happens. Instead of guessing how things will fit, you can visually place, tweak, and perfect your arrangement right on the screen.
- Drag and Drop: Just click on a design and drag it onto the sheet. You can slide it around until you find the perfect home for it.
- Resize and Rotate: Need that logo a bit smaller? Just grab a corner and scale it. You can also rotate designs, which is a lifesaver for tucking odd-shaped graphics into those little empty nooks and crannies.
- Duplicate Instantly: Want ten copies of a best-selling sticker design? No problem. A simple click of the duplicate button saves you from uploading the same file over and over, letting you fill up your UV DTF gang sheet in seconds.
The name of the game is efficiency. Your goal is to pack that sheet as tightly as possible, leaving minimal empty space. A well-organized gang sheet means a lower cost per transfer, which is exactly what we're all after.
If you're new to this, seeing how it all comes together can be the trickiest part. That's why we put together a detailed walkthrough. You can learn the ropes by checking out our guide on the UV DTF gang sheet builder for step-by-step instructions and a few pro tips.
Step 3: Finalize and Place Your Order
Once your masterpiece is complete and you’re happy with the layout, you’re on the home stretch. The builder will show you the final dimensions and calculate the price right then and there, so there are no surprises when you check out.
Before you hit that "buy" button, give your sheet one last look. Make sure you’ve left a tiny bit of room between each design for easy cutting and that nothing is accidentally overlapping. After that final check, just add the sheet to your cart and you're good to go. The whole process puts professional-grade printing power right at your fingertips.
Applying Your Transfers for a Professional Finish
A brilliantly designed and printed UV DTF gang sheet is only half the battle. The real test is the application. A flawless application turns a great print into a premium product, while a rushed job can undo all your hard work. Fortunately, the process is pretty straightforward once you get the hang of it.
Think of it like putting a high-quality screen protector on a new phone. You wouldn't just slap it on and hope for the best, right? You'd meticulously clean the screen to get that perfect, bubble-free bond. The same principle applies here—good prep work is everything if you want a durable, long-lasting finish.
This section will walk you through the techniques you need to make every transfer look like it was done by a seasoned pro.
The Foundation of a Great Application is Surface Prep
Before you even think about peeling the backing off your transfer, you have to prep the surface, or substrate. This is, without a doubt, the most important step in the entire process. Any dust, oil from your fingers, or other residue will prevent the adhesive from getting a clean grip, leading to poor adhesion and peeling down the road.
To get it right, just follow this simple cleaning process:
- Start with a Clean Cloth: Grab a lint-free microfiber cloth and give the surface a good wipe to get rid of any loose dust or debris.
- Use Isopropyl Alcohol: Lightly dampen a clean part of the cloth with isopropyl alcohol (rubbing alcohol) and wipe down the entire area where the transfer will go. This cuts through any oils or gunk you can't see.
- Let It Dry Completely: Just give it a minute or two to air dry. If you try to apply the transfer while the surface is still damp, the adhesive won't stick properly.
This quick prep work ensures the transfer's adhesive can form the strongest possible bond with the item, making it tough enough to handle scratches and daily wear.
The Peel, Stick, and Press Method
Once your surface is clean and dry, you’re ready for the fun part. Applying a UV DTF transfer is beautifully simple and doesn’t require any heat, which is why it's perfect for all sorts of hard surfaces like glass, metal, plastic, and treated wood. It all comes down to a simple three-step method.
The key to a bubble-free finish isn't speed; it's steady, even pressure. Rushing is the number one cause of application errors. Take your time to make sure the adhesive makes full contact everywhere.
Imagine you're smoothing a wrinkle out of a bedsheet—you'd start from the center and work your way out. It’s the same idea here.
Here’s the step-by-step process:
- Peel the Backing: Carefully peel the white paper backing away from the clear carrier film. This will expose the sticky side of your design. Try not to let the adhesive touch anything except your prepared surface.
- Position and Stick: Line up your transfer carefully. Once you’re happy with the placement, press one edge down firmly. Then, slowly lay down the rest of it, using your finger or a squeegee to smooth it out from the center.
- Apply Firm Pressure: This is where the magic happens. Using your thumb or a squeegee, rub firmly over the entire design right through the clear film. Pay extra attention to the edges and any small, detailed parts to make sure they're fully bonded.
- Remove the Carrier Film: After you’ve given it a good press all over, slowly and carefully peel the clear carrier film away. The trick is to pull it back at a low, sharp angle for the cleanest release.
And that’s it! Your vibrant, durable design will be perfectly applied, looking sharp and professional. This simple, heat-free process is what makes applying designs from UV DTF gang sheets so versatile and popular for customizing a huge range of products.
Creative Ways to Use UV DTF Transfers
The real magic of UV DTF gang sheets happens when you move past simple logos and labels. Think bigger! Since these transfers can stick to just about any hard, smooth surface without needing a heat press, they open up a huge world of creative projects and product ideas. Their durability and knockout vibrant finish are perfect for creating high-end, custom goods that really stand out.
The possibilities are pretty much endless, from promotional gear to one-of-a-kind personal accessories. What makes these transfers so special is their knack for adhering to weird shapes and tricky materials where other printing methods just can't compete. This makes them the go-to tool for adding a professional, permanent touch to items that used to be a real headache to customize.
Elevate Promotional Products
Let's be honest, nobody gets excited about another cheap pen. With UV DTF transfers, you can create promotional items people will actually keep and use. The scratch-resistant finish means your branding stays looking sharp, even on stuff that gets handled every day.
- Custom Keychains: Apply detailed, full-color logos to acrylic or metal keychains for a sleek, premium feel.
- Phone Grips and Cases: Offer personalized phone accessories with intricate designs that won't peel or fade from constant pocketing and use.
- Branded Tumblers and Mugs: Add permanent, waterproof logos to stainless steel tumblers, glass mugs, and ceramic cups—no special equipment required.
Unique Home and Event Decor
You can also use these transfers to craft stunning personalized decor, which is perfect for an Etsy shop, craft fairs, or special events like weddings. The ability to print on materials like glass, wood, and acrylic is a game-changer.
The real opportunity lies in transforming everyday objects into personalized art. A simple glass jar becomes a custom candy jar for a wedding, and a plain wooden sign becomes a cherished piece of home decor. This adds perceived value far beyond the cost of the transfer itself.
For instance, you can easily apply elegant designs to glass candle holders, personalize a set of wooden coasters with a family name, or create beautiful custom signage for an event on clear acrylic sheets. The application feels as simple as putting on a sticker, but the result looks permanent and high-end. To get your own creative juices flowing, you can explore more of these innovative UV DTF printing applications and see what others are making.
Personalize Everyday Accessories
Of course, one of the most popular uses is simply personalizing the gear we use every single day. From laptops and tablets to water bottles and toolboxes, UV DTF gang sheets make it incredibly easy to add a touch of personality that actually lasts. The tough adhesive and durable finish can handle the bumps and scrapes of daily life, making them a seriously practical choice for customizing your personal items.
Got Questions About UV DTF Gang Sheets? We’ve Got Answers.
Even after getting the rundown, it's totally normal to have a few questions pop up. When you're putting your money into custom prints, you want to be sure you're getting something that looks great, lasts, and works for your project. Let's tackle some of the most common questions about UV DTF gang sheets so you can order with confidence.
Think of this as your go-to cheat sheet. We'll get straight to the point and give you clear, practical answers to help you make the most of your transfers.
Are UV DTF Transfers Waterproof and Durable?
You bet they are. In fact, that’s one of their standout features. Once you apply a UV DTF transfer correctly, it forms a permanent, waterproof seal on the surface. The ink is cured with UV light, making it incredibly resistant to water, scratches, and sun-fading.
This built-in toughness makes them a fantastic choice for items that get handled a lot or are exposed to the weather. For instance:
- Drinkware: Go ahead and hand-wash those custom mugs and tumblers. The design isn't going anywhere.
- Outdoor Signage: These transfers can stand up to rain and sun without losing their pop.
- High-Touch Items: They’re perfect for branding things like phone cases, keychains, and laptops.
A quick heads-up: while they’re incredibly resilient, we recommend skipping the dishwasher or any harsh, abrasive scrubbing. A simple hand wash is all it takes to keep them looking sharp for the long haul.
Can I Really Stick These on Any Surface?
Just about! The versatility of UV DTF transfers is a game-changer. They adhere beautifully to a huge variety of hard, non-porous surfaces—even the tricky ones like glass, metal, plastic, acrylic, ceramics, and finished wood.
The secret is a clean, smooth surface. These transfers aren't made for fabrics or porous materials like raw wood or terracotta because the adhesive needs a solid, non-absorbent foundation to create that super-strong bond. If you’re ever in doubt, it’s always a good idea to test a small, hidden spot first.
What’s the Deal With Sustainability?
Great question. As more of us look for eco-conscious options, it's good to know where things stand. Using UV DTF gang sheets is a smarter, greener way to print. When you fit multiple designs onto one sheet, you use every inch of the film, which can slash material waste by up to 50% compared to printing one-off decals.
That efficiency trickles down—less raw material used, less packaging for shipping, and a smaller footprint overall. Plus, the entire process is heat-free, which cuts out the energy draw you'd see with a traditional heat press. You can find more details on how gang sheets support eco-friendly printing on dtftransfersnow.com.
Ready to bring your own durable, eye-catching designs to life? At Raccoon Transfers, our gang sheet builder is designed to be simple, and we back it up with a speedy, 24-hour turnaround. Start building your custom UV DTF gang sheet today!