

DTF Print Size: Complete Reference Guide for 2026
You're probably here because a design that looked right on screen looked wrong on a shirt. That happens every day with DTF. The file isn't always the problem, and the printer isn't always the limit. Most of the time, the issue is that people treat dtf print size like a fixed chart when it's really a fit decision.
A buyer says they want a “large front.” A designer builds to the printer's max width. Then the transfer lands on a fitted women's tee, a youth blank, or a heavyweight oversized shirt, and the proportions are off. The print may be technically correct, but it still looks wrong on the garment.
In production, the better question isn't “what's the biggest size I can print?” It's “what size fits this garment, this placement, and this file without compromising output?” That's the standard that matters.
What DTF Print Size Actually Controls
DTF print size is controlled by three constraints in sequence. If you get the order wrong, you usually end up resizing late, wasting film, or pressing a transfer that feels oversized for the blank.
First comes media width. DTF output is width-locked. Shops usually build layouts as width × length because the printer's film width is fixed while the length can scale. Common production widths include 13 in, 22 in, and 24 in, with gang sheets often built in sizes like 22 × 24 in, 22 × 48 in, 22 × 72 in, and 22 × 96 in according to the DTF gang sheet optimization guide.
Right after that comes garment placement. A printer may accept a wide sheet, but the shirt doesn't. A chest panel, back panel, sleeve, or label area creates the boundary.
This visual sums up the relationship:
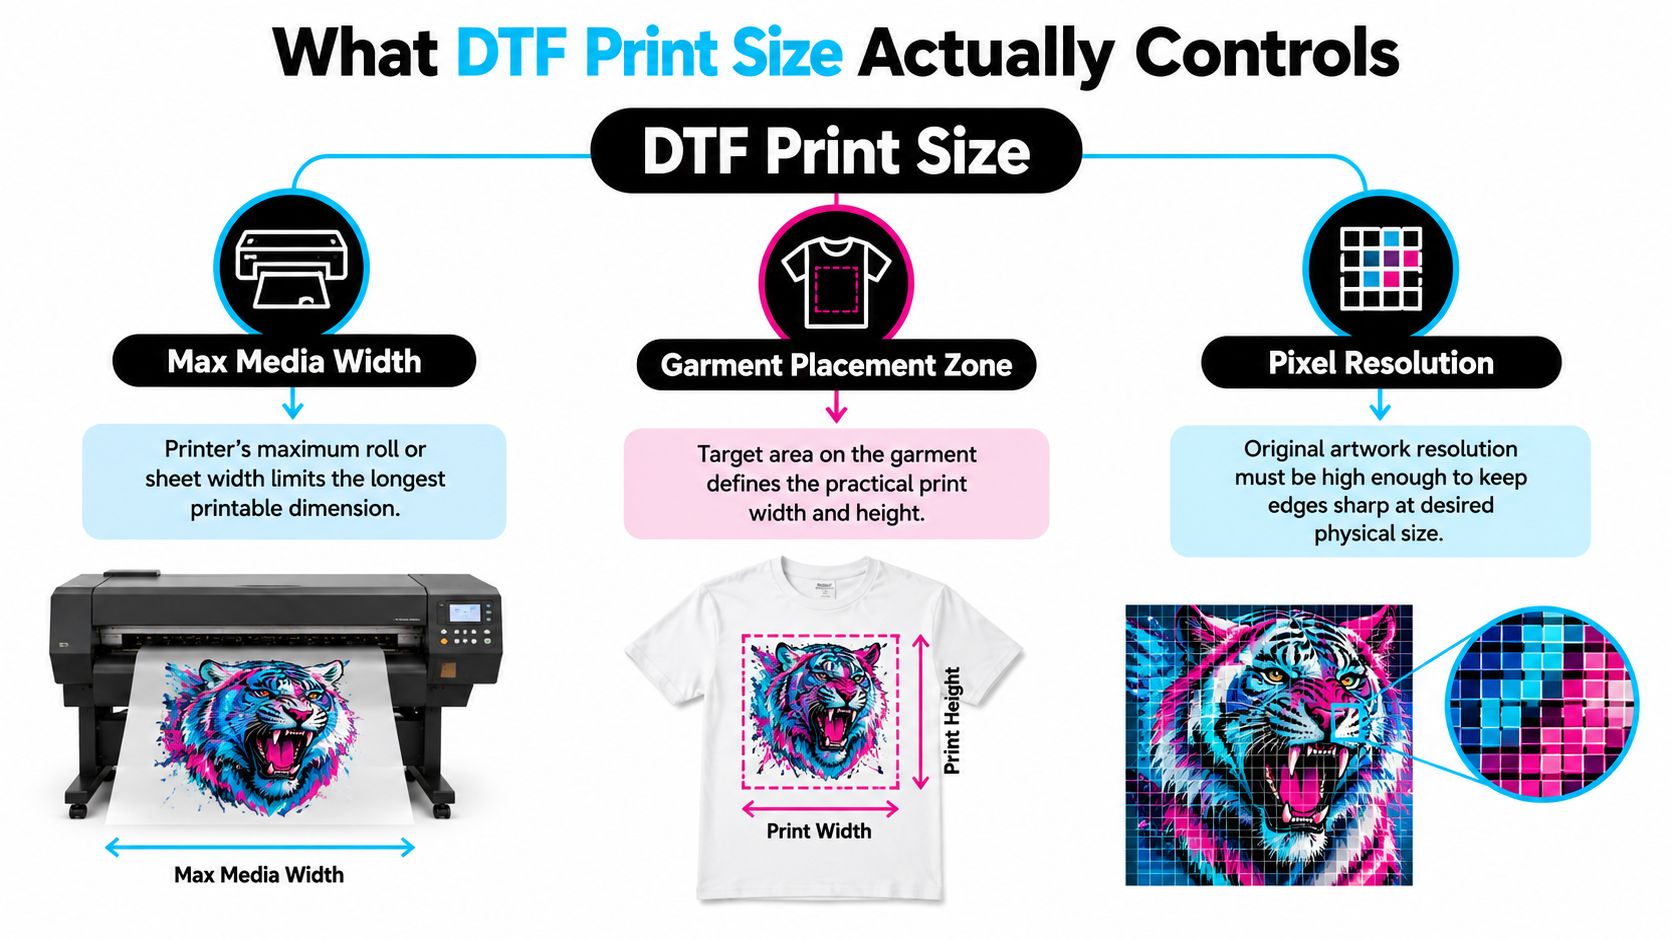
The three checks that matter
-
Start with printer width
If your setup runs narrow media, you can't fake your way into a wide adult front without compromises. -
Check the placement zone on the actual blank
The shirt decides whether the print looks balanced. The file doesn't. -
Build the file at final output size
Resolution only matters at the printed dimensions. A small file stretched at RIP stage may still print at the requested size, but it won't print clean.
Practical rule: Pick width first, placement second, and file dimensions last. Reversing that order causes most size problems.
What buyers usually misunderstand
People often confuse maximum printable width with ideal finished size. Those aren't the same thing. A transfer can fit the film and still look cramped, too dominant, or awkwardly placed once it's pressed.
That's why good dtf print size decisions always connect the machine to the garment. The printer sets the ceiling. The shirt sets the usable target. The artwork determines whether the result holds detail at that target.
Standard DTF Sheet and Roll Formats
DTF output falls into two camps. Cut sheets suit small runs, samples, and compact machines. Roll media suits repeat production, gang-sheet workflows, and longer unattended runs.
For small-format work, standardized sheets still matter. A neutral market summary notes that DTF commonly uses A3 and A4 formats in smaller setups, with A3 at 297 × 420 mm, or about 11.7 × 16.5 inches, and A4 at 210 × 297 mm, or about 8.3 × 11.7 inches in this DTF film sheet market overview. Those sizes make sense for desktop users, test prints, and low-volume orders.
Roll production is different. Film is sold in widths that map directly to printer class. Desktop systems often run 30 cm (11.8 in) or 33 cm (13 in), while wider systems commonly run 60 cm (23.6 in), 66 cm (26 in), or 76 cm (30 in) on 100 m (328 ft) rolls, as listed in the DTF film media width reference.
Standard DTF Sheet and Roll Formats at a Glance
| Format | Dimensions | Format Type | Typical Printer Class | Order Volume Fit |
|---|---|---|---|---|
| A4 | 210 × 297 mm / about 8.3 × 11.7 in | Sheet | Desktop | Samples, labels, very small runs |
| A3 | 297 × 420 mm / about 11.7 × 16.5 in | Sheet | Desktop or compact small business setup | Small orders, sample apparel graphics |
| 30 cm roll | 30 cm × 100 m / 11.8 in × 328 ft | Roll | Desktop | Short runs and small placements |
| 33 cm roll | 33 cm × 100 m / 13 in × 328 ft | Roll | Desktop or entry production | Logos, youth fronts, compact gang sheets |
| 60 cm roll | 60 cm × 100 m / 23.6 in × 328 ft | Roll | Wide-format production | Adult fronts, larger gang sheets, repeat work |
| 66 cm roll | 66 cm × 100 m / 26 in × 328 ft | Roll | Wide-format production | Larger mixed layouts and oversized jobs |
| 76 cm roll | 76 cm × 100 m / 30 in × 328 ft | Roll | Wide-format production | High-throughput and wide-format layouts |
How to choose between sheets and rolls
Sheets are easy to load and easy to understand. They're also limiting once order count rises. Rolls make more sense when you're running multiple SKUs, batching chest logos, or trying to keep the printer moving.
If you're building a merch workflow rather than just ordering one-off prints, it helps to compare that file-prep reality with a broader fulfillment model like the PuppetVendors POD page, especially if you're deciding whether to stock blanks, print in-house, or route recurring orders differently.
If you already know the exact transfer dimensions you want, Custom DTF Transfer by Size: Perfect Prints for Every Project is one example of a by-size ordering format, which is often easier for brands that have already standardized placement specs.
Comparing 13-Inch, 22-Inch, and 24-Inch Widths
A customer asks for a 12-inch front print on an oversized hoodie. On paper, that sounds fine on any of these widths. In production, the question is how much of the film width becomes usable art after side margins, trim tolerance, and the placement zone that fits the garment silhouette.
That is why width should be treated as a fit problem, not just a max-dimensions claim.
The practical difference between 13-inch, 22-inch, and 24-inch media is not only whether a design can print. It is whether the print fits the chest, back, or mixed gang layout cleanly without forcing compromises in scale, rotation, or spacing.
13-Inch vs 22-Inch vs 24-Inch DTF Width Comparison
| Width | Best Fit | Usable Outcome in Production | Gang Sheet Density | Shop Profile |
|---|---|---|---|---|
| 13 in | Left chest, sleeve, youth front, compact adult graphics | Tight once margins are accounted for. Full adult fronts often need to be scaled down more than the buyer expects | Lower | Entry setup, samples, short custom runs |
| 22 in | Standard adult fronts, back prints, mixed gang sheets | Usually wide enough for common adult placements while still nesting efficiently | Strong | Core production shop |
| 24 in | Wider adult fronts, mixed orientations, oversized layouts | Gives more room for broad placements and cleaner packing on mixed-order sheets | Strongest of the three | Higher-throughput shop or multi-brand production |
Where each width starts to help, or hurt
13-inch media works best for small placement zones. Left chest logos, sleeve hits, youth fronts, and simple one-color marks lay out efficiently here. The problem shows up when buyers want an adult full front that fills the shirt the way retail graphics usually do. Once you reserve a little buffer at the edges, the usable width gets tight fast.
22-inch media is the width many shops settle into because it matches the placements they print every day. Standard adult fronts, many back prints, and mixed gang sheets fit without constant resizing. It is wide enough to handle common apparel work, but still narrow enough to keep film waste under control on repeat jobs.
For most shops, 22 inches is the point where production gets easier.
24-inch media does not sound much wider, but those extra inches matter in two places. First, broad prints on heavyweight tees, hoodies, and boxier silhouettes have more room before they start looking undersized. Second, mixed gang sheets pack better when you combine a large front, a few chest logos, and a sleeve print on the same row.
The trade-off is simple. If your order mix is mostly logos and small placements, 24-inch film can leave more unused width than you need. If your mix includes fashion fronts, oversized blanks, or frequent back prints, 24 inches gives you more usable layout space and fewer last-minute scaling decisions.
Artwork Dimensions and DPI Targets
A customer orders a “12-inch front,” then sends a 1500-pixel file they already stretched for social media. On screen it looks fine. On film, that same file prints soft edges, rough type, and detail that closes up after powder and press. File size decides whether the print holds up at the dimensions you output.
Build artwork at final print size, not at a placeholder size you plan to enlarge later. In production, scaling down is usually safe. Scaling up is where quality drops.
Pixel targets at final size
The quick rule is simple. Multiply the finished inches by 300 to get the pixel dimensions for raster art. A 10-inch-wide print should be built at about 3000 pixels wide if you expect clean edges and readable detail at output.
That matters most on placement zones where buyers often ask for “just make it a little bigger.” A design that fits a youth front or a narrow women's cut may not have enough native pixels to fill a standard adult front cleanly. The file has to match the intended placement zone, not just a generic width request.
Here's a practical reference.
Artwork Pixel Dimensions by Print Size
| Print Size (in) | Print Size (cm) | Pixels @ 300 DPI | File Format |
|---|---|---|---|
| 3 × 3 | 7.62 × 7.62 | 900 × 900 | PNG with transparency |
| 4 × 4 | 10.16 × 10.16 | 1200 × 1200 | PNG with transparency |
| 9 × 11 | 22.86 × 27.94 | 2700 × 3300 | PNG with transparency |
| 10 × 10 | 25.4 × 25.4 | 3000 × 3000 | PNG with transparency |
| 10 × 12 | 25.4 × 30.48 | 3000 × 3600 | PNG with transparency |
| 12 × 16 | 30.48 × 40.64 | 3600 × 4800 | PNG with transparency |
File setup that prevents avoidable resizing
- Match canvas to intended output: Set the artboard to the actual print dimensions before export.
- Keep transparency intact: Leave non-print areas transparent so the transfer only carries the graphic.
- Size for the garment zone first: Use a graphic size guide for t-shirt placements to decide whether the art is meant for a left chest, full front, oversized front, or back print before you lock the file dimensions.
- Use vector art where you can: Logos, text, and simple shapes hold up better when they stay vector until export.
- Check fine details at output scale: Thin strokes, small knockouts, and tiny text may look acceptable at 100 percent on a monitor but fail once printed at garment size.
A file can be correct in inches and still be wrong for print because the pixel density is too low at final output size.
If one design will run across multiple garment types, build the master file for the largest placement you expect to print cleanly. Then scale down for smaller zones. That approach gives you better control than trying to stretch a small chest graphic into a print that has to fill a wider hoodie or boxy tee front.
Safe Area, Bleed, and Usable Print Zone
A customer sends a 12-inch-wide front graphic for a medium tee. The file fits the film on paper. On press, it still feels too wide for the shirt once you account for side seams, collar drop, and the space you need to keep the design from riding into a fold or trim edge. That gap between sheet size and wearable print area causes a lot of sizing mistakes.
The usable print zone is the area you can print, press, and wear without crowding the garment or risking edge problems in production. Sheet dimensions and film width only tell you the outer limit. They do not tell you how much of that area is safe for artwork after bleed, cut tolerance, and handling space are factored in.
This visual makes the reduction easy to see:
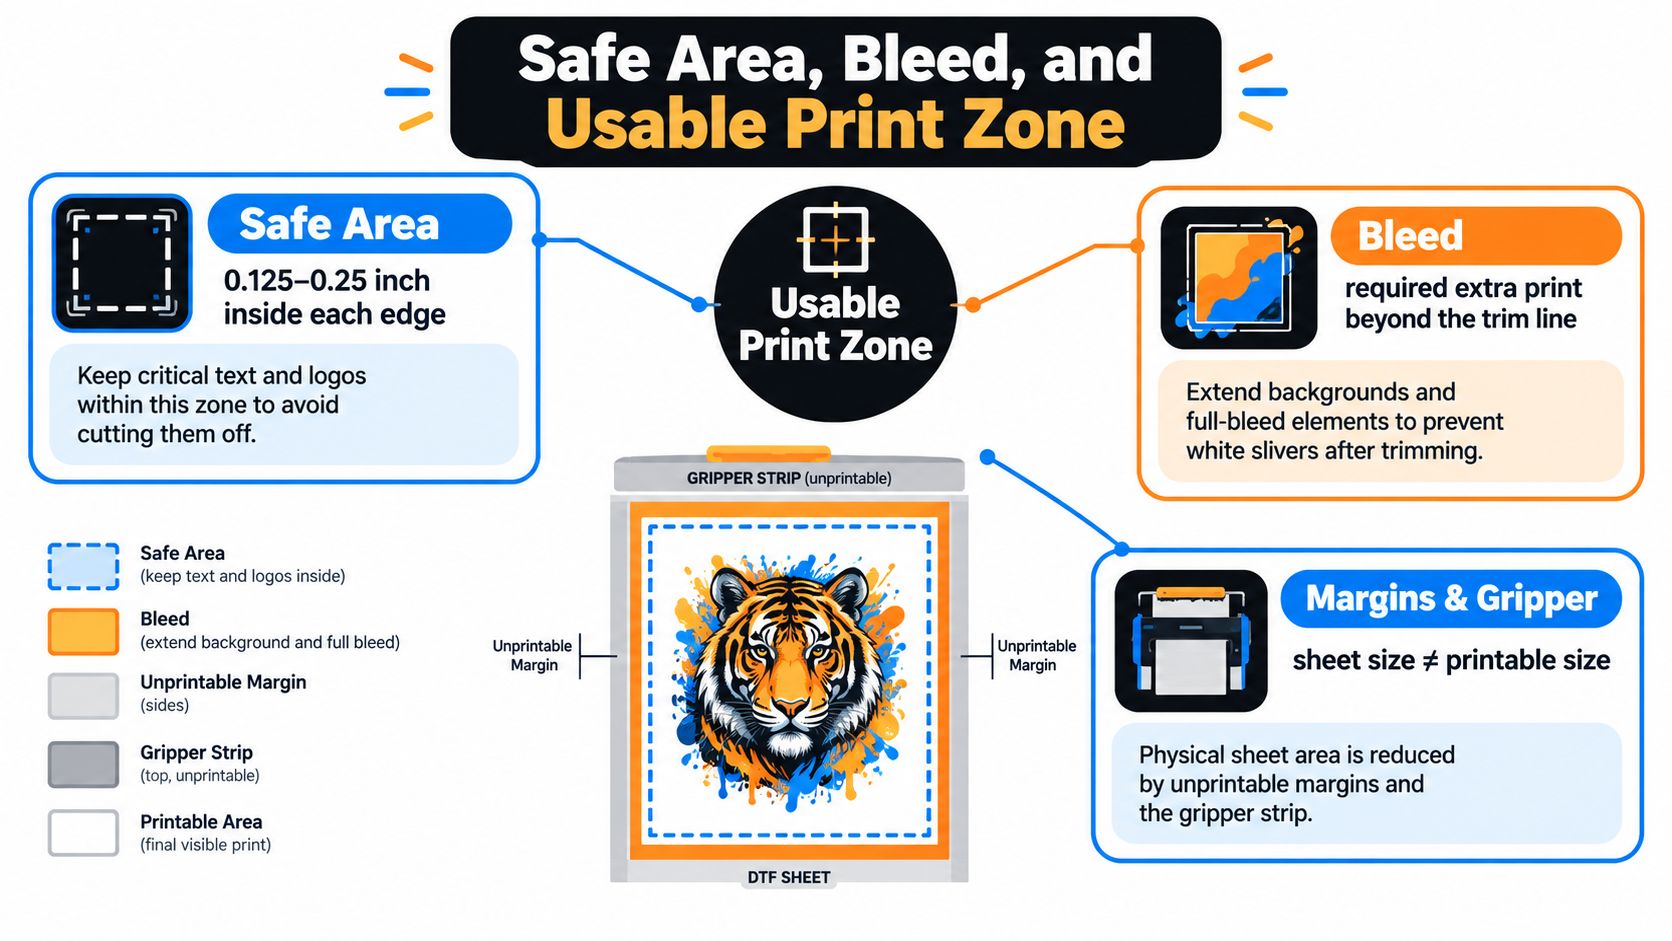
The three zones that affect output
- Bleed: Extra printed area outside the intended cut edge. Use it when the design needs color or texture to run fully to the edge of the transfer shape.
- Safe area: The protected inner zone for text, small details, and any edge you cannot afford to lose.
- Margins and handling space: Area consumed by cutting tolerance, sheet control, and the spacing that keeps transfers from merging or becoming awkward to trim.
For DTF, the practical question is not “What is the biggest print my sheet allows?” It is “What area is left after production allowances, and does that area match the garment's placement zone?” Those are different questions.
A full-front print on a fitted small shirt and a full-front print on a boxy heavyweight tee may use the same transfer width, but they do not read the same once worn. A design can be technically printable and still be wrong for the silhouette. That is why I treat usable area as a fit problem first and a sheet problem second.
Production note: Bleed is expendable. Safe area is protected. Build your artwork so the design still reads correctly if the outer edge gets trimmed a little tighter than expected.
Usable area also affects gang-sheet yield. Every allowance you leave for trimming and handling reduces how many clean pieces fit on the sheet. Shops that only quote max dimensions often miss this. Shops that work from usable print zone tend to size artwork more accurately, especially for chest prints, youth garments, cropped blanks, and oversized placements where a half inch in either direction changes the final look.
Scaling and Nesting Designs on a Gang Sheet
A gang sheet usually goes wrong before it ever reaches the printer. The common mistake is sizing each logo or graphic in isolation, then trying to pack the leftovers into whatever space remains. In production, the better approach is to treat the sheet as a fixed-width layout with a limited usable zone, then fit each design to its actual garment placement before you start nesting.
That changes the order of decisions. First confirm the print size each placement needs on the shirt, hoodie, tote, or youth blank. Then build the gang sheet around those finished dimensions. A left chest print that fits well at one width, and a full front that needs a different proportion, should be locked before they ever share the same sheet.
The process is easier to visualize than to describe:
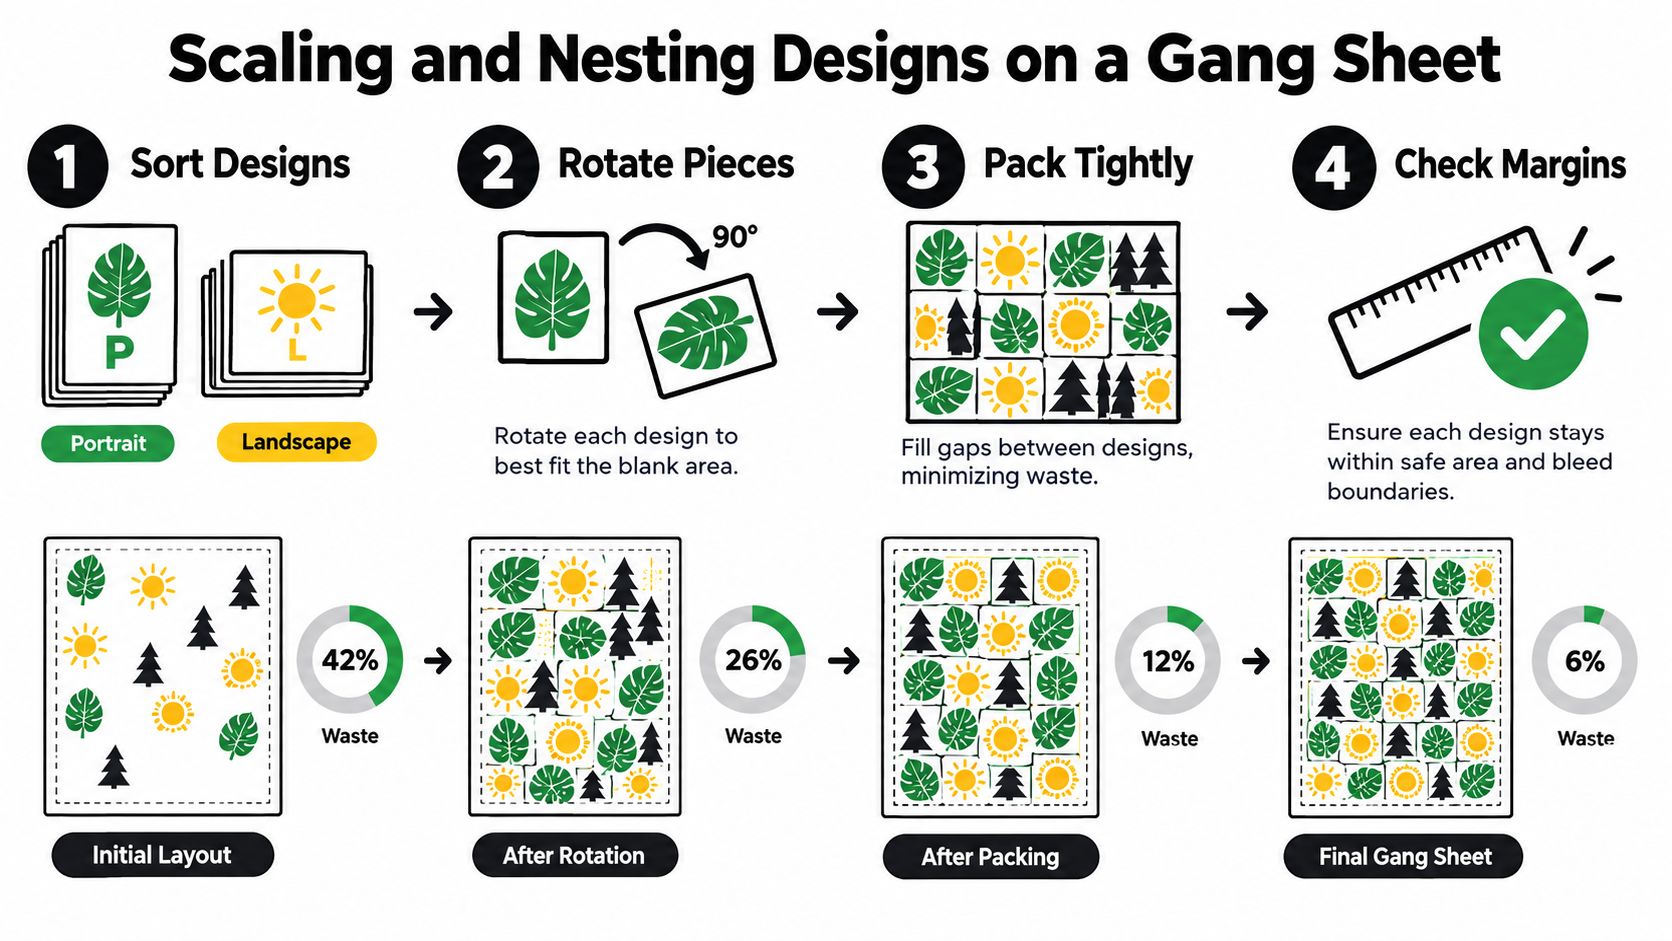
A practical nesting order
-
Sort by placement type first
Keep left chest, full front, sleeve, neck label, and back prints in separate groups. Pieces with different placement jobs usually need different spacing and trimming priorities. -
Lock final output size before packing
Scale artwork to the size it should press at on the garment, not the size that happens to fill an empty gap on the sheet. -
Build rows by similar height
Designs with close heights nest cleaner and waste less film length. -
Rotate with intent
Rotate small pieces only when it clears dead space without making trimming slower or increasing the chance of picking the wrong transfer at press time. -
Leave real cutting space
Tight layouts may look efficient on screen, but they slow down peeling, trimming, and sorting if pieces sit too close together.
Efficient sheets are usually boring to look at. That is a good sign. Clean rows, consistent spacing, and grouped sizes are easier to cut and harder to mis-sort at the heat press.
I also watch for a trade-off buyers miss. The tightest possible nest is not always the best production layout. Saving a little film can create awkward trim paths, mixed stacks, and wasted time on the back end. If you build gang sheets often, a dedicated DTF gang sheet builder guide can help standardize sizing and packing before upload.
Save the file at final sheet dimensions. Flatten only after you confirm transparency, spacing, and orientation. Reopening and rebuilding a rushed export is one of the easiest ways to change print size without noticing.
Matching Print Size to Garment Type and Placement
Most sizing advice gets too simplistic. DTF print size isn't just a machine question. It's a garment silhouette question.
A placement guide points out that common rules of thumb such as 3.5 to 4.5 inches for left chest, 10 to 12 inches for standard adult fronts, and 12 to 16 inches for oversize or full-back prints are useful starting points, but they're not universal. The same guide also notes that XL and larger garments justify 11 to 12 inches or more while smaller sizes need less coverage in the DTF transfer placement guide. That's the production issue. Size charts give averages. Shirts need proportional decisions.
This comparison helps frame it:
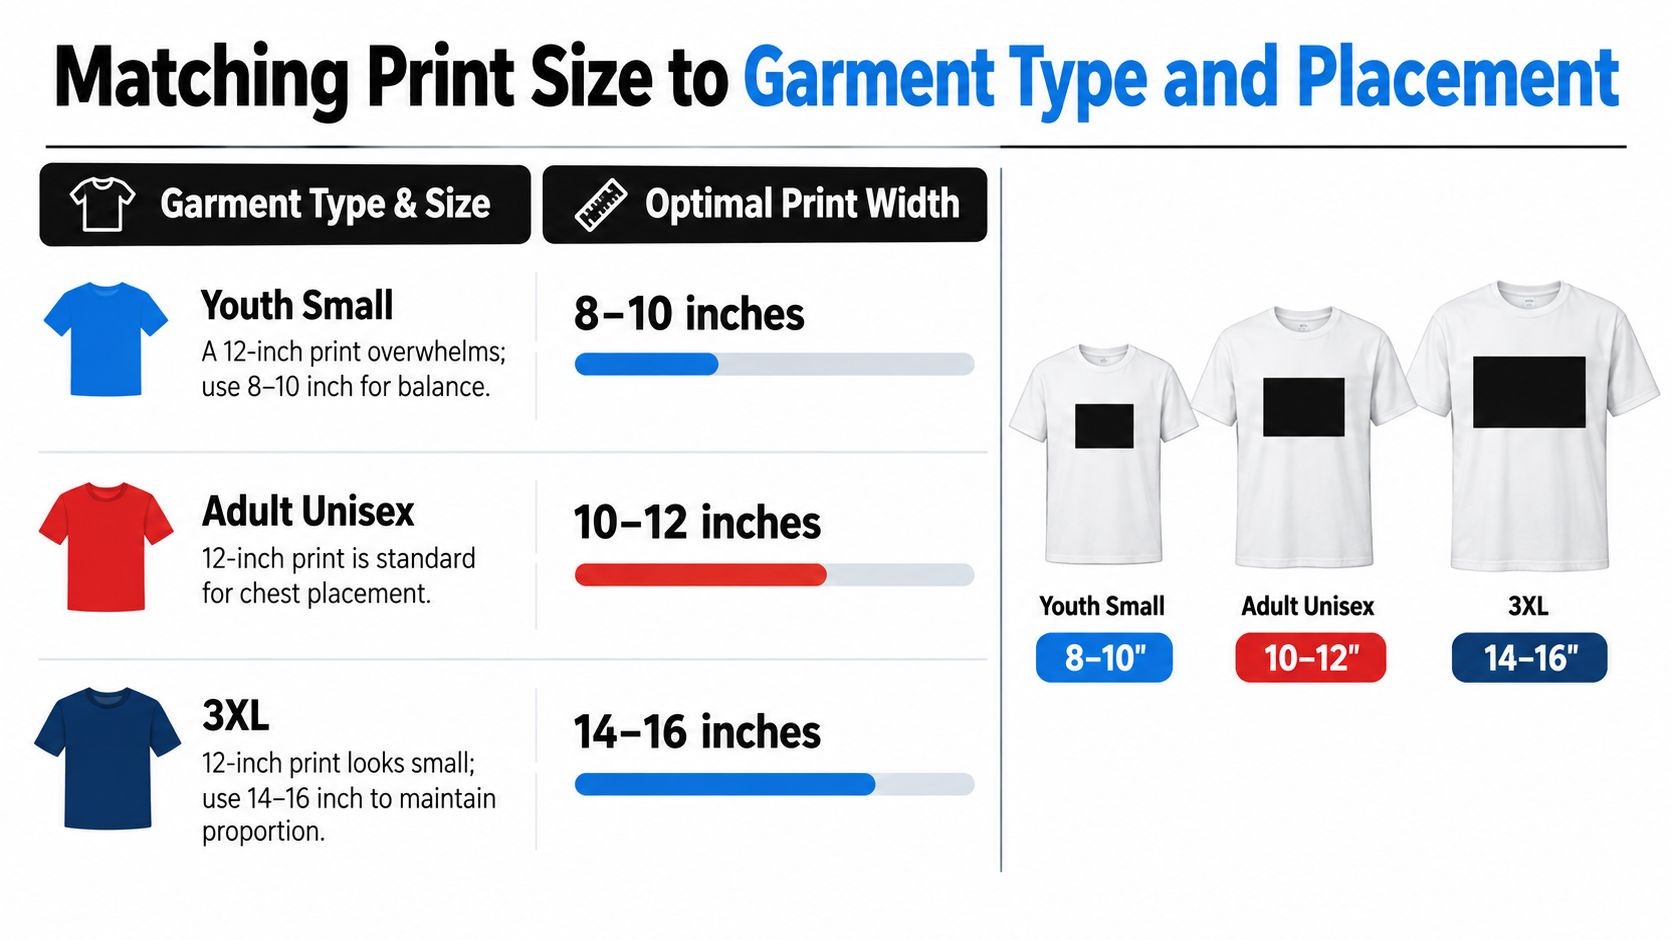
Why the same artwork reads differently
A centered front graphic that feels balanced on a standard adult unisex tee can look oversized on a fitted women's cut. Put that same file on a larger relaxed shirt and it may suddenly read too small.
That's because the eye doesn't judge print size in isolation. It judges the relationship between the print and the garment's chest panel, shoulder spread, body length, and cut.
Placement decisions that usually hold up
- Left chest: Good for logos and marks that need restraint. Smaller garments need a smaller read.
- Full front: Proportion mistakes show fastest. Slight oversizing can dominate the entire shirt.
- Full back: Easier to size up, but still limited by the visual balance of the back panel.
- Oversized cuts: These can carry more width without the print wrapping awkwardly toward side seams.
The most reliable habit is to measure the blank, not just trust the size label. A medium in one brand may carry a very different front panel than a medium in another.
If you need a placement-oriented reference before building a file, the DTF transfer zone guide is useful for mapping artwork to specific garment areas instead of relying on one universal dimension.
Quick-Reference Size Chart by Placement Zone
Most shops don't need a hundred size presets. They need a few starting ranges that keep them from making obvious proportion mistakes. Use these as working defaults, then adjust to the actual blank in hand.
DTF Print Size by Placement Zone and Garment
| Placement Zone | Adult Unisex Tee (in / cm) | Women's Fitted Tee (in / cm) | Youth Tee (in / cm) | Hoodie (in / cm) |
|---|---|---|---|---|
| Left chest | 3.5 to 4 in / 8.89 to 10.16 cm | about 3 in / 7.62 cm | about 2.5 in / 6.35 cm | 3.5 to 4 in / 8.89 to 10.16 cm |
| Full front | 10 to 12 in / 25.4 to 30.48 cm | 9 to 10 in / 22.86 to 25.4 cm | 8 to 9 in / 20.32 to 22.86 cm | 10 to 12 in / 25.4 to 30.48 cm |
| Full back | 13 to 15 in / 33.02 to 38.1 cm | 11 to 12 in / 27.94 to 30.48 cm | 11 to 12 in / 27.94 to 30.48 cm | 13 to 15 in / 33.02 to 38.1 cm |
How to use the chart without misusing it
These aren't hard rules. They're starting placements. If the garment has a narrow body, a cropped cut, a deep collar drop, or a pocket seam, the chart should lose the argument.
One practical way to avoid mistakes is to print or mock up the design at actual size and place it on the blank before committing to the run. You'll catch proportion issues much faster that way than by debating inches on a screen.
When Bigger Prints Stop Looking Better
A lot of bad dtf print size decisions come from one assumption: if the printer can output it, bigger must look better. It usually doesn't.
Large graphics only work when the garment can carry them. Once a print starts pushing too close to side seams, collar transitions, pocket interruptions, or the visual edge of the body panel, it stops reading as intentional and starts reading as oversized by accident.
Where bigger starts to hurt
- On fitted garments: Wide prints can feel crowded fast.
- On youth blanks: Adult-sized artwork usually overwhelms the shirt.
- On detailed art: Scaling up exposes weak file prep and thin detail.
A shirt doesn't become more premium just because the design occupies more area.
Bigger prints also create practical downsides. They consume more film, leave less room on gang sheets, and demand more care during alignment. If the design doesn't have enough visual weight to justify the scale, the extra size only makes emptiness more obvious.
The cleanest result usually comes from stopping at the point where the print feels proportionate, even if the printer still has room to go wider.
Common File Prep Mistakes That Change Print Size
A customer approves a 10-inch front print, then the finished transfer arrives and the art feels smaller, weaker, or crowded at the edge. The printer did not change the size. The file changed what that size could do on the shirt.
In production, print size is only one part of the result. File prep decides whether those inches hold clean detail, proper edge coverage, and enough breathing room to read correctly in the placement zone.
Six DTF File Prep Mistakes and Their Fixes
| Mistake | What goes wrong in production | Exact fix |
|---|---|---|
| Low-resolution artwork | The print hits the ordered dimensions but loses edge sharpness and detail at final size | Build or rebuild the file at final print dimensions and export at 300 DPI |
| Designing small, then scaling up | The art technically gets bigger, but the file does not gain detail, so the print softens fast | Set the artboard to actual print inches before designing |
| Missing bleed | Edge-touching art can trim short or show a hard cutoff | Extend background or edge elements by 0.125 inch on all sides |
| Critical content too close to edge | The usable print zone shrinks because trimming tolerance eats into the design | Pull text, logos, and thin border elements inward from the cut line |
| Extremely thin details | Hairlines, tiny gaps, and fine distress marks can close up or break apart during print and transfer | Thicken fragile lines and small negative spaces before export. For film and transfer readability, Adobe's line-art guidance is a good practical check when reviewing fine detail |
| Wrong mirroring assumption | The transfer may arrive reversed from the workflow you planned, which can force a reprint or last-minute file edit | Confirm whether the provider handles mirroring or whether you need to mirror the file before upload |
One mistake I see often is sizing to the overall art bounds instead of the part that matters on the garment. A 12-inch-wide file with transparent padding does not print like a true 12-inch graphic. The RIP reads the full file area, but the wearer only sees the active artwork. That is how buyers ask for a "full-size" print and end up with something that wears small.
The same problem shows up with borders and outlines. If a design includes a stroke that sits too close to the edge, the ordered dimensions may still be correct, but the usable area gets tighter after bleed, trim tolerance, and placement error are accounted for. On press, that difference is visible.
A blurry 10-inch print is still 10 inches wide. A clipped 10-inch print is also 10 inches wide. Neither one is sized correctly for production, because the file did not preserve the usable image area the garment needed.
Good file prep protects the placement zone, not just the measurement box. That is what keeps the printed result aligned with what the customer thought they were ordering.
Putting the Full DTF Print Size Workflow Together
The cleanest workflow is the one that removes guesswork before production starts. In practice, that means moving in a fixed order and treating each step like a gate.
The sequence that prevents most problems
- Choose the media class based on the kind of work you run.
- Pick the garment placement from the blank, not from memory.
- Set the file to final size before you design or export.
- Build in bleed and protect the safe area so trimming doesn't damage the artwork.
- Nest intelligently on the gang sheet with spacing that supports cutting and handling.
- Export the correct file type with transparency intact.
- Check a physical sample before committing the whole run.
Why the order matters
If you skip the garment check, you size to the printer instead of the shirt. If you skip proper file setup, the RIP ends up doing resizing that should've been handled upstream. If you skip layout discipline, film usage gets sloppy fast.
The best dtf print size workflow is boring on purpose. Every step answers one question before the next one starts.
That's how shops stay consistent. Not by memorizing one “standard” size, but by repeating the same decision path every time a new garment, placement, or design comes in.
If you already know your target dimensions or need help turning artwork into press-ready transfers, Raccoon Transfers offers DTF options built around by-size ordering and gang-sheet workflows. It's a practical fit when you want to match the transfer to the garment instead of guessing from max sheet width alone.