

DTF Transfers for T Shirts How to Press Perfect Tees
You've got the blank shirt on the heat press, the transfer in your hand, and one shot to get it right. That's the pressure point with DTF transfers for t shirts, not the idea of printing. The good news is that DTF became a practical apparel method because it moved from niche experimentation into wider shop use in the 2020s, with roots going back to inkjet textile development and industrial work associated with Kornit Digital, founded in 2002, as outlined in this history of DTF transfers and the broader timeline here.
Why DTF Transfers Work So Well for T Shirts
A customer needs a single full-color design on black cotton by tomorrow. Screen printing brings setup and color constraints, while vinyl leaves you weeding fine details. DTF transfers for t shirts give a shop a practical middle ground: press the prepared transfer, get sharp color and clean edges, and avoid a thick vinyl-like feel when the artwork and settings are right. That combination suits one-off customs, short runs, event shirts, and small apparel brands.
What makes DTF different on tees
DTF works across many t-shirt colors and supports detailed artwork without requiring a separate stencil for each color. The transfer includes the image and its white underbase, so vivid graphics can sit on dark garments without extensive file adjustments. A small chest logo, a full-front illustration, or fine text can use the same basic production method.
The process also fits mixed orders. You can print transfers in advance, sort them by garment, and press only what the customer ordered. A printing-industry summary reports a DTF market value of $2.72 billion in 2024 and a projection of $4 billion by 2030, figures presented as evidence of expanding commercial use in apparel decoration Printify's printing-tech summary. The shop-floor takeaway matters more than the headline: DTF has become a production tool rather than a niche experiment. Its development and broader adoption are also outlined in this guide to how DTF transfers work.
Practical rule: Choose DTF when the order needs full color, flexible quantities, and repeatable pressing without weeding or garment pretreatment.
What it does better, and where it still has limits
Compared with vinyl, DTF handles intricate artwork without weeding each exposed detail. Compared with DTG, it removes the need to pretreat every shirt before printing. That helps when one order includes several garment colors or fabric types.
The method still depends heavily on execution. Seams, collars, pockets, moisture, uneven pressure, and incorrect temperature can create lifted edges even when the transfer itself is sound. Place the artwork on a flat section of the shirt, use a pressing pillow when a seam affects platen contact, and follow the supplier's curing and care guidance.
Durability is strong when the press is properly set. Testing summarized by Alpha Print Supply reports roughly 40 to 80+ wash cycles with correct garment care, while harsher testing found edge cracking around 35 washes and corner peeling by wash 50 on cotton Alpha Print Supply. In practical terms, the film is often not the weak point. Uneven pressure, poor bonding, and rough aftercare cause more failures.
Preparing Your Shirt Artwork and Gang Sheet for Success
A shirt can look ready on the table and still fail under the press. Moisture, lint, crooked placement, and poor layout create more bad transfers than the film itself. Handle those details before heating, while corrections are still cheap.
Start with the shirt, not the design
Pre-press the garment to remove moisture and flatten wrinkles. Moisture can weaken the bond and produce uneven adhesion. Lint-roll the print area afterward, especially on dark tees where loose fibers show through a clean transfer.
Check the shirt's construction before placing the artwork. Collars, seams, and pockets can create high spots that keep the platen from pressing evenly. Use a press pillow or another method to level the area. If the design crosses a thick seam or hard ridge, expect lifted corners and incomplete bonding.
Build the gang sheet like production, not a scrapbook
Gang sheets improve the economics of small apparel runs by placing multiple graphics on one sheet. Arrange each design with its final size in mind, then leave enough room for cutting and handling. That lowers waste and makes short runs much easier to price. For a full walkthrough of building one, see this guide to DTF transfers gang sheets.
Treat the sheet as a cutting plan. Group related sizes, keep edges easy to trim, and remove awkward gaps that waste usable film. For a pop-up, school event, or Etsy order set, careful nesting can reduce material waste and simplify production. Keep the file clean and sized correctly, and remember that the same preparation principles apply when you Upload Your Own UV DTF Gang Sheets.
Use the right files before you pay to print
Start with high-resolution PNG, PDF, or AI artwork. Keep transparent backgrounds where the design needs them. Do not mirror the file unless your supplier specifically requires it. Some shops mirror during production and some do not, so confirm the workflow before sending the sheet.
A clean layout prevents problems that are often blamed on the press. Bad transfers frequently begin with poor artwork preparation, crowded spacing, or a shirt surface that was never made flat.
Pressing Your DTF Transfer With the Right Time Temperature and Peel
A transfer can look perfect on the platen and still fail after washing. The usual causes are a wrinkled shirt, uneven pressure, a rushed peel, or adhesive that never reached the fabric properly. Build the press cycle around repeatable preparation rather than a timer alone.
The press sequence that holds up
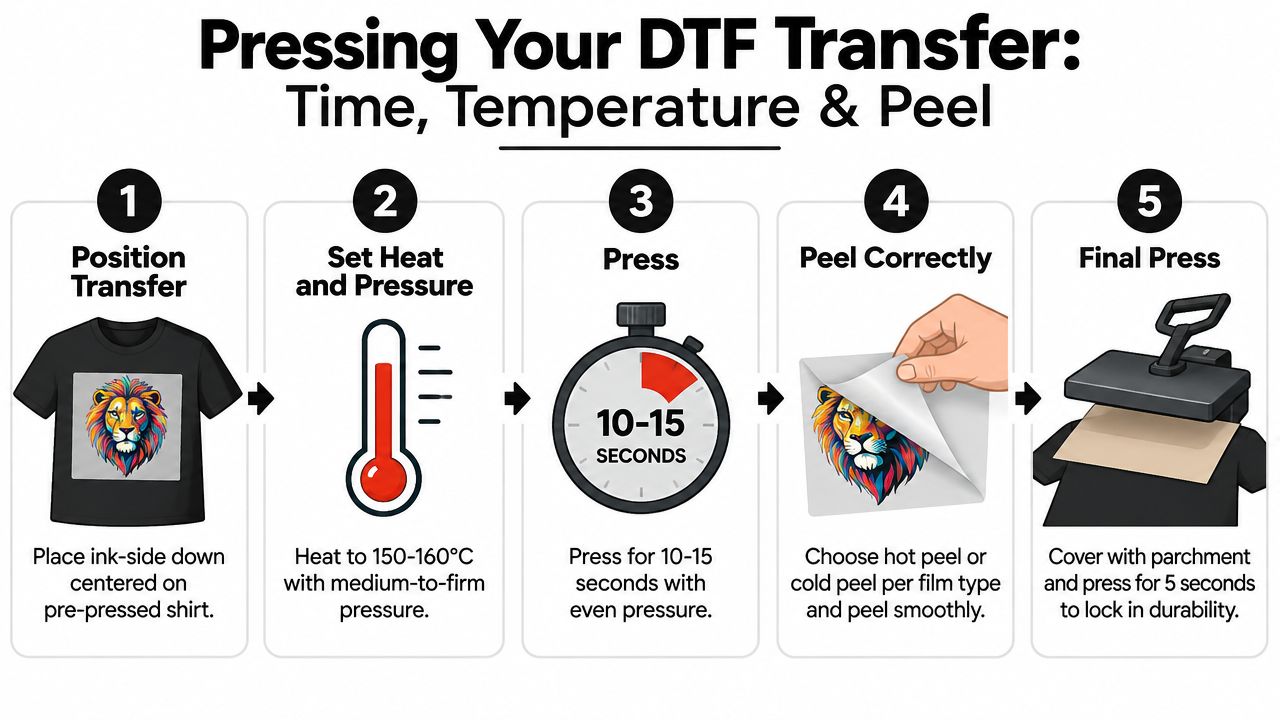
Lay the shirt flat and pre-press it briefly to remove moisture and wrinkles. Check the print area for lint, then place the transfer ink-side down with the artwork aligned to the garment. As a shop-tested baseline, use about 150 to 160°C, medium-to-firm pressure, and 10 to 15 seconds. That range gives the adhesive enough heat to bond without unnecessarily stressing the film.
Seams, pockets, collars, and thick hems can hold one side of the platen higher than the other. Move the garment so the print sits on a level area, or use a pressing pillow to lift the decoration above the seam. Uneven contact often causes missing edges even when the displayed temperature is correct.
Peel according to the carrier film's instructions. Some films require a hot peel, while others must cool before removal. If the carrier feels stuck or a corner lifts with it, stop and wait. Pulling harder can remove fine detail or weaken the bond.
Golden rule: if the transfer does not release cleanly, re-check the film type and peel timing before pulling again.
Why the second press matters
After removing the carrier, cover the design with the recommended protective sheet and apply a short second press. This helps flatten the surface, improve the finish, and reinforce adhesion. It also matters when the first press covered a large design unevenly.
The failures I see most often come from small process misses. Skipping the pre-press, pressing across a seam, leaving lint under the film, or peeling at the wrong moment can produce rough edges and incomplete bonding. Keep the shirt position, pressure, timing, and peel method consistent across a batch.
For broader apparel production context, consult the FLYP LTD printing guide when comparing decoration methods and workflow habits.
Matching Press Settings to Your T Shirt Fabric
A cotton tee may come off the press looking perfect, while a polyester shirt develops a faint color shift later. Fabric type changes how much heat the garment can tolerate, how the adhesive bonds, and whether the print stays clean after washing. One recipe for every shirt creates avoidable failures.
| DTF Press Settings by T Shirt Fabric | ||
|---|---|---|
| Fabric Type | Recommended Temperature | Key Handling Note |
| Cotton | 320°F (160°C) | Handles standard DTF heat well, still pre-press and finish with a second press. |
| Polyester | 290°F (143°C) | Lower heat helps protect the fabric and reduce dye migration risk. |
| Cotton-poly blends | Adjust to the garment | Test first, because blend content and knit structure change how the press behaves. |
Cotton is forgiving, polyester is not
Cotton usually gives you more working room because it tolerates standard DTF heat well. Keep the garment flat, use steady pressure, and check the bond after peeling rather than assuming the display reading guarantees a good result.
Polyester needs restraint. Excess heat can trigger dye migration, leaving a shadow or tint around the transfer. The change may not appear while the shirt is still hot. It can become visible after the garment cools, sits, or goes through washing, so inspect a test shirt before pressing the full order.
A dark performance tee deserves extra caution, especially if the design includes white ink. Lower the heat to suit the fabric and avoid extending the dwell time because the surface looks unchanged.
Blends need judgment, not autopilot
Cotton-poly blends fall between the two, but their behavior depends on the ratio, knit density, dye, and finish. A stretchy or moisture-wicking shirt may distort under pressure or show heat stress sooner than a stable jersey tee. Test one garment, wash it when the order allows, and use that result to set the batch.
For a practical comparison of how these fabrics respond, use this cotton vs polyester guide. Keep pressure consistent, adjust heat to the garment, and record the setting that produced a clean edge without shine, scorching, or color bleed.
Short version: cotton gives you more room to work, polyester demands more restraint, and blends reward testing.
Design Layout and Placement Tips That Save Money and Improve Quality
A transfer can be printed perfectly and still look wrong on the shirt. A chest graphic pressed across a seam may have lifted edges, while a small logo placed on a flat panel can look sharp and wear well. Good layout protects both the garment and the gang sheet budget.
Place the art on stable fabric
Center-chest designs are generally easier to press because the platen can apply even pressure across a broad, flat area. Pocket prints, oversized fronts, and artwork close to the collar need more care. Seams, hems, and raised edges change the pressure, so a press pillow may help create clearance, but it cannot correct a poor position.
Treat the shirt as a shaped garment. Keep important artwork away from thick seams, pockets, collars, and hems unless the design specifically requires that placement. If an edge must sit near a seam, shift the design slightly or support the surrounding fabric so the transfer can make full contact. For a clean minimalist t-shirt styling approach, fewer elements also leave more room around the print and reduce placement problems.
Check alignment before pressing. Fold the shirt to find its actual center, then use the collar and side seams as reference points rather than trusting the platen alone. On pocket-area designs, compare the artwork with the pocket opening and keep the visual center consistent across sizes.
Build gang sheets around the order
Gang sheet savings come from using every usable area without making trimming risky. Group similar transfer sizes, nest small logos into open spaces, and leave enough separation for scissors or a cutter to follow the edges cleanly. Crowding artwork too tightly can turn a material saving into damaged prints and slower production.
Plan around the actual order mix. A sheet for several shirt sizes may combine full fronts, pocket logos, and sleeve marks, provided each piece remains easy to identify and trim. Keep repeat designs together when possible, and label or organize them so the press operator does not waste time sorting transfers.
Choose artwork that suits DTF
DTF handles fine lines, gradients, and full-color artwork well. Use those strengths, but keep placement practical. Detailed artwork pressed over a seam is still difficult to finish, regardless of how well it was printed.
A well-planned sheet can serve different sizes, shirt colors, and customer groups with less unused film. The goal is not to fit more transfers. It is to reduce trimming, prevent placement errors, and keep each garment looking deliberate from the press through delivery.
Troubleshooting Common DTF Transfer Problems on T Shirts
A transfer can look perfect on the platen and still fail after the first wash. If edges lift, fine text disappears, or the print cracks early, check the process before blaming the film. Prep, adhesive curing, peel timing, and fabric choice usually explain the failure, especially on structured tees and poly-blends.
Find the failure point
Moisture left in the shirt weakens the bond, so pre-press the garment before positioning the transfer. Lint and dust create small gaps at the edges, which become obvious on thin outlines and small lettering. Brush the print area, use a clean platen, and keep the carrier film flat while placing it.
Peel timing also changes the result. A hot peel can pull soft adhesive and fine detail away from the fabric. A cold peel made before the adhesive has settled can produce the same problem. Follow the transfer supplier's specified peel method rather than guessing from how the film feels.
Under-cured adhesive often looks acceptable immediately after pressing, then shows lifted edges or weak corners during washing. Overheating can discolor polyester, flatten the shirt's surface, or make the adhesive brittle. A firm, even final press helps set the bond, but pressure cannot rescue a transfer that was poorly cured or placed across a raised seam.
Care that protects the print
Wash the shirt inside out with cold water and mild detergent. Skip bleach, then dry on low heat or air dry. High heat and harsh chemicals place unnecessary stress on the adhesive layer.
Judge a transfer after the first few washes, not only on press day.
A practical fix checklist
- Lifted edges: Remove lint, check pressure, and re-press with clean parchment or a protective cover.
- Dull finish: Confirm that the second press was completed and that the cover sheet was clean.
- Corner peel: Review garment prep, pressure near the edge, and the required peel temperature.
- Early cracking: Check curing time, platen temperature, and whether the garment was overheated.
- Polyester issues: Use the fabric's lower-temperature requirements instead of applying cotton settings.
- Seam marks or weak areas: Move the artwork away from the seam, or use a pressing pad that keeps pressure even around the raised section.
Fix one variable at a time and test a spare shirt. That approach identifies the cause faster than changing every press setting at once.
If you need transfers for production runs, Raccoon Transfers offers DTF and UV DTF production, gang sheet ordering, and size-based options for apparel jobs. Visit Raccoon Transfers to upload artwork and compare transfer options.