
Fleece Crewneck Pullover Guide: Fabric, Printing and Care
Polyester isn't a niche fiber for a fleece crewneck pullover. The Textile Exchange 2024 Materials Market Report reported worldwide fiber production reached 124 million metric tonnes in 2023, up 7% from 116 million tonnes in 2022, with polyester at 57% of global output. That scale explains why fleece blanks look interchangeable in a catalog. They aren't. Weight, blend, loop construction, and pilling behavior change how heat moves, how adhesive bonds, and how a graphic survives washing and drying. I treat those specs as press variables, not buying details.
Fleece Crewneck Specifications That Affect Printing
Check these values before you pick art size, placement, or press settings. A missing number isn't a minor gap, it's a reason to press and wash a sample first.
| Specification | Reference value | What It Means for Printing |
|---|---|---|
| Fabric weight | 8.0 oz/yd², about 271 g/m² | Above 240 g/m², so the heavy-duty ASTM abrasion procedure applies |
| Fiber blend, standard colors | 50/50 cotton/polyester | Cotton-rich faces take heat and form fuzz differently from polyester-rich faces |
| Fiber blend, heather colors | 60/40 polyester/cotton | Test heather blanks separately from standard colors |
| Pique fleece yarn in thermal study | 65% cotton / 35% polyester | Higher air permeability in some constructions |
| Loop length in thermal study | 2.8 mm | Best overall thermal-comfort balance among the tested samples |
| Pilling rating | 5 (no pilling) to 1 (very severe) | Ask suppliers for the rating and the test method behind it |
| Heavy-duty abrasion threshold | 240 g/m² (7 oz/yd²) | Heavier fleece follows the heavy-duty procedure, which matters for high-wear prints |
How to Read the Rows
Fabric weight tells you how much loft you're compressing and how the blank should be judged for wear. The Gildan Heavy Blend 18000 example at 8.0 oz/yd² sits above the heavy-duty threshold, so don't evaluate it like a lightweight pile fabric.
Fiber blend changes heat response and fuzz formation. Cotton and polyester don't soften, hold moisture, or abrade the same way, which is why our cotton versus polyester guide is worth checking before you lock a temperature. Heather colors need their own test because the blend shifts toward polyester and the face looks less uniform under fine detail.
Loop length and yarn blend work together. Longer loops can feel softer without giving better comfort, so judge loft, warmth, and breathability as one construction, not as separate selling points.
Practical rule: Record weight, blend by color family, and pilling method for every blank. If a supplier gives you "premium" or "anti-pill" without a rating, you don't have a spec yet.
Pilling deserves the same discipline you'd apply to color matching. Browsing examples of how garments photograph and wear, even a style reference such as Earl Sweatshirt's OohYeah profile from OohYeah, won't tell you whether a face will fuzz around a graphic after ten washes. Only a named test and your own wash sample do that.
Why Fleece Surface Changes How Ink Sits
Brushed fleece is a dense pile of raised fibers and tiny air pockets. Pressing a design onto it is closer to stamping into carpet than stamping onto a tabletop. The surface gives under the platen, fibers shift as pressure releases, and the adhesive layer sits on a base with more movement than a flat jersey tee.
That construction has a long history. The New York Times history of fleece traces Malden Mills twisting superfine polyester yarn into a dense, terry-like structure and brushing it to increase volume, then partnering with Yvon Chouinard in 1981, before Patagonia's Synchilla Snap-T debuted in 1985. The brushing that created insulation and low weight is still the reason your print surface isn't flat.
Check three features on any blank:
- Face yarn: What fiber touches the transfer
- Loop or pile height: How much the surface compresses and rebounds
- Finishing step: How brushing or treatment left loose fiber on the face
A heavier-looking or softer fleece crewneck pullover isn't automatically warmer, more breathable, or easier to print. Press one sample at your planned settings, then inspect the edges under light at a normal viewing angle. Fine detail on fleece needs that sample press before production, not an assumption from a product listing.
Where to Place a DTF Print on a Fleece Crewneck
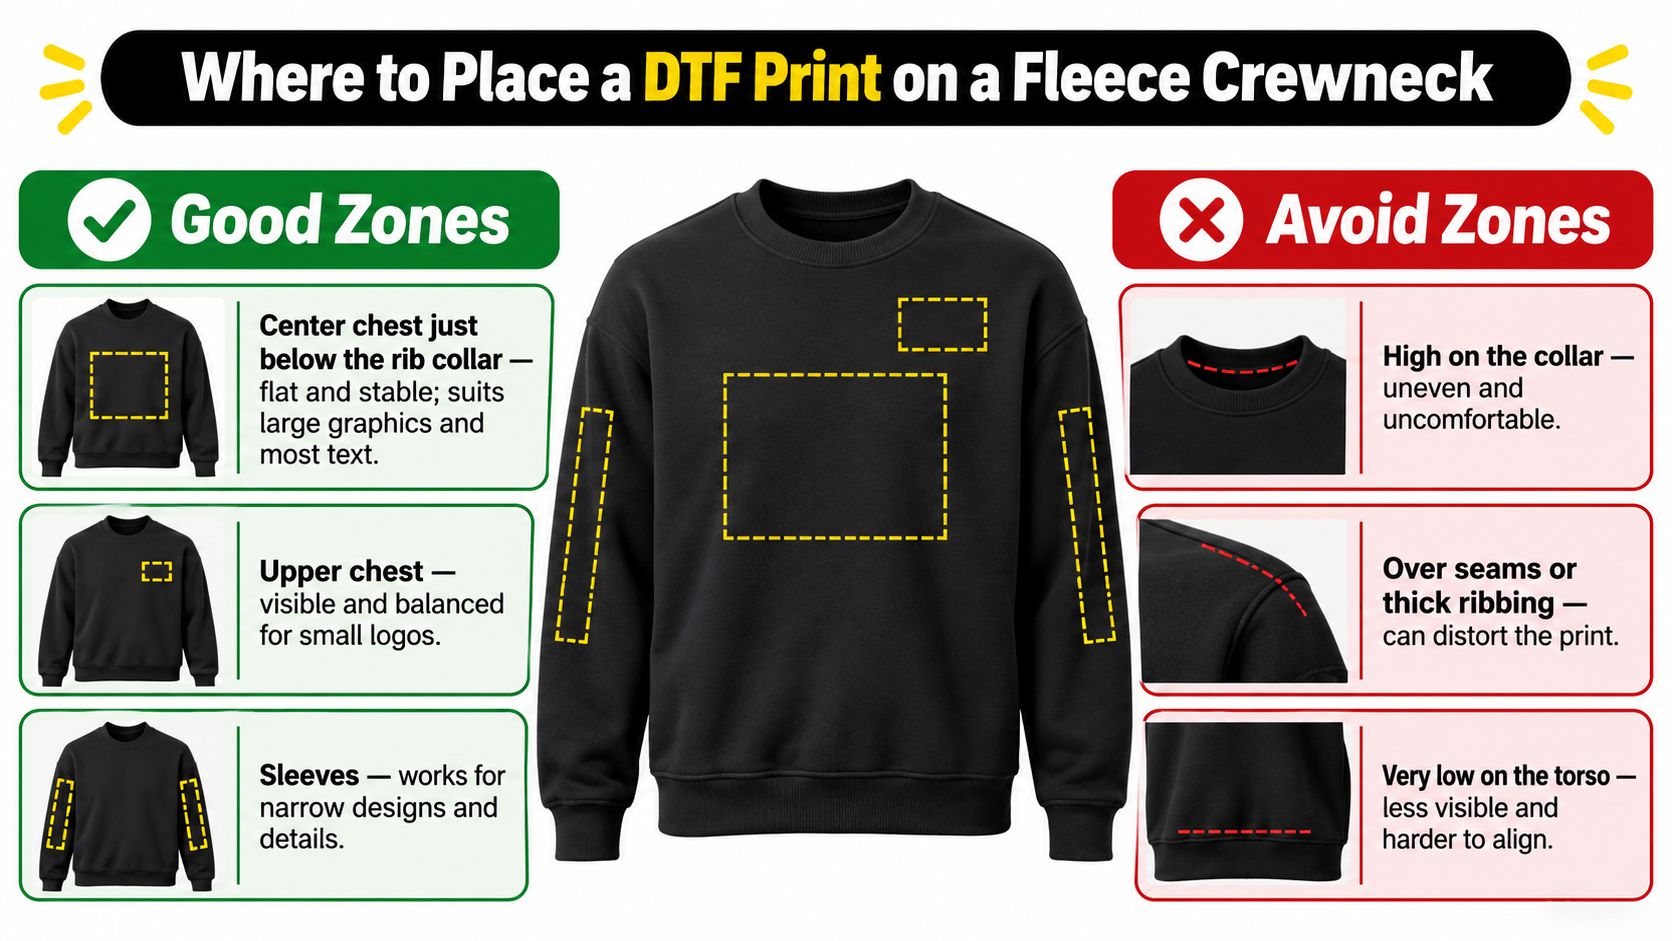
Placement decides whether a good press stays good. Choose a flat panel first, then size the art to fit it, not the other way around.
Good Zones
- Center chest just below the rib collar: This is the flattest, most stable panel on most crewnecks. It suits large graphics and most text because the platen contacts evenly and the fabric doesn't stretch much in wear.
- Upper back: Bold designs work here when the wearer won't carry a backpack. Straps turn a stable zone into a friction zone, so the use case matters as much as the panel.
- Sleeves on a flat, unseamed panel: Narrow designs can work with a sleeve board to keep pressure even. Don't wrap art around the seam to gain width.
For sizing those zones, a product such as Custom DTF Transfer by Size: Perfect Prints for Every Project lets you order the transfer to the panel dimension instead of trimming or stretching a design to fit after it arrives.
Avoid Zones
- Underarm panels and cuffs: Movement and friction are constant, and edges lift first where fabric folds.
- Waistband rib and rib transitions: Ribbing stretches at a different rate than fleece, so a design crossing that boundary cracks along the change.
- Shoulder seams and pouch pocket edges: Thickness changes steal pressure from part of the design and leave weak bonds beside the seam.
The construction research behind this split is direct. A study of pique fleece thermal comfort found a 65% cotton/35% polyester fleece yarn improved air permeability in some constructions, while increasing loop length reduced thermal conductivity, thermal resistance, and thermal absorptivity. Loft isn't uniform decoration ground. A lofty or brushed surface can change perceived edge sharpness and adhesion consistency across one garment.
Keep fine lines and small text clear of every seam, and never run one design across a rib transition.
Press a sample in the exact zone you plan to sell, wash it, and inspect the edges before you run the batch. A chest sample doesn't validate a sleeve placement on a fleece crewneck pullover.
How to Press DTF Transfers onto Fleece
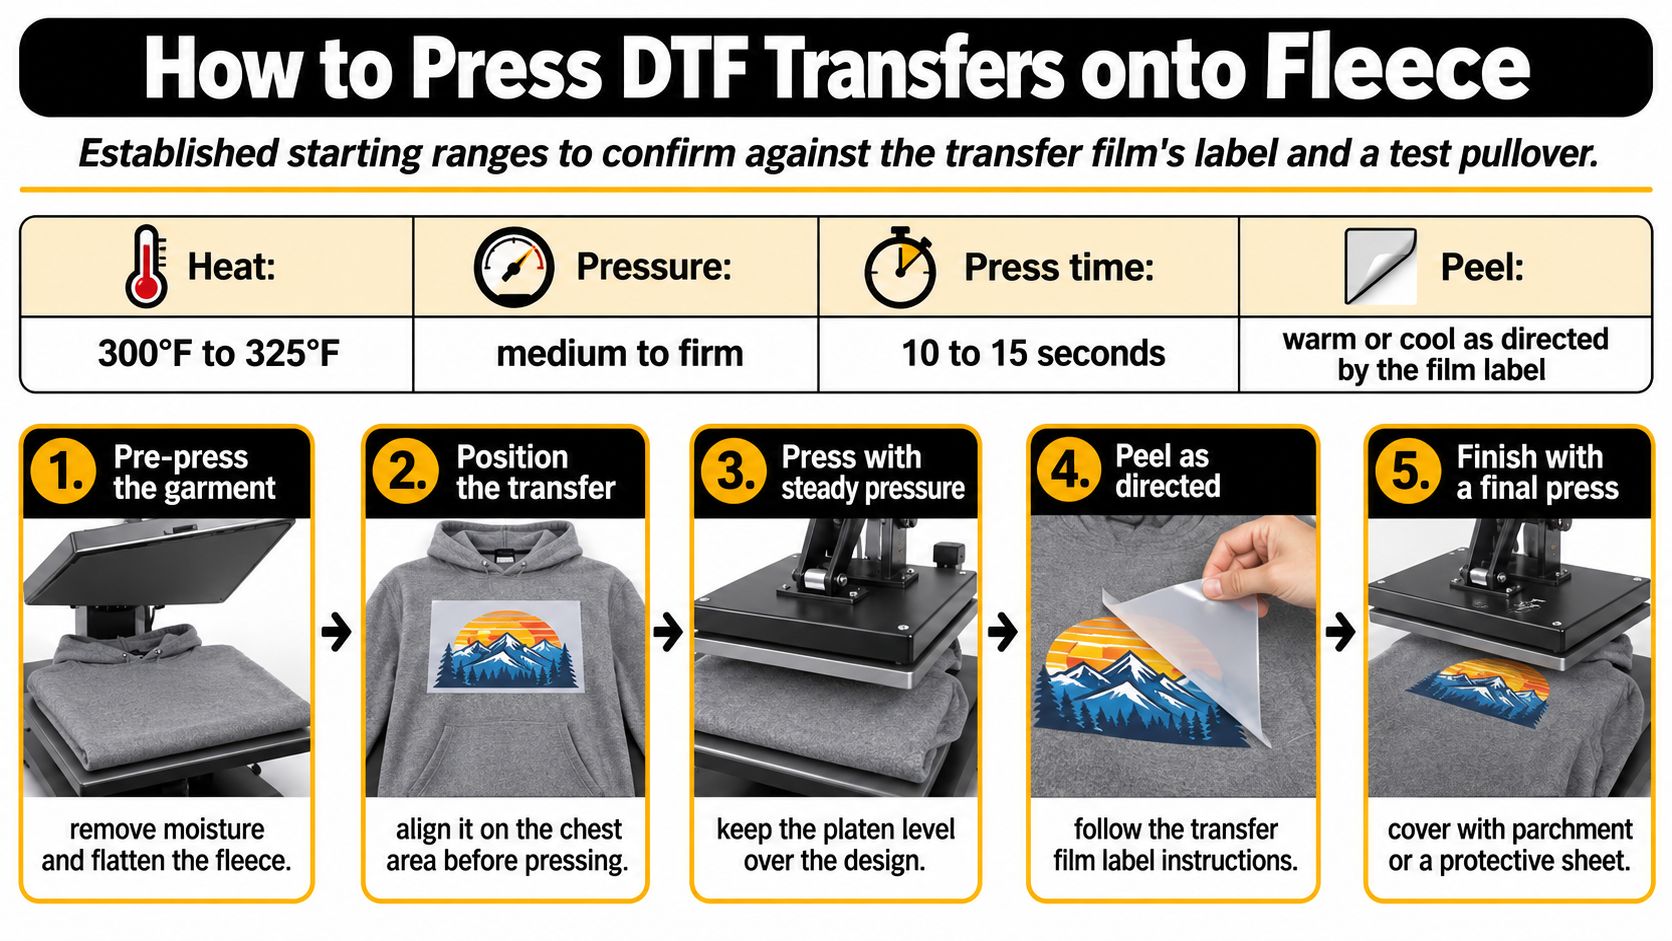
Use these as established starting ranges to confirm against your transfer film's label and a test pullover. The film label wins when it conflicts with a generic range.
| Fabric or step | Time | Pressure |
|---|---|---|
| Pre-press to remove moisture | 3-5 seconds | Light |
| Cotton-rich fleece, 50/50 or 65/35 | 10 to 15 seconds at the film label temperature | Medium |
| Polyester-rich fleece, 60/40 polyester/cotton | 10 to 15 seconds at the film label temperature | Medium |
For the temperature band and peel timing for your specific film, cross-check our heat press settings for DTF guide before the first sample, then write down what worked on that blank.
The Procedure
- Pre-press for 3-5 seconds. This drives out moisture and flattens raised fiber so the transfer contacts a consistent surface.
- Check for lint and loose fibers. Brush them away. Anything trapped under the adhesive becomes a weak point or a visible speck.
- Position the transfer in your chosen zone. Orient it exactly as the film instructions specify and confirm alignment before you close the press.
- Press at the table time with medium pressure. Put a firm pad inside the garment so pressure stays even and the back layer doesn't trap heat unevenly. The finished DTF print is applied to the chosen fabric using a heat press, so platen contact is the bond, there's no second mechanism saving a poor press.
- Peel as the film specifies, cold or hot. Guessing here causes gloss changes and edge lift that look like adhesion failure.
- Re-press only if the film calls for it. Use a protective sheet and keep it brief. Extra heat isn't insurance, it's another chance to crush loft or scorch the face.
- Let the garment rest flat before folding. Folding a warm print sets creases through the graphic.
Adhesion Without Extra Products
DTF prints carry heat-activated adhesive powder, so you don't need a separate spray adhesive. If a print lifts, I would check temperature, time, and pressure in that order before blaming the powder. Confirm every starting value on a test fleece crewneck pullover, because fleece thickness changes how quickly heat reaches the adhesive layer.
How to Wash a Printed Fleece Crewneck
Washing and drying undo more fleece prints than pressing does. The same routine protects the graphic and reduces fiber shedding, but for different reasons, heat and friction damage prints, while agitation and tumble drying release fibers.

A Care Routine That Serves Both
- Wait 24 hours after pressing before the first wash. That gives the adhesive time to fully set. Treat it as a conservative default and follow your film's cure instruction if it gives a different window.
- Turn the pullover inside out. The print shouldn't take direct drum friction or rub against zippers and heavier garments.
- Wash on a short, cool cycle with mild detergent. In the testing summarized by the microfiber release study in PMC, detergent pods did not change microfiber release, so choose detergent on cost and cleaning performance instead.
- Expect the most shedding early. That study measured an average of 7,360 fibers per square meter per liter of wash water for polyester fleece versus 87 for polyester fabric, and separate testing found polyester fleece releases the most fibers during early washes, with shedding declining after repeated laundering.
- Skip the tumble dryer where possible. Domestic tumble drying produced approximately 3.5 times more microfiber release than washing in one experiment, and dryer heat also stresses the print.
- Air dry flat or hang away from direct heat. You preserve loft, softness, and edge adhesion at the same time.
Print these steps on a care card and match them to our DTF washing instructions so customers hear one consistent routine. If a customer outsources laundry to get your laundry washed and folded from Tumble Laundry, tell them to pass along the inside-out and no-tumble-dry instructions, since a service wash defaults to speed, not print care.
A fleece crewneck pullover isn't an ordinary polyester tee in the wash. Care for the pile and the print as two separate surfaces sharing one garment.
Fixing Cracking, Lifting and Pilling After Washing
Start with edge cracking, it's the most common complaint and usually points to heat, dwell, or a seam under the art. Diagnose from the symptom, then change one variable per test pullover so the cause stays visible.
| Symptom | Likely cause | First fix |
|---|---|---|
| Print cracks at edges after washing | Too little heat or dwell, or a seam running under the print | Add time or temperature in small steps and move the print off seams |
| Corners lift within a few washes | Uneven pressure or moisture in the fleece at press time | Pre-press for 3-5 seconds and press firmly and evenly with a pad |
| Pills or fuzz around the graphic | High-friction zone or a blank with a weak pilling rating | Move the print away from underarms and cuffs and choose a rated blank |
| Print looks glossy or dull after pressing | Too hot, or hot peel used where the film calls for cold peel | Lower the temperature and follow the film's peel instruction |
| Fleece flattened under the print | Excess pressure crushing the loft | Reduce pressure and do not press longer than the table time |
The Order I Would Change Things
Move temperature in small steps first. Change dwell time before pressure, because pressure changes also change loft and hand feel. Move the print before you change the blank, since placement fixes are free and a new blank restarts your testing.
Timing differs by cause. Temperature and dwell fixes prove themselves in one test press and one wash. Pilling in a high-friction zone won't, that needs a new zone or a better-rated blank, because pilling is judged on the fabric, not the transfer. If the rating is missing, wash-test the undecorated garment before a batch.
If the print still fails after two sample presses with corrected settings, return to blank choice. At that point the fabric is the limiting factor, and more heat will only mask it until the customer washes the fleece crewneck pullover.
Confirm the Blank and Print Plan Before You Order
Run this checklist before you commit to a run, one item at a time:
- Fabric weight above 240 g/m² (7 oz/yd²): Required if the print must survive heavy wear
- Fiber blend matched to method and color family: Standard and heather colors tested separately
- Pilling rating from a named test method: Not a bare number or a marketing claim
- Print zone clear of trouble: No underarms, cuffs, rib transitions, or shoulder seams under the art
- Sample press completed: At your starting settings, washed and inspected
- Care card written: Inside out, short cool cycle, no unnecessary tumble drying
A catalog listing is a starting point to check against this list, not proof of performance. Comparing constructions helps, whether that's fleece or the French terry pieces in the Palisades Collection from Luca & Charlize, because loop and face structure change hand feel and surface stability in ways a product name doesn't capture.
Your next step is one order, not a full run. We sell the blank Gildan Heavy Blend 18000 Sweatshirt and the Gildan 18500 Heavy Blend Hoodie in sizes Small to XLarge, and the Gildan Heavy Blend Sweatshirt 18000 starts from $8.99 USD. Order a sample of the chosen blank with a single test design, press it, wash it, and confirm current pricing, sizes, and fabric specifications on the product page before you scale up.
Order one fleece crewneck pullover blank and one test transfer first, then press, wash, and inspect it using the settings and care routine in this guide. When that sample holds, visit Raccoon Transfers to order your DTF transfers by size or gang sheet and blanks for the full run with settings you've already proven.