

Silk Screen Printing for T Shirts
Likely, your path here is a common one. You've got a design in your head, maybe already mocked up on a blank tee, and now you want to turn it into something that looks real. Not homemade in the bad sense. Not crooked, patchy, or washed out after one laundry cycle. You want a shirt that feels like a shirt people would buy.
That's why people gravitate toward silk screen printing for T shirts. It has history, it has credibility, and when it's done well, it still delivers one of the most satisfying results in apparel decoration. The print can look bold, clean, and intentional. Pull a sharp print off the platen, peel the shirt up, and you understand why printers stick with the craft.
It's also one of the easiest decorating methods to underestimate.
Screen printing rewards discipline more than enthusiasm. Beginners usually think the hard part is the print stroke. It usually isn't. The hard part is controlling all the small variables before the ink ever touches the shirt: artwork prep, stencil quality, exposure, registration, off-contact, cure, cleanup. Get those right and printing feels smooth. Get one of them wrong and the whole job starts fighting you.
That's the honest version of this craft. It's rewarding, but it's not quick to learn and it's rarely the smartest option for every order. If you love the process, it can be worth every messy hour. If you care more about speed, simple fulfillment, or full-color short runs, there are cases where a different method makes more sense.
Your Journey into T-Shirt Screen Printing Starts Here
Most first-time printers start with the same assumption. Put design on screen, push ink through mesh, done. That's the broad idea, but professional results come from process control, not just effort.
Screen printing is a stencil process. You block part of the mesh, leave the image area open, and use a squeegee to force ink through the open areas onto the garment. That sounds simple because the basic concept is simple. The execution isn't.
What makes it worth learning
A good screen print has a look that's hard to fake. Solid shapes read cleanly. White ink on black cotton can look punchy and deliberate. Large graphics sit on the shirt with confidence. For bold logos, spot colors, and repeat orders, the method still earns its reputation.
There's also a physical satisfaction to it that newer methods don't always give you. You prep the screen, line up the shirt, flood the mesh, pull the stroke, and the image appears all at once. That part never really gets old.
A perfect print usually comes from boring discipline, not talent. The shop that looks smooth on print day did the hard work before print day.
What trips beginners up
The biggest beginner mistake isn't poor effort. It's assuming that every problem can be fixed at the press. It can't. If your emulsion coat is uneven, your exposure is off, or your art wasn't separated properly, no amount of squeegee confidence will rescue the job.
A few realities help set expectations early:
- It takes setup time: Every print starts before the shirt is on the platen.
- Mistakes compound: A weak stencil creates poor edges, which creates touch-up decisions, which creates inconsistent output.
- Multi-color work gets harder fast: Alignment becomes less forgiving with every added color.
- Cleanup is part of production: A shirt isn't done when it looks good. It's done when the ink is cured and the screen is cleaned.
If that sounds demanding, it is. But it's also learnable. The trick is treating screen printing like a shop process, not a craft shortcut.
Gathering Your Screen Printing Tools and Supplies
Before you print anything, you need a setup that matches your goal. Printing a few shirts for a band is different from running repeat merch orders. A home hobby setup can work, but only if you understand what each tool does.
Silk screen printing traces back to China during the Song Dynasty, approximately 960–1279 AD, with some histories placing the earliest records of printing on materials as far back as 960 AD. The technique later spread through Asia and, by the early 1900s, expanded across Europe before becoming a mainstream garment-printing method in the 20th century, as outlined in this history of custom screen printing on T-shirts.
The non-negotiable gear
You can improvise some things. You can't improvise consistency.
- Screens and frames: This is your stencil carrier. Cheap screens can work for learning, but weak mesh tension makes clean printing harder.
- Photo emulsion and scoop coater: The emulsion creates the stencil. The coater helps you apply it evenly, which matters more than beginners think.
- Transparency film or film positive: Your artwork has to block light cleanly during exposure.
- Exposure light setup: Even a simple setup can work if it's stable and repeatable.
- Squeegee: This controls ink deposit. A poor squeegee edge makes decent screens print badly.
- Ink: The actual print material. Your choice affects feel, curing, cleanup, and troubleshooting.
- Platen or print surface: You need the shirt held flat and stable.
- Tape: Screen edges should be taped before production to keep ink where it belongs.
- Washout space: You need a place to rinse screens and clean tools without rushing.
- Heat source for curing: This isn't optional. Uncured ink ruins otherwise good work.
If you're still deciding whether to build a home setup or buy a starter package, this guide to silk screen kits for home helps frame what's included and what usually gets left out.
What beginners often forget
The shopping list people imagine is usually too short. They buy a screen, a jar of ink, and a squeegee. Then they discover they still need chemicals, drying space, a dark area for coated screens, and a plan for cleanup.
A more realistic checklist looks like this:
| Item | Why it matters |
|---|---|
| Dark storage area | Coated screens need to dry fully away from light |
| Cleaning brushes and reclaim supplies | Old ink and emulsion residue will ruin future jobs |
| Shirt adhesive or platen tack | Keeps garments from shifting during the stroke |
| Test fabric or scrap shirts | Lets you dial in pressure and registration before real production |
| Rags and disposable gloves | You'll use more cleanup materials than you expect |
Buy for the work you actually plan to do
A lot of people overspend on the wrong things and underspend on the critical ones.
- If you want to learn the craft: Prioritize decent screens, an even coating method, and a dependable exposure setup.
- If you want to sell small runs quickly: Be careful. Traditional screen printing may not match your business model.
- If you want to print mostly bold logos: Screen printing fits that well.
- If you expect lots of custom names, one-offs, or detailed full-color art: Another method may serve you better.
For a broader view of what setup choices look like in print-on-demand workflows, this complete guide for POD screen printing is useful because it focuses on practical setup decisions instead of just romanticizing the process.
Shop reality: The right equipment doesn't make you good. It makes it easier to repeat what works.
Space matters more than people admit
You don't need a giant commercial shop to start. You do need separation between dirty work, coated screens, printing, and curing. If your exposure area, washout area, and print area all compete for the same cramped corner, errors increase fast.
Ventilation matters too. So does lighting control. So does having enough room to set wet prints down without stacking them into ruin.
That's the part many tutorials gloss over. Screen printing can start small, but it never stays tidy by accident.
The Pre-Press Workflow From Artwork to Stencil
Pre-press is where most jobs are won or lost. If your stencil is weak, uneven, underexposed, or misaligned, you're printing defects with confidence. New printers love to obsess over ink and squeegees. Experienced printers obsess over stencil quality first.
A practical silk-screen workflow for shirts uses a dark-room emulsion coat, screen drying, artwork alignment, exposure, washout, ink pull, and immediate screen cleanup. Home-practice guidance also stresses that the emulsion layer should be the thinnest possible, and that screens should be washed right away after printing so ink doesn't dry into the mesh and clog it, as described in this screen printing at home workflow guide.
Start with artwork that behaves well
Not every design is naturally screen-print friendly. Fine gradients, tiny text, distressed textures, and photographic detail can all create headaches. The method works best when the artwork respects the stencil process.
For shirts, think in terms of separation and edge clarity. If the design has multiple colors, each color needs its own screen. If the design relies on soft tonal shifts, you need to decide whether you're simplifying it or using another printing method entirely.
When sizing your art, placement matters as much as the design file itself. This guide on graphic size for T-shirt printing is useful because it helps you avoid a common beginner mistake: making a perfectly exposed screen for artwork that sits wrong on the garment.
If your idea is more photo-driven than screen-print driven, it can help to first review examples of how people design their own photo clothing. That tends to clarify whether you're pursuing a screen-printable graphic or an image style better suited to transfer-based production.
Build the stencil carefully
This part is less glamorous than pulling prints, but it decides the whole job.
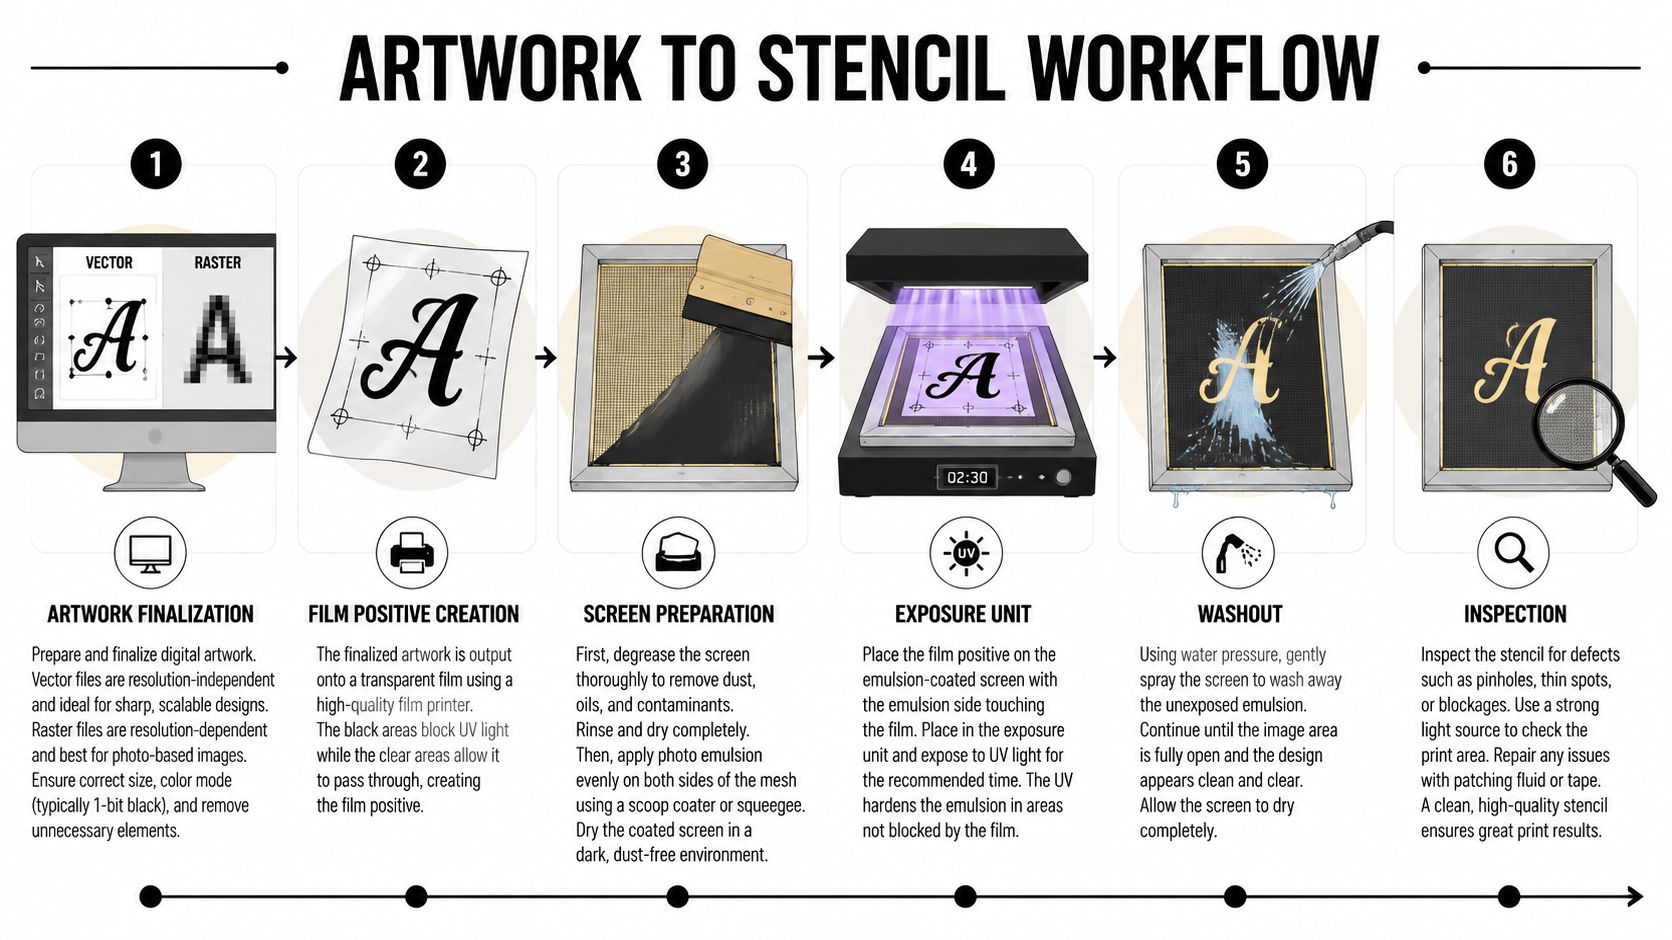
A clean stencil workflow usually follows this order:
- Finalize the artwork so shapes, separations, and size are locked.
- Output the film positive with solid opacity where light must be blocked.
- Prepare the screen by cleaning it and coating it evenly with emulsion.
- Dry the screen fully in darkness before exposure.
- Align the film and expose the screen with controlled light.
- Wash out the image area and inspect the stencil for flaws.
The phrase “thin and even” matters more than almost anything here. Heavy emulsion coats create more room for error, not less. If the coat is inconsistent, exposure becomes inconsistent. Then washout becomes unpredictable. Then you're standing at the booth wondering why one side of the image opened and the other didn't.
Drying and exposure decide everything
Most stencil failures come from rushing. The screen isn't fully dry. The room leaks light. The film doesn't sit tightly. The exposure setup shifts from one attempt to the next. Those are process failures, not mysteries.
Here's what experienced printers watch closely:
- Coating consistency: Uneven emulsion leads to weak stencils and exposure problems.
- Drying discipline: A screen that feels dry on the surface may still be wet enough to fail.
- Film contact: Poor contact softens edges.
- Screen inspection: Pinholes and weak spots should be found before printing, not after the first ruined shirt.
If your stencil looks unpredictable in the washout booth, the problem usually started before the light ever turned on.
Inspection is not optional
Once the image washes out, hold the screen up and inspect it. Don't just admire that the design appeared. Look for pinholes, weak edges, blocked detail, and any area that looks softer than it should.
A decent screen can still fail in production if you skip this check. One tiny flaw in the wrong spot can print across every shirt in the run.
Good pre-press doesn't feel dramatic. It feels controlled. The printer who makes it look easy usually has a boring, repeatable routine for coating, drying, exposing, and checking every screen before it reaches the press.
Executing the Perfect Print Stroke
You line up the shirt, drop the screen, pull the squeegee, and lift the frame expecting a clean hit. Instead, the edge looks soft, the ink coverage is patchy, or the shirt comes up with the screen. That moment teaches printing fast. The stroke gets blamed, but the stroke only exposes what the setup allows.
Good manual printing starts before the squeegee moves. The shirt has to sit flat on the platen with enough tack to stay put. The screen needs a small, consistent gap off the garment so the mesh can touch during the stroke and release as soon as the pressure passes. If that release is lazy, the print loses definition and the whole job starts feeling harder than it should.
Set the shirt and screen correctly
Registration marks can be perfect and the print can still fail if the shirt shifts. Check platen adhesive, smooth out wrinkles, and make sure seams or collars are not holding the garment unevenly. A shirt that rocks on the platen will print unevenly no matter how skilled the operator is.
Screen height matters for the same reason. Too little gap and the mesh sticks to the ink film. Too much gap and you have to use extra pressure just to reach the garment, which wears out both the stencil and your arm. New printers often try to solve every problem with force. That habit ruins more prints than it fixes.
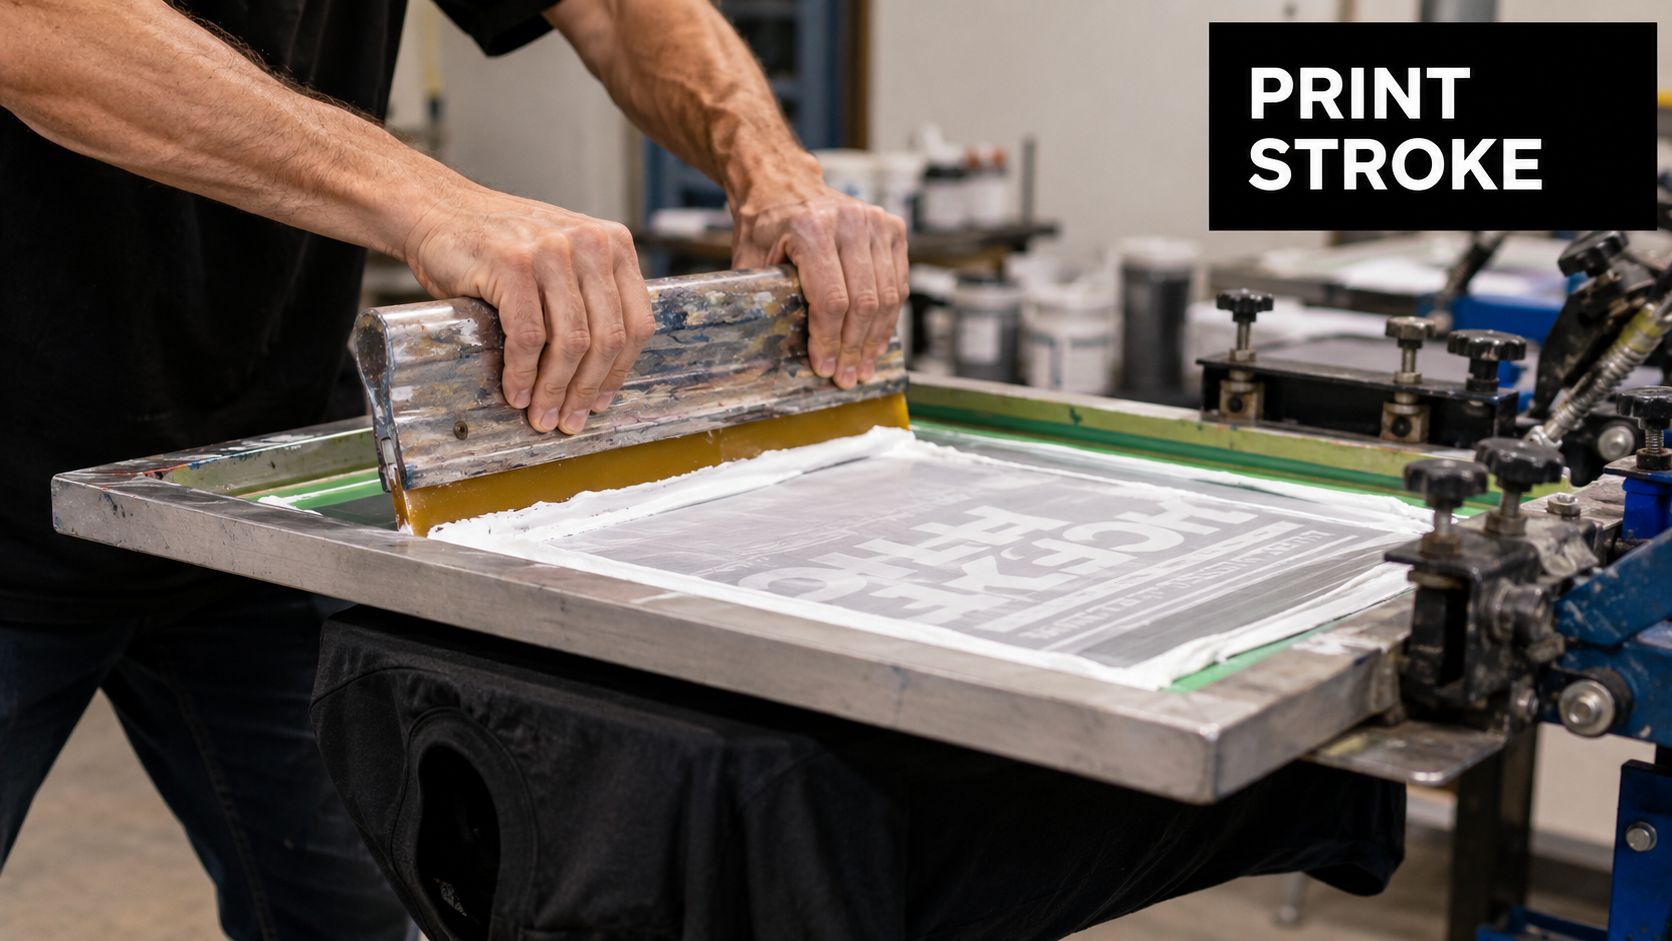
Flood first, then print with intent
A clean print usually comes from two separate motions that stay consistent from shirt to shirt.
The flood stroke fills the open mesh with ink. The print stroke pushes that ink through onto the garment. Beginners tend to blur those together, then wonder why one print is heavy, the next is light, and the third has detail plugging up.
Keep the sequence simple:
- Flood evenly: Cover the image area without leaving dry sections.
- Make one controlled print stroke: Use firm, even pressure from one side to the other.
- Watch the ink deposit: Thin spots, blurred edges, and excessive ink all point to a different problem.
- Add a second stroke only if the job needs it: Some prints need it. Many do not.
One clean pass beats two sloppy ones.
Pressure, angle, and speed have to match
Printers love asking for the magic number. The right angle. The exact pressure. The perfect speed. Real shops do not work that way. Those three variables work together, and they change with mesh count, ink body, artwork detail, and garment type.
A flatter squeegee angle usually lays down more ink. A more upright angle can give you a cleaner, leaner deposit. More pressure can help coverage, but too much pressure pushes ink past the edge of the stencil and makes fine detail look swollen. Speed matters too. A rushed pull skips and chatters. A slow, heavy pull can dump too much ink.
The best stroke feels repeatable. You should feel the mesh make contact, shear the ink, and release cleanly behind the blade. If every print feels like a wrestling match, stop and fix the cause. Check off-contact, ink consistency, mesh tension, or a screen that is starting to clog.
Multi-color jobs punish sloppy habits
A one-color chest print will forgive a lot. A four-color front print on black shirts will not.
Tape your screen edges, test your registration on scrap or pellons, and watch how each color sits against the last one before you start the run. Small registration errors look huge once the stack of printed shirts starts growing. Nothing wastes time faster than realizing shirt twelve looks different from shirt two.
Dark garments add another layer of work. A white underbase often improves opacity, and many shops flash between colors to keep the next layer from smearing. That process works, but it slows production and gives you more chances to drift out of alignment. This is one of the honest limits of screen printing. For short runs, artwork with lots of colors, or orders that need to turn fast, DTF transfers are often the more practical choice. The print can still look professional, and you skip a lot of setup that makes screen printing expensive to do badly.
What experienced printers watch during the run
The print stroke is not one decision. It is a series of checks repeated every few shirts.
Look at these points while you print:
- Edge sharpness: Fuzzy edges usually point to poor screen release or too much pressure.
- Coverage: Thin ink deposit can come from weak pressure, poor flood, or ink that is not flowing well.
- Garment movement: If the shirt lifts, fix the platen tack before the next print.
- Stencil condition: Fine detail breaking down means the screen may not survive the whole run.
This is the part many beginners underestimate. Screen printing is satisfying because a good print looks and feels earned. It also asks for setup time, consistency, and enough discipline to stop when something drifts. For shops that enjoy the craft and print enough volume to justify the labor, that effort pays off. For everybody else, especially on small multi-color orders, there is no shame in choosing a method that gets the job out cleanly with less setup.
Curing, Cleanup, and Solving Common Problems
The job is not finished when the last shirt comes off the platen. It is finished when the ink is cured, the screens are cleaned, and the next wash test does not expose a mistake you could have caught in the shop.
That part frustrates beginners because a print can look perfect and still fail later. Ink that feels dry on the surface can still be undercured. A screen that looks “good enough” after a quick rinse can hold residue in the corners and ruin the next run. This is one reason screen printing has a steeper learning curve than many people expect. The print stroke gets the attention, but curing and cleanup decide whether the work holds up.
Cure the print all the way through
Heat has to reach the ink film properly, not just warm the top layer. If you rush this step, the print may crack, fade early, or wash out before the shirt has seen real use.
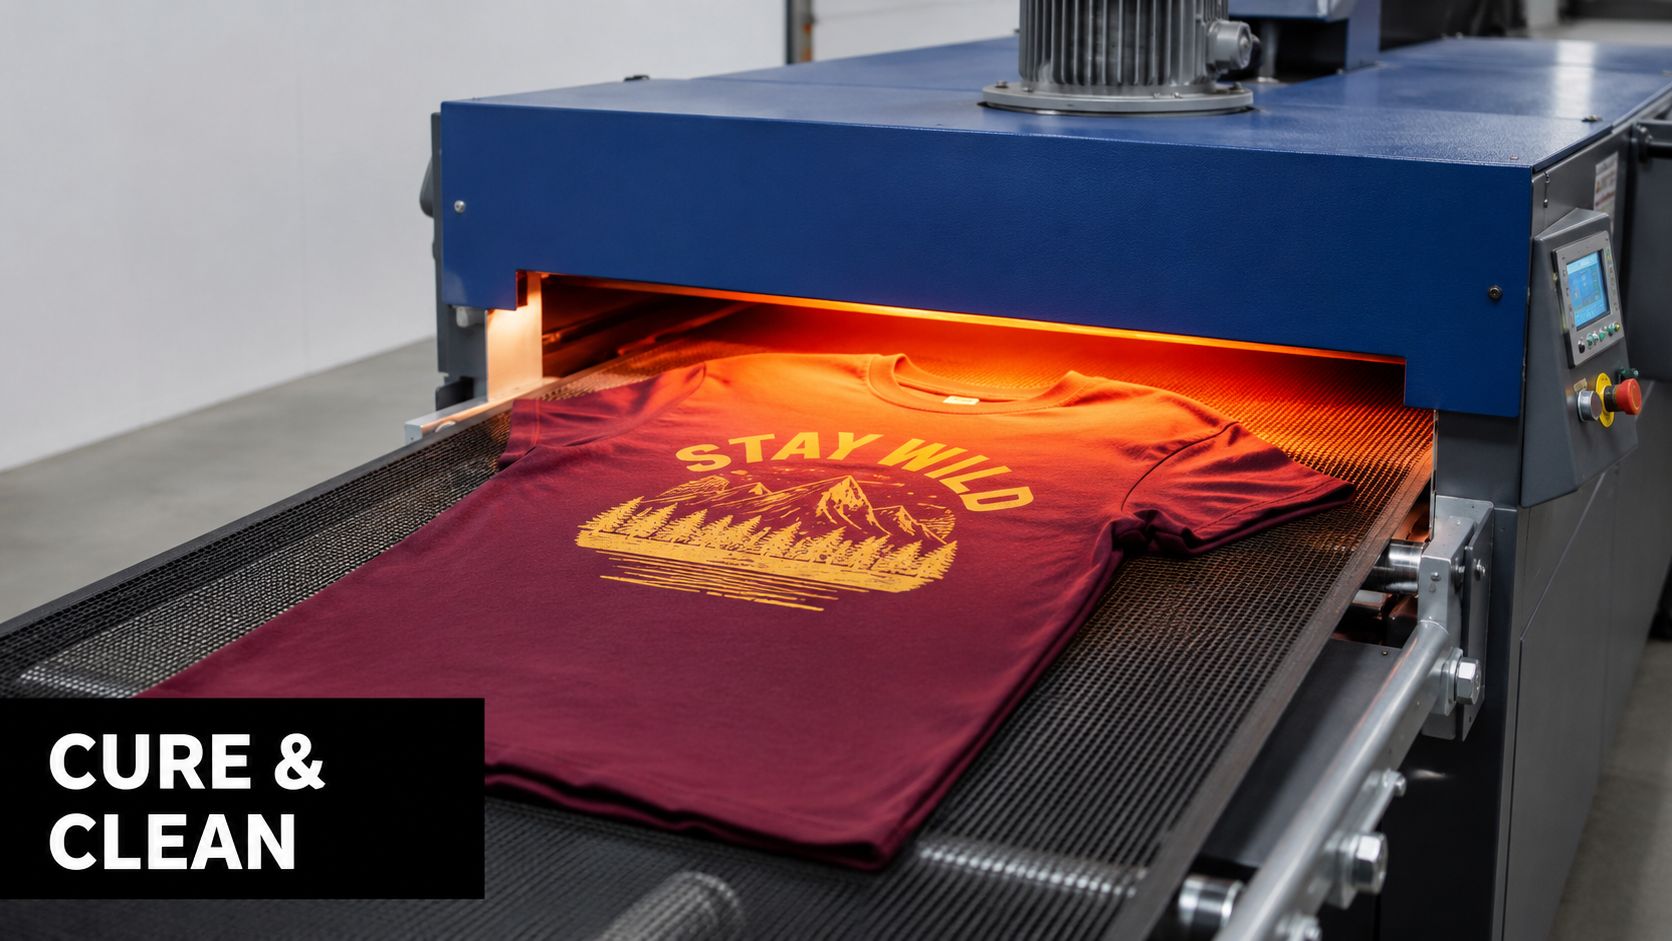
A controlled dryer is the easiest way to get repeatable results. A heat press can work for small batches if you pay attention and test your process. A handheld heat source is where many new printers get into trouble because it is hard to apply heat evenly from shirt to shirt.
Use the method you can repeat. That is the definitive rule.
If you are running production for clients, test cured prints instead of trusting appearance alone. Stretch the print. Wash a sample. Keep notes on what worked. Shops that do this catch problems early. Shops that skip it usually learn the hard way.
This is also where some orders stop making financial sense for screen printing. If the run is small, the artwork is full color, and speed matters more than the craft process, a transfer method can cut out a lot of risk. This comparison of silk screen printing vs heat transfer lays out that trade-off clearly.
Clean the screen before the ink wins
Cleanup is dirty, repetitive work. It also protects your margins.
Leave ink in the mesh too long and it starts to dry in places you cannot always see at first. Then the next time you pull that screen, coverage gets uneven, fine details close up, and you waste time trying to diagnose a problem you created during cleanup.
A good shutdown routine is simple:
- Scrape usable ink out of the screen quickly: Do not let it sit in the image area while you answer emails or pack boxes.
- Wash both sides of the mesh thoroughly: Residue hides on the shirt side more often than beginners expect.
- Inspect corners, frame edges, and taped areas: Ink collects there and later flakes loose into prints.
- Reclaim the screen fully if the job is done: Half-finished reclaim work turns into a harder job tomorrow.
I tell new printers this all the time. Five extra minutes of cleanup beats an hour of trying to recover a neglected screen.
Read the symptom before you touch the setup
Random adjustments waste shirts. Good troubleshooting starts with the flaw in front of you.
| Symptom | Likely cause | What to do |
|---|---|---|
| Blurry edges | Screen not releasing cleanly, too much pressure, or the shirt shifting | Check screen lift, reduce pressure, and make sure the pallet adhesive is still holding |
| Ink will not clear the mesh | Ink buildup, blocked mesh, or a weak flood | Clean the screen, reflood evenly, and check ink condition |
| Stencil starts breaking down mid-run | Weak emulsion, poor exposure, or too much abuse on press | Stop the run and inspect the stencil before you lose more shirts |
| Pinholes in the print | Small stencil defects or debris in the screen | Block the defects before production and inspect screens under good light |
| Registration drifts | Loose setup or shirts not loading consistently | Recheck registration points and slow down the loading rhythm |
| Print fails after washing | Cure was incomplete or inconsistent | Test your cure process on samples before delivering the order |
One hard rule applies here. If the same defect shows up twice in a row, stop and fix it. Printing through a problem rarely saves time.
That honesty matters, especially for small shops. Screen printing rewards discipline, but it punishes shortcuts. For repeat jobs and simple designs, that effort can be worth it. For short runs, multi-color art, or orders you need out the door fast, DTF is often the more practical professional choice.
Screen Printing vs DTF When to Choose Each Method
This is the question many people should ask sooner. Not “Can I screen print this?” but “Should I?” Traditional screen printing is excellent for some jobs. It's also the wrong tool for others, especially if you care more about fast fulfillment and design flexibility than about the craft process itself.
A key economic reality often gets skipped in beginner guides. Each color requires a separate screen, which is one reason screen printing is usually strongest for bold, solid designs and can become less cost-effective for small runs or multi-color artwork, as explained in this screen printing pros and cons breakdown.
Where screen printing still makes sense
Screen printing shines when the artwork is straightforward and the order repeats enough to justify setup. Once the screens are made and the press is dialed in, repeating the same print can be efficient and consistent.
That usually fits jobs like:
- Brand merch with simple spot colors
- Event shirts with stable artwork
- School, team, or staff apparel
- Designs where ink feel and classic print aesthetics matter
For those jobs, the setup labor can pay off because you're not rebuilding the job every shirt.
Where DTF is the smarter move
DTF changes the decision because it strips out much of the setup burden. You don't coat a screen, expose a stencil, register separate colors, or reclaim mesh after the run. That matters if your orders are mixed, small, personalized, or image-heavy.
A lot of modern businesses don't need a craft bench. They need a production method that handles variation without turning every order into a setup project.
That's why DTF often fits better for:
- One-off orders
- Small batch ecommerce runs
- Full-color graphics
- Photo-based designs
- Names, numbers, and variable artwork
- Businesses without darkroom or washout space
If you're weighing the two approaches from a production standpoint, this comparison of silk screen printing vs heat transfer helps clarify why many smaller operators move toward transfer-based workflows.
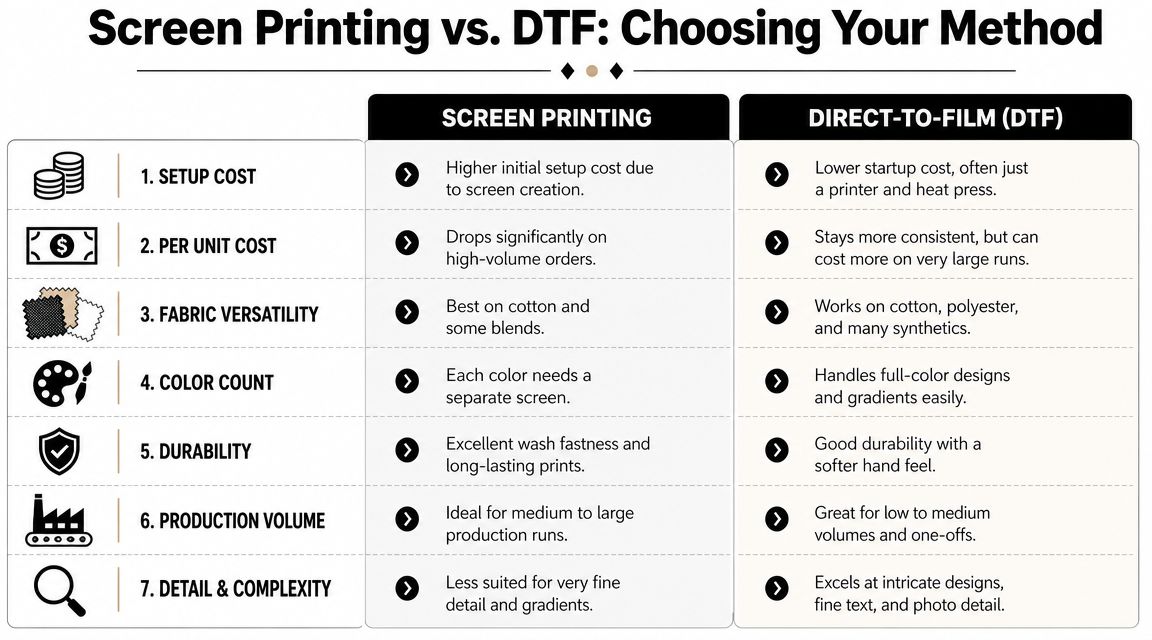
Comparison of screen printing vs DTF transfers
| Factor | Screen Printing | DTF (Direct-to-Film) |
|---|---|---|
| Setup | Requires screen prep, stencil creation, registration, and cleanup | Uses transfers and heat application, with less setup labor |
| Color handling | Each color needs its own screen | Handles full-color artwork more easily |
| Best order type | Repeats, larger runs, bold graphics | Small runs, one-offs, and variable designs |
| Learning curve | Steeper, with more room for technical error | Easier to operationalize for many small businesses |
| Production space | Needs room for coating, exposure, printing, and washout | More compact workflow |
| Shop preference | Best for printers who value process control and repeat jobs | Best for sellers who value speed and flexibility |
The honest trade-off
If you love printing as a craft, screen printing can be very satisfying. If you run a shop built around quick custom orders, it can become a bottleneck. There's no shame in that. A lot of people force screen printing into jobs it doesn't fit because it feels more “real.” Customers usually care about the final shirt, not whether you spent the afternoon reclaiming screens.
For operators who want transfer-based production without running a full print shop, Raccoon Transfers is one example of a service that provides DTF transfers for custom apparel workflows. That kind of option makes sense when your business needs full-color flexibility and simpler application rather than manual screen setup.
The practical rule is simple. Choose screen printing when repetition justifies the setup. Choose DTF when variation, speed, and simplicity matter more.
Frequently Asked Questions About Screen Printing
Is screen printing still the standard for T-shirts
It's still one of the defining methods in apparel decoration. Modern T-shirt screen printing took a major step forward with Samuel Simon's 1907 patent in England, and later with Michael Vasilantone's 1960 screen-printing machine for clothing, which helped make mass production practical. One industry source also claims that screen printing on T-shirts accounts for about 50% of all printing activity in the U.S., according to this brief history of T-shirt screen printing.
Does a well-made screen print last
Yes, if it's cured properly and the stencil and print process were solid. Most durability failures come from weak curing, bad ink deposit, or stencil issues that should have been caught during production. A great-looking print can still fail if the shop treated curing like an afterthought.
Can I use a simple home light setup for exposure
You can, but only if the setup is consistent. Exposure is not a place for guesswork. One home-oriented guide recommends about 13–14 minutes of exposure at roughly 2 feet from the light source for a typical setup, which shows how specific this stage can be. If you change the light, distance, or drying conditions without testing, you'll get unpredictable stencils.
Why do beginners struggle with multi-color prints
Because every added color adds registration work. Separate screens have to line up cleanly on the garment, and small positioning errors become obvious fast. Dark garments can add another layer of complexity because printers often use an underbase before the visible colors go down.
Most “printing problems” that beginners notice on press are really setup problems that started earlier.
Is screen printing the right choice for a small clothing brand
Sometimes. If your line centers on repeat graphics and simple color separations, it can fit well. If your catalog changes constantly, uses lots of color, or relies on made-to-order fulfillment, another method may be more practical. That's not a downgrade. It's just matching the production method to the business model.
What makes screen printing satisfying despite the hassle
Control. When the screen is exposed correctly, the registration is locked in, the stroke feels right, and the print cures properly, the result has a confidence to it. Good screen printing looks deliberate. It rewards patience, and that's part of why printers stay attached to it even when newer methods are easier.
If you like the look of custom apparel but don't want the full darkroom, stencil, and cleanup burden of screen printing, Raccoon Transfers is a practical option to consider. They provide DTF and UV-DTF transfers for apparel and hard-surface projects, which can make small runs, full-color designs, and fast-turn custom orders much easier to produce with a heat press workflow.