
How to Transfer a Picture Onto a Shirt A Practical Guide
The easiest way to get a picture onto a shirt at home is with specialty heat transfer paper. You just print your design on it and use a regular household iron to apply it. For results that look and feel professional, though, modern methods like Direct-to-Film (DTF) are the way to go. They're soft, incredibly durable, and hold up wash after wash.
From Digital Image to Wearable Art
Turning a picture on your screen into a piece of clothing you can actually wear is a really cool process. It’s how you transform a simple graphic into a real-life statement piece.
Whether you're a DIYer making a one-off gift, an artist wanting to sell your work on merch, or a small brand launching a new clothing line, knowing how to do this is a game-changer. This guide will walk you through everything, from getting your artwork ready to making that final press.
We'll break down the most popular methods so you can figure out what’s best for your specific project. By the end, you'll have the foundation you need to create shirts that not only look amazing but are made to last.
Getting Your Artwork Ready for Print
Before you get anywhere near a printer or a heat press, a few crucial prep steps will make or break your final product. The quality of your shirt is a direct reflection of the quality of your digital file.
First things first, you have to ensure your image is free from copyright issues. It's a step people often forget, but using someone else's art without the proper permission can land you in serious hot water. Always double-check that you have the rights to print the image you've chosen.
Key Takeaway: A great-looking custom shirt starts long before you turn on the heat press. The absolute first step is locking in a high-resolution image that you have the legal right to use.
Next up is figuring out the size and placement of your design. An image can look perfect on your monitor but end up looking way too small or awkwardly placed once it's on a shirt. Getting the scale right is what separates an amateur look from a professional one.
For a deep dive into this, check out our guide on finding the perfect graphic size for a t-shirt. It has detailed charts and tips for all kinds of shirt sizes and common placements.
Nailing these details from the get-go is the best way to make sure your creative vision comes to life exactly how you imagined it.
Choosing the Right Way to Get Your Picture on a Shirt
Picking the right method to transfer your image onto a shirt is easily the most important decision you'll make. It’s what separates a professional-looking, durable design from a shirt that cracks and fades after one wash. The technique you choose will define the final look, the feel of the print on the fabric, and how long it lasts.
We’re going to walk through the four most common methods out there: Direct-to-Film (DTF), Heat Transfer Paper, Heat Transfer Vinyl (HTV), and the old-school classic, Screen Printing. Each one has its place, whether you’re making a single custom tee for fun or running a small brand.
First, What Are You Trying to Make?
Before you even think about printers or heat presses, you need a clear picture of your end goal.
Are you whipping up a few shirts with a simple, one-color logo for a family reunion? Or are you trying to print a complex, full-color photograph that needs to look absolutely perfect?
The answer to that question alone will start steering you in the right direction. For example, a detailed photo loaded with color gradients is a terrible match for traditional HTV, which is really built for solid, bold shapes.
This quick decision tree can help you visualize the best path for your project.
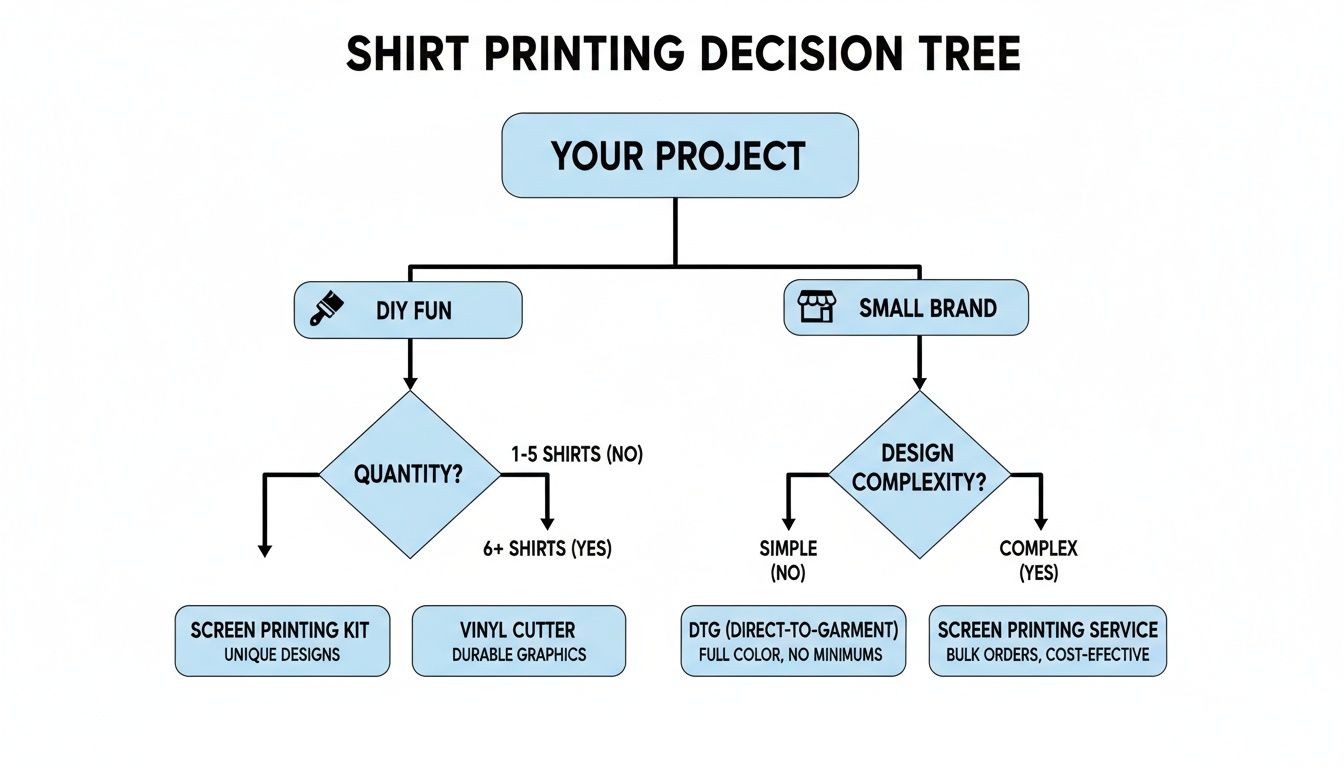
As you can see, the first big question is whether this is a personal project or a business venture. That single choice immediately narrows down your options.
Comparing the Top Four Methods
Let’s get into the nitty-gritty of each technique. Knowing the pros and cons will help you make a smart choice that fits your budget, the equipment you have (or don't have), and the quality you’re aiming for.
Heat Transfer Paper
For many people just starting, this is the entry point. It's cheap, easy to find, and you can use a regular inkjet printer and a home iron. You just print your design onto the special paper and iron it on. The downside? The print often feels like a stiff plastic patch on the shirt and can start to crack or fade pretty quickly, sometimes after just a few washes.
Heat Transfer Vinyl (HTV)
HTV is a solid step up in durability and is my go-to for bold, simple graphics like text or single-color logos. You use a cutting machine to cut your design from colored vinyl sheets and then press it onto the shirt. It’s incredibly tough, but it’s a pain for multi-color or photographic images since every single color has to be cut and layered separately.
Screen Printing
This is the industry standard for big runs. It works by pushing ink through a stenciled screen directly onto the fabric. The result is a vibrant, durable print that feels incredibly soft because the ink becomes part of the shirt. The catch? The setup is a beast—it's complex and expensive, making it completely impractical for one-off prints or designs with a ton of colors.
A Quick Word of Experience: The high setup cost for screen printing is per color. That means it only starts making financial sense when you’re ordering a large batch of the exact same, simple design. For anything else, you'll find better and more cost-effective options.
Direct-to-Film (DTF)
DTF is the modern solution that really feels like it combines the best of all the other methods. A specialized printer creates a full-color transfer on a film, which you then press onto the shirt. DTF can handle unbelievably detailed, vibrant photographic images with an unlimited color palette. The transfers are soft, stretchy, and so durable they often outlast the shirt itself.
If you want to dive deeper into the technical side, we have a whole guide covering the different types of heat transfers.
This method has quickly become a favorite for both small businesses and serious hobbyists. The custom t-shirt market is booming—it grew from $8.17 billion to a projected $9 billion and is on track to hit $13.55 billion. While traditional screen printing still holds a 51.8% market share, its bulky process doesn't quite fit today's on-demand world. DTF offers the speed and flexibility that modern e-commerce brands need.
Shirt Transfer Method Comparison
To make things even easier, here’s a straightforward table comparing the key features of each method. This should help you see the trade-offs at a glance.
| Feature | DTF (Direct-to-Film) | Heat Transfer Paper | HTV (Heat Transfer Vinyl) | Screen Printing |
|---|---|---|---|---|
| Best For | Full-color photos, complex graphics, any fabric type | Quick DIY projects, single-use or novelty shirts | Simple text, logos, one-color designs | High-volume orders (100+), simple graphics |
| Durability | Excellent (50+ washes) | Low (5-10 washes) | Very Good (50+ washes) | Excellent (can outlast the shirt) |
| Feel on Shirt | Soft, flexible, lightweight | Stiff, plastic-like film | Thicker layer, can feel heavy | Very soft, ink dyes the fabric |
| Color Vibrancy | Excellent, unlimited colors | Good, but can fade quickly | Excellent, but limited to vinyl colors | Excellent, very vibrant |
| Startup Cost | Moderate (outsource) to high (own equipment) | Very Low (printer, iron, paper) | Low (cutter, vinyl, heat press) | Very High (screens, press, inks) |
The table makes the choices pretty clear. If you need top-notch photographic quality and durability for any quantity, DTF is the undisputed winner. But if you just want to get a picture on a shirt for a one-time event as cheaply as possible, heat transfer paper will get the job done.
Prepping Your Artwork for a Perfect Print
The final quality of your custom shirt is decided long before you ever turn on a heat press. I’ve seen it time and time again: a fantastic design idea falls flat because the initial file wasn't up to snuff. Think of your digital file as the blueprint; any flaws in that blueprint will show up in the final product. Getting this stage right is the secret to avoiding frustrations like blurry images and dull, disappointing colors.
It all starts with the quality of your source image. That low-res photo you pulled from social media might look fine on your phone, but it will turn into a pixelated mess when blown up to fit on a shirt. This is where Dots Per Inch (DPI) becomes your most important spec.
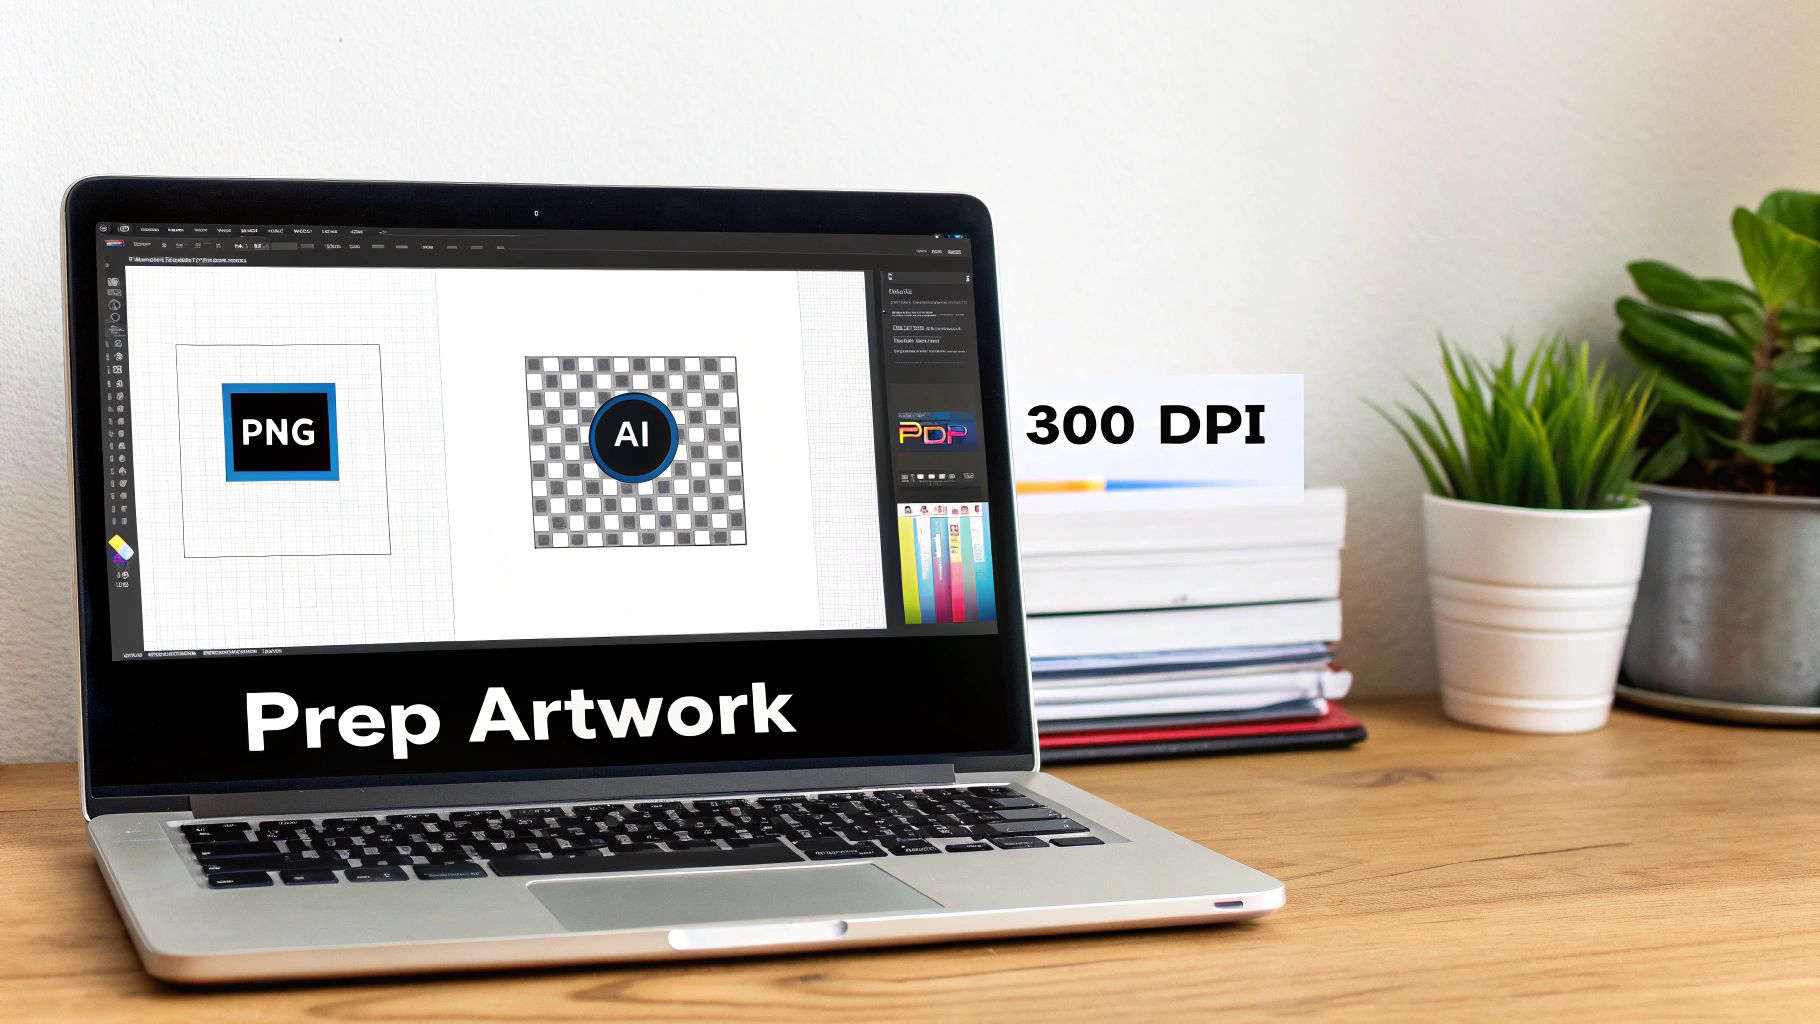
Getting Resolution and Color Right
For printing, 300 DPI is the industry gold standard. This tells you how many tiny dots of ink will be printed within each inch of fabric. More dots mean more detail and a sharper image. In contrast, most images you find online are only 72 DPI, which works for glowing screens but is totally inadequate for a physical print.
Here’s a hard-learned lesson: always start with the highest resolution file you can get your hands on. You can always scale an image down without losing quality, but you can never successfully scale it up. Trying to enlarge a low-res image just stretches the pixels you already have, giving you that telltale blocky, fuzzy look.
Another critical detail is the color mode. Your computer screen uses RGB (Red, Green, Blue) to create colors with light. Printers, however, use CMYK (Cyan, Magenta, Yellow, Black) to mix physical inks.
Pro Tip: Always design or save your final print file in CMYK. If you send an RGB file to a professional printer, their system will convert it automatically, and you might not like the results. That vibrant electric blue on your screen can easily turn into a duller, more muted shade on the shirt.
Choosing the Right File Format
With resolution and color sorted, you need to save your artwork in the right format. Not all file types are created equal, especially when it comes to custom apparel.
- PNG (Portable Network Graphics): This is your go-to for most DTF and heat transfer projects. The killer feature? PNGs support transparent backgrounds. This is absolutely essential if you want to print a design with an irregular shape without a clunky white box around it.
- AI (Adobe Illustrator): If you're working with vector graphics—designs built from mathematical lines and shapes instead of pixels—an AI file is perfect. Vectors can be scaled to the size of a billboard without losing an ounce of quality.
- PDF (Portable Document Format): PDFs are fantastic for locking down your design's layout and fonts. They’re a reliable, safe bet when sending files off to a professional service like Raccoon Transfers.
One of the most common rookie mistakes I see is forgetting to remove the background. Unless a solid square is part of your design, you must make sure the background is transparent before you save that PNG.
Work Smarter with Gang Sheets
If you're printing more than one design, putting them on a gang sheet is the smartest, most cost-effective way to do it. A gang sheet is just a large printable area where you can arrange multiple images. This lets you pay for one big sheet instead of a bunch of small, individual ones.
Think of it like baking cookies—you fit as many as you can onto one tray to make the most of your oven space. Most online gang sheet builders make this super easy. You just upload your individual files and drag them around to fill the sheet with minimal wasted space.
To make sure your design really pops, try applying some basic design principles like mastering visual hierarchy and layout techniques when arranging your artwork. A well-organized gang sheet doesn't just save you money; it shows you're thinking like a pro. Taking these steps ensures your picture transfers onto the shirt looking crisp, vibrant, and exactly how you imagined it.
The Heat Press Application Process
This is where all your prep work pays off. Your digital file is ready, the transfer is printed, and your shirt is waiting. The heat press is where the real magic happens, permanently bonding your design to the fabric to create a professional, wearable piece of art. We’ll be focusing on the Direct-to-Film (DTF) method here, but honestly, the core principles apply to heat transfer paper, too.
The process itself isn't complicated, but you have to be precise. Every single step, from getting the garment ready to the final press, makes a huge difference in the final quality and how long the print lasts. It's often the small, overlooked details that separate a flawless finish from a frustrating failure.
The All-Important Pre-Press
Before you even think about laying down your transfer, you must pre-press the shirt. This is, without a doubt, the most skipped step for beginners—and it’s one of the most vital for getting a good stick.
Every garment, even one that feels bone dry, holds a surprising amount of moisture in its fibers. Pressing the shirt for just 5-10 seconds at your target temperature does two crucial things. First, it zaps any of that hidden moisture. If you skip this, the moisture turns to steam during the main press, messing with the adhesive and leading to a weak bond that will start peeling after the first wash.
Second, it smooths out every wrinkle and crease, giving you a perfectly flat canvas. Trust me, trying to apply a transfer over a wrinkle is a recipe for disaster; the graphic will look warped and uneven.
Takeaway Tip: Think of the pre-press as your insurance policy. It guarantees a stronger bond, a cleaner look, and a more durable print every single time. Don't skip it!
Nailing Your Transfer Placement
Once the shirt is pre-pressed and smooth, it's time to position your transfer. Getting this right is what separates a professional-looking shirt from something that screams "homemade." A design that’s even slightly crooked or off-center is an instant giveaway.
A simple trick to find the vertical centerline is to fold the shirt in half lengthwise and give it a quick, light press. This leaves a faint crease to guide you. For horizontal placement, a good rule of thumb for most adult t-shirts is to place the top of the design about 3 to 3.5 inches (or roughly four fingers' width) down from the bottom of the collar.
Once you’re happy with the placement, use a little heat-resistant tape on the corners of your DTF transfer. This is a small step, but it ensures the design doesn't slide around when you lower the heat press.
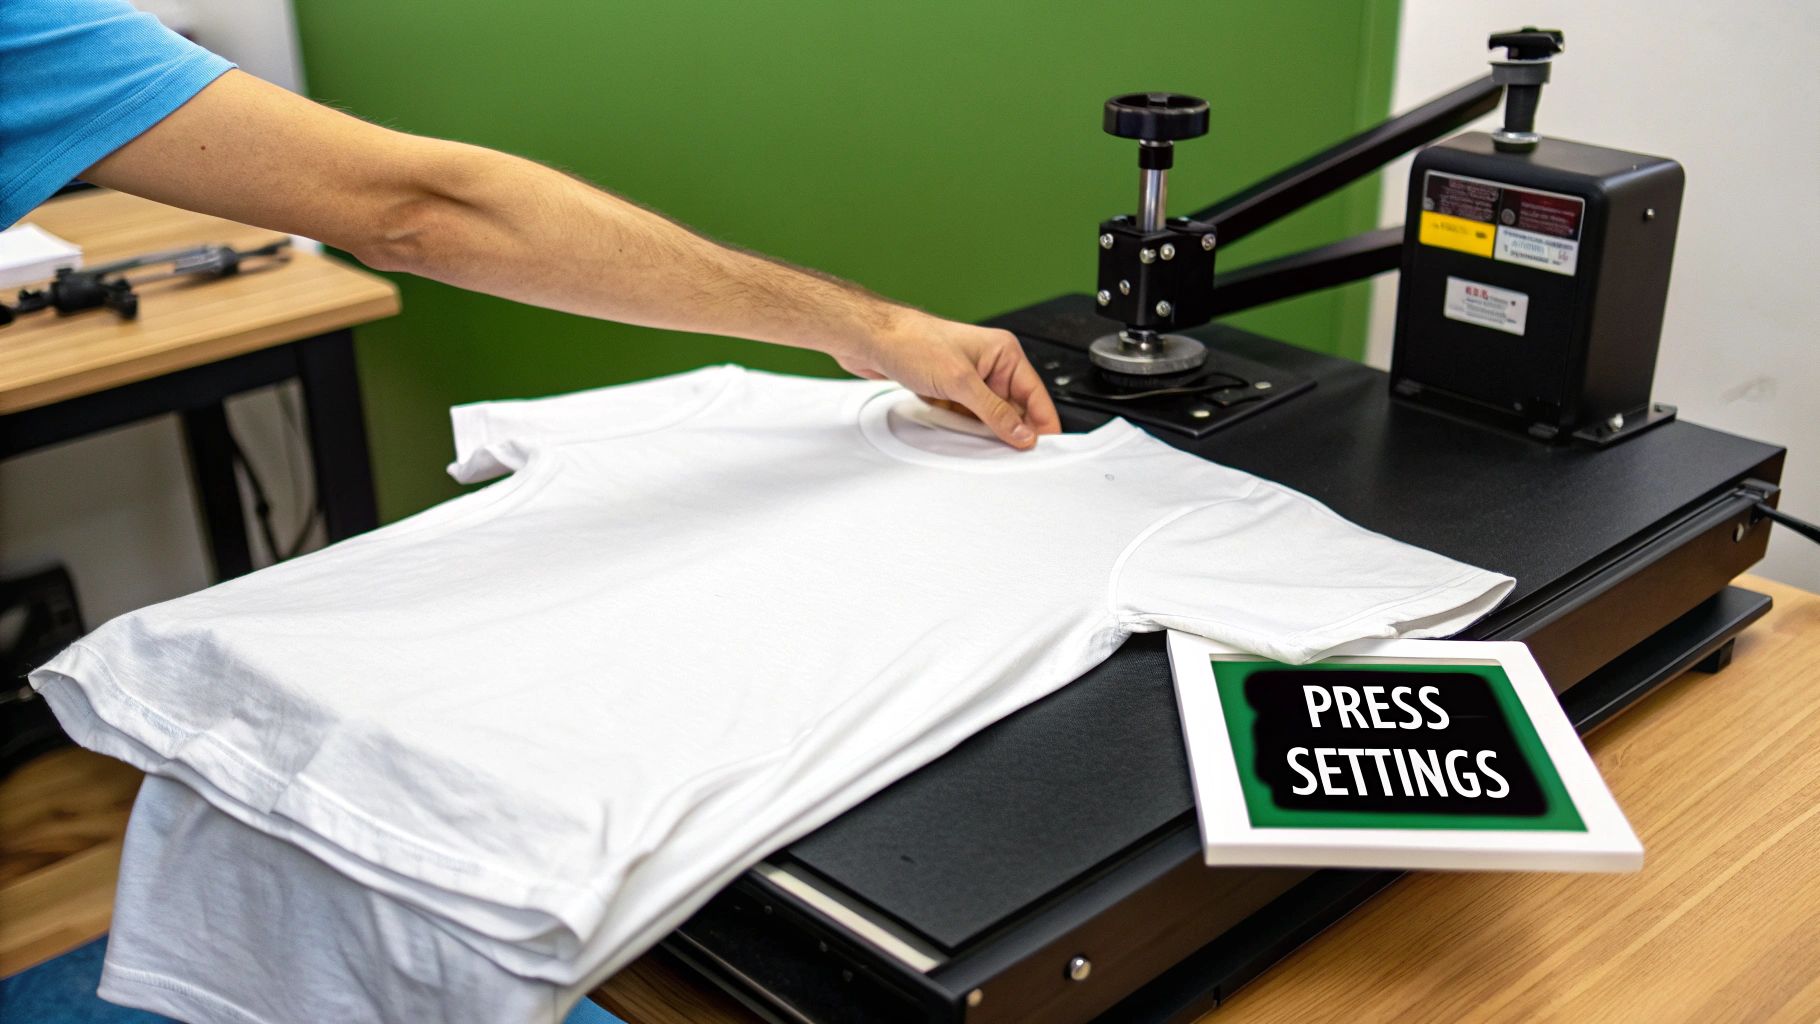
Setting Your Heat Press Correctly
Dialing in the right settings on your press is everything. You're juggling three key variables: temperature, time, and pressure. These settings will vary based on the fabric you’re using and the specific type of transfer. Getting them wrong can lead to scorched fabric on one end or a failed transfer on the other.
For a deep dive into settings for all kinds of materials, you should definitely check out our complete guide on how to use a heat press for t-shirts. It’s an essential resource for getting consistent, reliable results.
As a quick starting point, here are some common settings for DTF transfers:
| Fabric Type | Temperature Range | Time | Pressure |
|---|---|---|---|
| 100% Cotton | 300-320°F (149-160°C) | 10-15 seconds | Medium |
| Polyester Blends | 280-300°F (138-149°C) | 8-12 seconds | Medium |
| 100% Polyester | 260-280°F (127-138°C) | 8-10 seconds | Light |
Remember to always start with the manufacturer's recommendations and do a test press on a scrap piece of fabric if you're ever in doubt.
The Peel: Hot or Cold?
After that first press, you need to peel away the carrier film. This is where you’ll hear the terms "hot peel" and "cold peel." The right method depends entirely on the type of DTF transfer you have. Here at Raccoon Transfers, all our DTF products are designed for a cold peel to ensure the best possible quality and finish.
- Hot Peel: The film is removed immediately after the press opens, while everything is still hot. It's faster but can sometimes leave the design with a glossier finish.
- Cold Peel: You have to wait for the garment and transfer to cool down completely before peeling. This process lets the adhesive fully cure and bond with the fabric, resulting in a much more durable, matte finish.
To do a cold peel, just lift the shirt from the press and set it aside for 30-60 seconds until it’s cool to the touch. Then, grab a corner and peel the film back smoothly at a low angle.
The rise of DTF technology is a huge deal in the custom apparel world, fueling an anticipated 11.8% CAGR in the US market. A big reason for this growth is the specialized adhesive powder, which creates incredibly crisp designs that stick to almost any material without special pre-treatments, a point highlighted in this custom t-shirt market analysis.
The Final Curing Press
You're almost there! Once the film is peeled away, there’s one last step to lock the design in for good. This is the curing press, and it’s what gives your print its final texture and wash-proof durability.
Place a protective sheet, like parchment paper or a Teflon sheet, over the exposed design. This prevents the hot platen from making direct contact with the ink, which could ruin the finish.
Press the shirt one more time for 5-10 seconds, using the exact same temperature and pressure settings as before. This final press gently melts the ink, helping it fuse deeper into the fabric's weave. It also gives the design a soft, matte finish that feels less like plastic and more like part of the shirt itself. After this, your custom shirt is officially done and ready to survive the washing machine.
Troubleshooting and Aftercare for Lasting Results
Getting your custom shirt to look great is just the first step. The real trick is making it last. How you care for that garment after it comes off the heat press makes all the difference in whether your design stays vibrant or starts to fade and peel after a few washes.
The first wash is a make-or-break moment. You absolutely have to wait at least 24 hours after pressing before that shirt sees the inside of a laundry machine. This cool-down time is crucial; it lets the adhesive fully cure and lock into the fabric's fibers. If you get impatient here, you're practically inviting the design to peel.
How to Properly Wash and Dry Your Custom Shirt
Once it's time for that first wash, a few simple habits will protect your hard work. Think of it as preserving the print's flexibility and color.
- Turn it inside out. This is the golden rule, no exceptions. It protects the design from rubbing against other clothes and the inside of your washer.
- Wash in cold water. Hot water is the enemy of custom prints. It can weaken the adhesive and make the colors fade or bleed. Stick to a gentle cycle with cold water.
- Use a mild detergent. Skip the harsh stuff, bleach, and fabric softeners. They’re too aggressive and can eat away at the ink and the transfer film.
- Hang dry if you can. A machine dryer’s heat is brutal on any heat-applied graphic. For the best, longest-lasting results, just hang it up to air dry. If you’re in a pinch and must use a dryer, choose the absolute lowest heat setting and pull it out as soon as it's done.
And if you ever need to iron the shirt? Never let a hot iron touch the graphic directly. Either keep the shirt inside out or throw a piece of parchment paper over the design first.
Fixing Common Transfer Problems
Even when you do everything right, sometimes things just don't go perfectly. Don't worry—most common issues have a straightforward fix.
Are the edges of your design lifting right after you press it? This is almost always a pressure or temperature issue. The culprit is often uneven heating on your press (a common problem with budget models) or just not enough pressure. The solution is easy: cover the design with a Teflon sheet and press it again for another 5-10 seconds, really leaning into it to ensure you get firm, even pressure across the whole thing.
Pro Tip: If you see your design cracking after the first wash, the problem was almost certainly heat-related. Either your press was too hot and scorched the adhesive, or you didn't pre-press the shirt long enough to get all the moisture out. That trapped moisture turns to steam and stops the transfer from getting a solid bond.
Another thing you might run into is a design that feels way too stiff, almost like a plastic shield on the shirt. This usually means you used too much pressure or pressed it for too long. You can't really undo this, but on your next project, just back off the pressure and shorten your press time a bit. You’ll get a much softer, more professional feel. Knowing these little tricks will help you make sure every shirt you press not only looks great but is built to last.
When to Call in a Pro for Flawless Transfers
Doing it yourself is a fantastic way to learn the ropes, but there's a point where you need consistency, top-tier quality, and speed. For anyone running a small business, launching a brand, or just getting serious about their craft, partnering with a professional Direct-to-Film (DTF) service isn't just a shortcut—it’s a smart business move. It lets you completely bypass the steep learning curve and hefty equipment costs, giving you access to commercial-grade quality right out of the gate.
This completely changes the game. Instead of wrestling with printer settings, clogged nozzles, and messy powder, you can pour all your energy into what you do best: creating awesome designs. A dedicated service handles all the technical headaches, using machinery that delivers a look and feel most home setups can only dream of.
The Professional Quality You Can See and Feel
The first thing you’ll notice when you use a pro service is the jaw-dropping quality of the print itself. Professional DTF printers are built for one thing: precision. They can reproduce incredibly fine details and a massive range of vibrant, true-to-screen colors. That detailed photograph or logo with a dozen colors will look just as crisp and bright on the shirt as it did on your monitor.
Honestly, it's a level of detail that’s nearly impossible to hit with DIY heat transfer paper or a consumer-grade vinyl cutter. Plus, pro services have their ink and adhesive powder formulas dialed in perfectly. The result is a transfer that’s not just stunning to look at but also incredibly durable and surprisingly soft.
My Takeaway: Pro DTF services close the gap between a hobby and a business. You get the quality of a huge print shop but with the freedom to order a single transfer or a hundred, which makes premium results attainable for everyone.
Works on Just About Anything
One of the biggest wins for professional DTF transfers is their insane versatility. Forget worrying about whether your design will stick. Unlike other methods that are picky about fabrics, these transfers work beautifully on a huge variety of materials.
- Classic Cottons: Get that soft, breathable print on all your standard tees and hoodies.
- Tricky Synthetics: Finally, a reliable way to print on polyester and poly-blends for athletic wear.
- Way Beyond Fabric: You can even press these onto things like leather, denim, canvas, and hats.
This kind of flexibility throws the creative doors wide open. You can use the same batch of high-quality transfers to brand everything from team jerseys to custom leather patches, keeping your look consistent across a whole line of products. The adhesion is so reliable that you won't have to second-guess whether your design will peel or crack, no matter what you press it on.
A Smarter, Faster, and Cheaper Workflow
Let’s be real: your time is valuable. Working with a professional service streamlines your whole operation. The process couldn't be simpler: you upload your ready-to-print artwork, arrange your designs on a digital "gang sheet," and hit order. That’s it. In a day or two, a roll of transfers ready for your heat press shows up at your door.
Using a gang sheet builder is a game-changer for your wallet. It lets you pack multiple designs—maybe for different customers or projects—onto a single sheet, which massively cuts your cost per print. This kind of efficiency is what’s fueling the explosion in the custom apparel world. The global market for custom t-shirts is on track to jump from $4,672.9 million to $11,370.8 million, and tools like gang sheets are a big reason why. With fast turnarounds and the ability to print on anything, pro DTF is perfectly suited for a market where on-demand printing is growing at a massive 26% CAGR. You can dive deeper into the numbers in this in-depth market report.
This whole setup empowers everyone, from a crafter in their garage to a growing business, to produce world-class custom apparel without dropping thousands on specialized gear.
Ready to skip the hassle and get perfect, press-ready transfers delivered right to you? At Raccoon Transfers, we make it incredibly easy to bring your designs to life with vibrant, durable DTF prints that look and feel professional. Just upload your art, fill up a gang sheet, and we'll take care of the rest. Start your order today and see the difference for yourself!