
Iron On Transfers How To Get Perfect Results
So, you want to create custom apparel that looks sharp and professional, not like a DIY project gone wrong? The secret often lies in mastering iron-on transfers, especially modern methods like Direct-to-Film (DTF). It's all about getting the right combination of heat, pressure, and timing.
This guide will walk you through exactly how to get those clean, vibrant designs onto t-shirts, hoodies, and more, achieving results that look like they came straight from a high-end print shop.
Your Guide to Flawless Custom Apparel
We’ll cover everything from prepping your fabric to the final press, sharing the little tips and tricks that make a huge difference. Getting this right is the key to turning a simple garment into a pro-quality product.
Why Are Iron-On Transfers So Popular?
The demand for personalized gear is exploding, and iron-on transfers are at the heart of it. This isn't just a small-time craft; it's a massive industry. The global market for iron-on transfer sheets has already hit USD 1.42 billion and is still growing.
This boom is fueled by creators who want an easy, reliable way to make unique products. For a closer look at the numbers, check out this market report on iron-on transfer sheet trends.
What makes this method a go-to choice?
- Works on Almost Anything: You're not limited to just cotton. These transfers work beautifully on polyester, leather, and various blends.
- Incredible Color: DTF transfers deliver stunning, full-color graphics without the tedious process of weeding out tiny vinyl pieces.
- Built to Last: When you apply them correctly, these designs hold up. They resist cracking and fading, even after many trips through the laundry.
Forget about designs that peel off after one wash. With the right technique, you can confidently customize everything from basic tees to performance sportswear. It's a process simple enough for beginners but delivers results that even seasoned pros rely on.
If you want to get into the nitty-gritty of the technology, our guide on the benefits of DTF custom transfers is a great place to start. It explains why this method has become a favorite for modern apparel customization.
Getting Your Setup Right: The Tools That Make a Difference
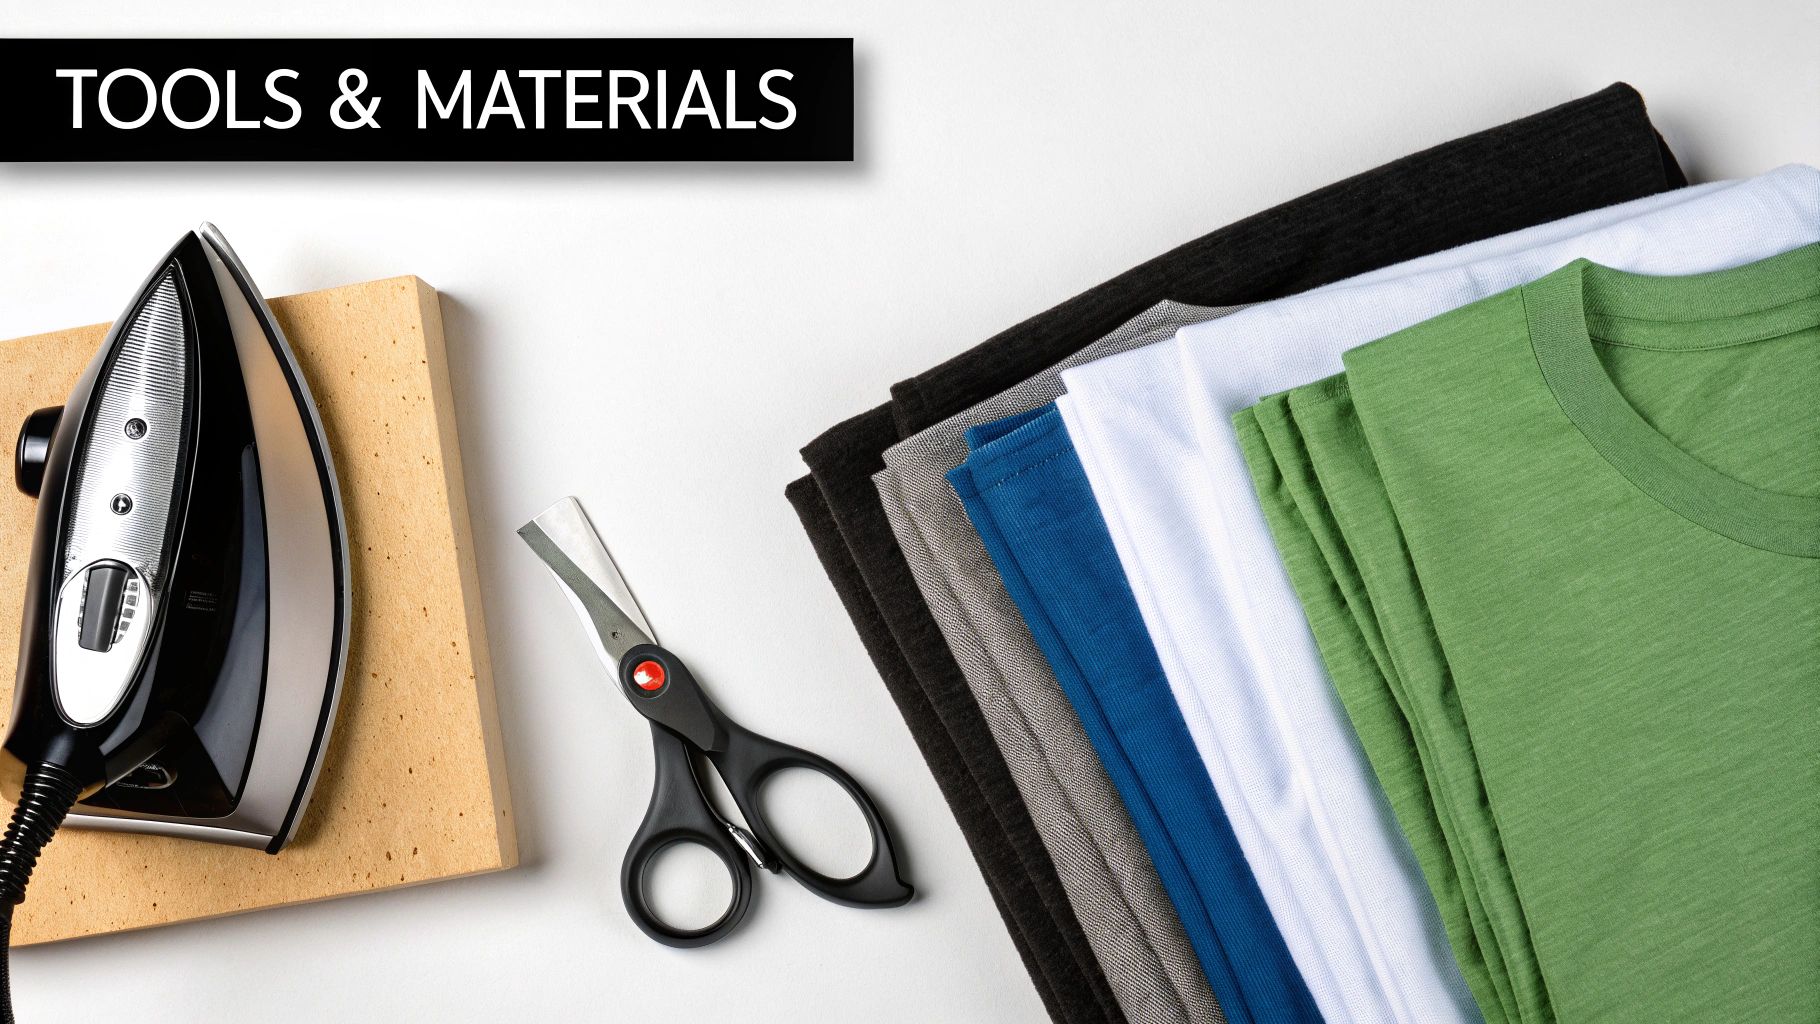
The final quality of your custom apparel comes down to more than just a great design. The tools you use for application can be the difference between a shirt that lasts for years and one that peels after the first wash.
It's about having the right gear for the job.
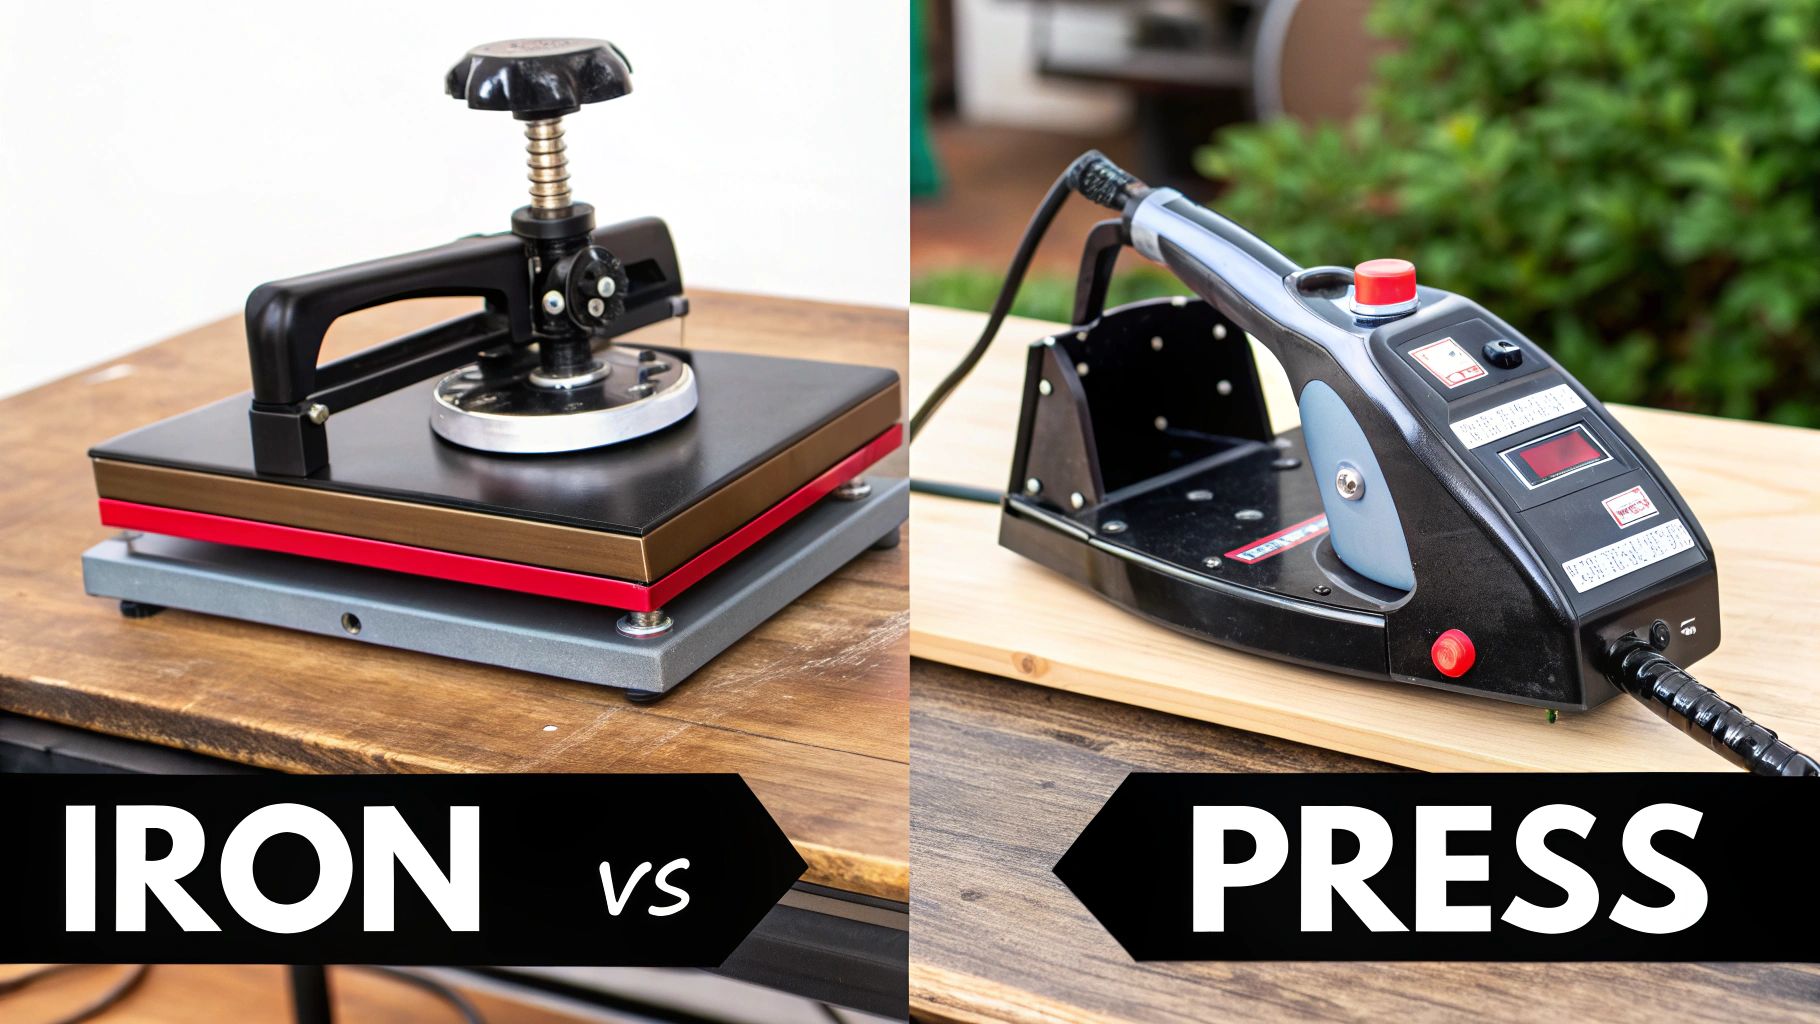
Heat Press vs Home Iron Which One to Choose
Thinking about using a regular home iron? I get it. It’s what you have on hand. But if you’re serious about this, a heat press is a non-negotiable upgrade. The reason is simple: consistency. Your iron has hot and cool spots, making it nearly impossible to apply the even, steady pressure a transfer needs to bond properly.
A heat press delivers on both fronts: consistent temperature and uniform pressure across the entire design. It's the key to getting that clean, professional finish that lasts. If you're ready to see what a difference the right machine makes, check out our guide on how to properly use a heat press.
Here’s a quick breakdown to help you decide which tool is right for you.
| Feature | Heat Press | Home Iron |
|---|---|---|
| Temperature Control | Precise, consistent heat across the entire surface. | Inconsistent heat with hot and cool spots. |
| Pressure Application | Even, firm pressure applied uniformly. | Uneven pressure based on your strength and technique. |
| Durability of Transfer | Creates a strong, long-lasting bond. | Higher risk of peeling, cracking, or lifting. |
| Best For | Professional results, batch projects, and businesses. | One-off hobby projects or very small designs. |
While you can technically get by with a home iron for a one-time craft, a heat press is the only way to guarantee professional, sellable results every time.
The Must-Have Accessories for a Flawless Press
Beyond the press itself, a few other tools are essential for getting things right. I've learned from experience that skipping these can lead to a lot of frustration.
-
Pressing Pillow: This is my secret weapon against uneven pressure. You slide this heat-resistant foam pad inside the shirt to lift the print area above any seams, collars, or zippers. This creates a perfectly flat surface, which is absolutely critical for a good press.
-
Teflon Sheet or Parchment Paper: Think of this as insurance for your heat press. You place it over the transfer before pressing to stop the plastic carrier sheet from melting onto your machine's hot platen. It also helps distribute the heat just a little more evenly.
-
Weeding Tools: If you're working with transfers that require you to remove excess material (like HTV), a sharp, pointed weeding tool is a must. It makes pulling away those tiny, intricate pieces so much easier and cleaner.
The name of the game is eliminating variables. When you combine the consistent heat of a press with the flat surface from a pillow and the protection of a Teflon sheet, you’re creating a controlled environment. That control is what guarantees a perfect, durable bond between the transfer and the fabric.
Preparing Your Fabric for a Lasting Bond
It’s tempting to jump right into pressing your new transfer, but I’ve learned from experience that this is a surefire way to get a design that peels or cracks. A strong, durable bond starts with a perfectly prepped surface. Think of it like painting—you'd never skip the cleaning and priming. The same holds true for your garments.
First things first, you have to pre-wash the fabric. This gets rid of any sizing agents or chemicals left over from the manufacturing process that can block the transfer’s adhesive. Just make sure you skip the fabric softener and dryer sheets. They leave behind a residue that actively works against the adhesive, making a solid bond nearly impossible.
Pre-Pressing for a Flawless Surface
After your garment is clean and dry, the next step is what I consider a real game-changer: the pre-press.
Before you even think about placing your design, press the garment with your heat press or iron for a quick 5-10 seconds. This simple action does two incredibly important things. It gets rid of any sneaky moisture hiding in the fibers and irons out every single wrinkle, giving you a perfectly flat canvas.
A dry, flat surface is the ideal foundation for any iron-on transfer. Moisture can turn into steam during pressing, creating air pockets and preventing the adhesive from fully bonding with the fabric.
Nailing the Placement Every Time
Okay, your fabric is prepped and ready to go. Now, let’s get that design positioned for a professional-looking finish. Just eyeballing it is a recipe for a crooked logo.
For perfect t-shirt alignment, I rely on a couple of simple tricks:
- The Center Fold: Fold the shirt in half vertically, making sure the shoulder seams line up perfectly. Give it a light press to create a faint centerline. Do the same with your transfer by folding it gently, then just match up the two creases.
- The Armpit Rule: For most chest designs, a good rule of thumb is to place the top of the design about three to four inches below the collar. You can use the armpit seams as a handy horizontal guide to make sure the design is perfectly level.
Getting the Perfect Press: Time, Temperature, and Pressure
Alright, your fabric is prepped and the design is sitting exactly where you want it. This next part is where the real magic happens. We're about to permanently fuse that design to your garment, and it all comes down to a careful balance of three key things: time, temperature, and pressure.
Getting this trio right is the secret to a transfer that not only looks fantastic but also lasts wash after wash. Too little heat, and the transfer won't stick properly. Too much, and you risk scorching your garment or melting the adhesive. It’s a bit of a science.
This diagram breaks down the core steps for a successful application.
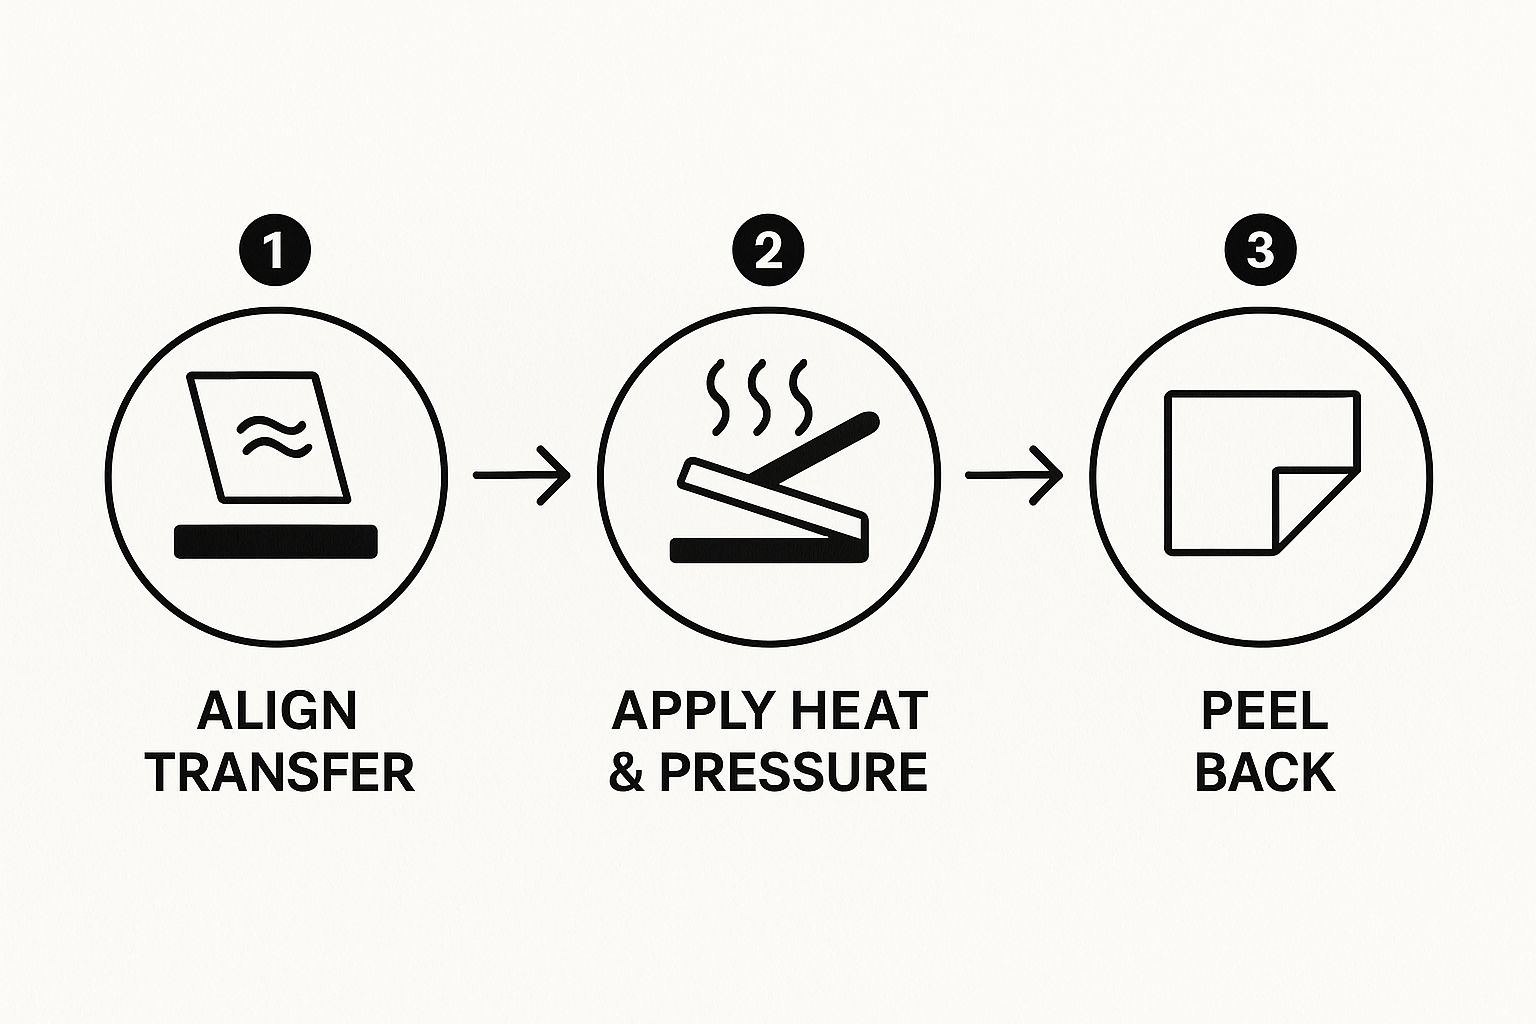
Think of it this way: aligning the transfer, pressing it, and peeling the film are all equally important. Rushing any of these steps can undo all your hard work.
Dialing in Your Settings for Different Fabrics
Every fabric is different, and your heat press settings need to reflect that. Always, and I mean always, check the instructions that came with your transfers first. But if you're looking for a solid starting point, here are some settings I’ve come to rely on for common materials:
- 100% Cotton: This is a pretty forgiving fabric. It can handle higher heat, so I usually start around 300-320°F (149-160°C) and press for about 10-15 seconds.
- Polyester & Blends: These are a bit more sensitive. You'll want to dial back the heat to prevent scorching. A good range is 260-280°F (127-138°C) for 8-12 seconds.
- Heat-Sensitive Synthetics: For tricky stuff like nylon, you have to go even lower. Start low and test if you're unsure.
What's really cool is that transfer technology has gotten so good that some films can now be applied at temperatures as low as 240°F (115°C) in just 8 seconds. This is a game-changer for delicate fabrics like recycled polyester, as it drastically reduces the risk of damage.
Now, about pressure. When instructions say "firm pressure," they mean it. On a professional heat press, you can set this precisely. If you’re using a home iron, it means putting some real muscle into it—use your body weight to press down evenly across the entire design. And a crucial tip: make sure you’re not pressing over the steam holes on your iron, as those spots won't get the direct heat and pressure needed.
The Make-or-Break Moment: Hot Peel vs. Cold Peel
Once the pressing is done, you've got one last critical decision: when to peel off the clear carrier film. This isn't just a matter of personal preference; it's determined by the specific type of transfer you're using.
Hot Peel: This means you peel the film off immediately after lifting the press, while everything is still piping hot. This technique often gives the design a softer, more matte finish because the ink settles right into the fabric's fibers.
Cold Peel: For these, you have to exercise some patience. You must wait until both the garment and the transfer are completely cool to the touch before you even think about peeling. Cold peel transfers usually result in a glossier, slightly smoother finish.
Peeling at the wrong time is a surefire way to ruin your project. If you try to peel a cold peel transfer while it's still hot, the design will probably lift right off with the film. For a more detailed walkthrough, our complete guide on how to properly apply iron-on transfers has some great step-by-step visuals.
Here’s one last pro tip I swear by: after you've peeled the film away, place a sheet of parchment paper over the design and give it one more quick press for about 3-5 seconds. This really helps lock the design in place and gives it that extra bit of durability in the wash.
How to Make Your Designs Last: Post-Press Care
You’ve put in the work to create something amazing—now let's make sure it actually survives the laundry. Proper aftercare is what separates a design that looks great for years from one that cracks and fades after a few washes.
The absolute first rule? Patience.
You have to wait at least 24 to 48 hours before that first wash. This isn't just a suggestion; it’s a critical curing period. The adhesive needs this time to fully bond with the fabric fibers, creating that permanent, durable finish you’re looking for. Washing it too soon is the fastest way to see your hard work peel away.
Smart Laundry Habits for Longevity
Once it's time for that first wash, a few simple habits will keep your creation looking brand new. Following these best practices is the secret to maintaining the integrity of your iron-on transfers.
- Turn It Inside Out: This is non-negotiable. Turning the garment inside out protects the design from getting roughed up by other clothes, zippers, and the washing machine drum.
- Use Cold Water Only: Hot water is the enemy of transfer adhesive. It can soften the glue, leading to peeling or cracking over time. Stick with a cold cycle.
- Choose a Mild Detergent: Avoid harsh detergents, and especially bleach. They're far too aggressive. A gentle, color-safe detergent is always your best bet.
- Skip the Fabric Softener: Both liquid softeners and dryer sheets can leave a residue that weakens the adhesive's bond, which is a one-way ticket to peeling.
My number one rule for drying? Hang-dry whenever possible. Air drying is by far the gentlest method and puts zero stress on the transfer. If you’re in a pinch and must use a machine, make sure it's on the lowest possible heat setting.
Thankfully, recent advances have given us more durable and eco-friendly transfer materials with much better washability. The demand for high-quality custom apparel continues to drive this market forward. You can learn more about the evolution of heat transfer materials and what's next for the industry.
Common Questions About Iron On Transfers
Even when you follow the instructions perfectly, things can sometimes go sideways. It happens to everyone. Let's walk through some of the most common questions and hiccups that pop up when you're working with iron-on transfers, so you can solve them like a pro.
Why Is My Iron On Transfer Peeling After Washing?
This is, without a doubt, the most common frustration. If your design is lifting after a wash, the problem almost always boils down to one of three things: not enough pressure, incorrect temperature, or washing it too soon.
When you press the design, you need to apply firm, even pressure over the entire transfer. If you’re using a household iron instead of a heat press, you really have to put your weight into it. Also, take a second to confirm you’re using the right heat setting for both your transfer type and your specific garment.
Most importantly, the adhesive needs time to set. Give it a full 24 to 48 hours to fully cure before it ever sees the inside of a washing machine. Patience is key here.
Can I Put Iron On Transfers On Stretchy Fabric?
Absolutely, but you have to use the right tool for the job. Your standard iron-on transfer will probably crack and peel when applied to super-flexible materials like spandex or lycra blends. It just wasn't made to move that way.
For these kinds of projects, you'll want to find transfers specifically designed for stretch or performance fabrics. These are made with a more elastic formula that allows them to flex and move with the garment without breaking.
Pro Tip: When working with stretchy material, try giving the fabric a slight stretch over your pressing pillow before you apply the transfer. Pressing it in this semi-stretched state helps prevent the design from cracking when the garment is worn and moves with the body.
What Is The Difference Between Hot Peel And Cold Peel?
This is a critical one, and it's not a matter of preference—it's about the chemistry of the transfer. The term simply tells you when to remove the clear plastic carrier sheet after pressing. Getting this step wrong can ruin your entire project.
- Hot Peel: The carrier sheet comes off immediately after you lift your press, while everything is still hot.
- Cold Peel: You have to wait. Let the garment and the transfer cool down completely until they are cool to the touch before you even think about peeling that film off.
Always, always check the manufacturer’s instructions for your specific transfer. Peeling at the wrong time will either pull the design right off with the sheet or result in a weak, incomplete bond to the fabric.
My Transfer Is Wrinkled, What Did I Do Wrong?
Wrinkles in the final design are usually a sign that the garment wasn't perfectly flat during pressing. It could also mean the iron or press shifted slightly while you were applying pressure. The fix for this is all in the prep work.
Make it a habit to pre-press your garment for 5-10 seconds. This simple step wicks out any trapped moisture and irons out any wrinkles you might not even see. When you place your transfer, make sure the fabric underneath is smooth and taut. Apply pressure straight down—no sliding or wiggling—to keep the design from shifting and creating those frustrating creases.
Ready to create stunning, durable custom apparel without the guesswork? At Raccoon Transfers, we specialize in premium, easy-to-apply DTF transfers that work on almost any fabric. Upload your design and see the professional quality for yourself. Start your custom transfer order today!