
Printing on Iron On Transfer Paper a Pro Guide
Before you even think about hitting 'print', let's talk about the single most important decision you'll make: your transfer paper. This choice is the bedrock of your entire project. It dictates whether your design will be vibrant and durable or a cracked, faded mess after one wash.
Choosing the Right Transfer Paper and Printer
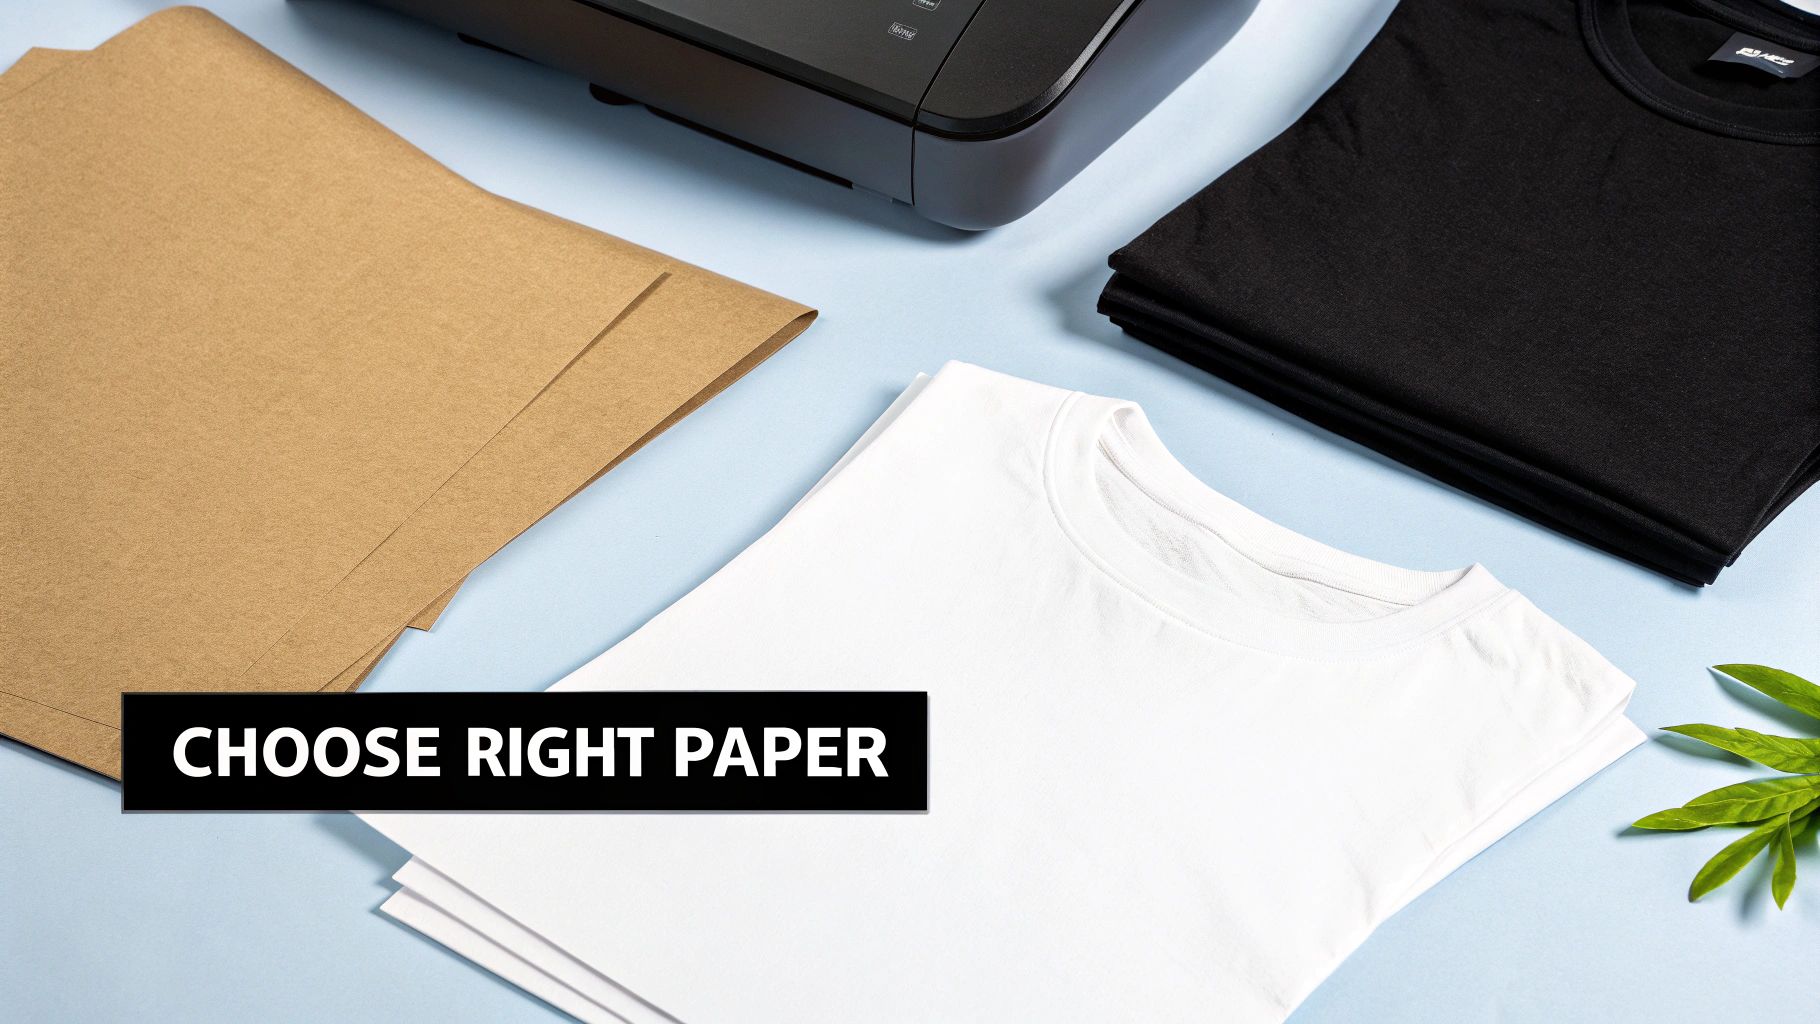
Think of transfer paper as the canvas for your art. The quality of that canvas directly impacts the final look and feel of your t-shirt. Picking the right one from the get-go helps you sidestep common headaches like dull colors or a design that feels like a stiff, plastic sticker.
The Great Divide: Light vs. Dark Fabric Paper
This is where many beginners trip up. Light-fabric paper and dark-fabric paper are not interchangeable; they are completely different products designed for specific jobs.
Paper for light fabrics (whites, pastels, heather grey) has a transparent polymer coating. When heat is applied, the ink sinks into the fabric, and the clear coating essentially disappears. This is why you must mirror your image before printing—you'll be applying it face-down onto the shirt.
On the other hand, paper for dark fabrics has a solid, opaque white background. You print your design normally (no mirroring needed) and press it face-up. That white layer acts as a primer, blocking out the dark fabric so your colors stay bright and true.
Pro Tip: Using light paper on a dark shirt will make your design invisible. Using dark paper on a light shirt without meticulously trimming the edges will leave a very obvious white box around your artwork.
Here’s a quick guide to help you choose the right paper every time.
Transfer Paper Selection Guide
This table breaks down the essentials for picking the perfect paper based on your shirt color and the final look you're after.
| Fabric Color | Recommended Paper Type | Key Characteristic | Best For |
|---|---|---|---|
| White & Pastels | Light Fabric Paper | Transparent background that blends into the shirt | Designs where the shirt color can show through, creating a soft feel. |
| All Other Colors | Dark Fabric Paper | Opaque white background for color vibrancy | Bold, colorful graphics on black, navy, red, or any non-light shirt. |
Getting this right is non-negotiable for a professional result. It’s the first and most critical step.
Finding the Perfect Printer for the Job
While you can often get by with a standard home inkjet printer, not all are up to the task of creating high-quality transfers. For printing on iron on transfer paper, some printers just perform better than others.
-
Inkjet is the Go-To: The overwhelming majority of transfer papers you'll find are made for inkjet printers. Their water-based inks are formulated to bond perfectly with the paper's special coating.
-
Laser Printers Require Special Paper: Do not, under any circumstances, run inkjet transfer paper through a laser printer. The intense heat from the fuser will melt the coating all over the inside of your machine, leading to a very expensive repair. If you have a laser printer, you must buy paper specifically made for it.
-
Pigment Inks vs. Dye Inks: This is a finer detail, but it matters. Pigment-based inks are generally more water-resistant and hold up better against UV fading, meaning your designs will last longer through wash and wear. Dye-based inks can look incredibly vibrant initially but are sometimes more prone to bleeding.
For a much deeper dive into the specific brands and types out there, check out our comprehensive guide on finding the best paper for heat transfer. Spending a few extra minutes on research here will pay off tenfold when you see the final, professional-looking result.
Prepping Your Design for a Perfect Print
Your digital artwork is the blueprint for the final t-shirt. I’ve seen it time and again: a great-looking design on screen that ends up a blurry mess on fabric. Taking a few extra minutes to prep your file correctly is what separates a crisp, professional-looking shirt from a disappointing one.
The first, and most crucial, step is mirroring your image. This is a classic rookie mistake, but easy to get right. You only need to do this when using transfer paper designed for light-colored fabrics. Since you apply this paper face-down onto the shirt, the image must be printed as a horizontal flip—a "mirror image"—so it reads correctly once you iron it on.
Imagine printing out a cool design with text, pressing it, and then realizing your words are backward. It's a frustrating waste of a good shirt and expensive paper.
However, if you're working with paper for dark fabrics, you can skip this step entirely. That type of paper has an opaque white backing and is applied face-up, so you print the design exactly as you want it to appear.
Resolution is Non-Negotiable
Ever seen a t-shirt where the graphic just looks… fuzzy? That's almost always a resolution problem. Your image resolution, measured in DPI (dots per inch), dictates how much detail your printer can pack into the design. For iron-on transfers, the gold standard is 300 DPI. Anything less, and you're risking a pixelated print.
Grabbing a small image from a Google search and blowing it up to t-shirt size is a recipe for disaster. It might look decent on your phone, but those tiny pixels become big, ugly squares when printed on a shirt.
My rule of thumb is simple: always start with the highest quality source file you can find. You can always shrink a big, high-res image without losing quality, but you can't magically add detail to a small, low-res one.
Getting the Color and Size Just Right
What you see on your monitor is not always what you'll get from your printer. Screens use an RGB (Red, Green, Blue) color model, while printers use CMYK (Cyan, Magenta, Yellow, Black). This difference can cause some slight color shifts in the final print.
For most home-based projects, this isn't a dealbreaker. But if you're aiming for a specific shade, dive into your printer's "color management" settings, usually tucked away in the advanced print options, to get a closer match.
Sizing is just as important. A design that’s perfect for a small pocket logo will look lost and awkward if it's the only graphic on the front of a shirt. Before you commit to the expensive transfer paper, print a draft on a regular piece of paper. Cut it out and hold it up against the t-shirt. This gives you a real-world feel for placement and scale.
For more detailed guidance, check out this expert take on choosing the perfect graphic size for t-shirt designs.
Configuring Your Printer for Transfer Paper
Getting your digital file ready is only half the battle. You also have to tell your printer exactly how to handle the specialty paper you're about to feed it. This is where a lot of people go wrong.
Just hitting "print" with your standard settings is a surefire way to get frustrating results like bleeding ink, muddy colors, or even a nasty paper jam. Taking a minute to fine-tune your printer settings is the real secret to getting a printout that looks professional.
The whole point is to signal to your printer that this isn't just plain old copy paper. That one little change affects everything—from how much ink it sprays to how fast the paper feeds through. For the special coating on transfer sheets, getting this right is critical.
Selecting the Right Media Type
Dive into your printer’s software, usually under "Print Settings" or "Preferences," and look for the paper or media type list. If you see an option for "T-Shirt Transfer," great! But honestly, most printers don't have it. Don't sweat it if yours doesn't—there are other settings that work just as well, sometimes even better.
You're looking for an option that's meant for a heavier, coated paper stock. The best bets are usually:
- Premium Matte Photo Paper: This is my go-to recommendation. It tells the printer to expect a thicker, more absorbent surface, which results in rich, controlled ink application.
- Glossy Photo Paper: This can work in a pinch, but be warned—it sometimes lays down a bit too much ink. It’s definitely a good idea to run a small test print first before committing your full design.
- Plain Paper / High Quality: If you’re really stuck, you can use the "Plain Paper" setting. The key is to make sure you crank the quality setting all the way up.
The goal here is simple: choose a setting that tells your printer to slow its roll and apply ink with more precision. This keeps the ink from pooling on the surface and gives it the time it needs to absorb properly into the paper's coating.
Adjusting Print Quality for Vibrant Colors
Once you've nailed down the media type, the next critical tweak is the print quality itself. This setting directly controls how sharp and vibrant your final transfer will be.
For printing on iron on transfer paper, you should pretty much always select "High" or "Best" quality. No exceptions. This pushes the printer to use its maximum resolution, which means you get crisp, clean lines and deep, beautifully saturated colors. Using a lower-quality "draft" mode will only give you a design that looks faded and pixelated once it's on the fabric.
One last thing—load the paper correctly! Most inkjet printers need you to load transfer paper with the printable side facing down in the main tray, but every model is different. Always double-check your printer's manual and the instructions that came with the transfer paper. Printing on the wrong side is a rookie mistake you don't want to make.
For more deep dives and advice on getting the most out of your printer, you might find the articles on the TonerConnect blog really helpful.
Applying Your Design With an Iron or Heat Press
Alright, this is where the magic happens. All that prep work is about to pay off as your digital design becomes a real, wearable piece of art. The final application is every bit as important as the printing itself, so getting this right is key to a design that looks great and lasts.
Whether you're working with a household iron or a dedicated heat press, the winning formula is always the same: a perfect balance of heat, pressure, and time. Nailing this trio is what separates a vibrant, durable print from one that cracks or peels after the first wash.
Using a Home Iron The Right Way
You can absolutely get a fantastic result with a standard home iron, but you have to be smart about it. First things first: ditch the ironing board. Its soft, padded surface is great for clothes but terrible for transfers because it can't provide the solid, even pressure you need.
Instead, find a hard, heat-resistant surface like a wooden cutting board or a sturdy tabletop. I like to lay a pillowcase down first just to protect the surface.
When you're ready to press, keep these points in mind:
- Go Dry. Empty all the water from your iron. Steam is the enemy of a good transfer; you need consistent, dry heat.
- Crank the Heat. Turn your iron to the highest setting your fabric can safely handle. This is usually the "cotton" or "linen" setting. No steam!
- Bring the Pressure. Don't be shy. Use your body weight to press down firmly and keep the iron moving across the entire design. Letting it sit in one spot can cause scorching or uneven application.
For a more detailed breakdown of this technique, check out our complete guide on how to iron on transfers.
Mastering the Heat Press for Consistent Results
If you find yourself making custom apparel on the regular, a heat press is a total game-changer. It takes all the guesswork out of the equation. You get precise control over temperature, pressure, and time, which means you get professional, consistent results every single time. It's no wonder the global Iron On Transfer Sheet market, valued at around $1.21 billion in 2024, is projected to hit $2.19 billion by 2033. For more on this trend, you can read the full research on the transfer sheet market.
This infographic gives a quick visual of the process leading up to the final press.

As you can see, choosing the right paper and settings is the foundation for a great print. Below are some go-to settings for common fabrics, but remember to always run a quick test on a scrap piece if you're ever in doubt.
| Fabric Type | Temperature | Time | Pressure |
|---|---|---|---|
| 100% Cotton | 325-350°F (163-177°C) | 10-15 seconds | Firm |
| Polyester | 270-300°F (132-149°C) | 8-12 seconds | Medium |
| 50/50 Cotton Blend | 300-325°F (149-163°C) | 10-12 seconds | Medium |
Understanding Hot Peel vs Cold Peel
The very last step is removing the backing paper, but when you do it is critical. This all comes down to the type of transfer paper you're using.
Hot Peel: Just like it sounds, you peel the backing away immediately after lifting the press, while everything is still hot. This usually gives the design a softer feel that's more integrated into the fabric.
Cold Peel: For this type, you have to let the garment and transfer cool down completely before you even think about touching the backing. This method tends to leave a glossier, more defined finish.
Neither one is inherently "better"—it all depends on the paper's instructions and the look you're going for. The most important thing is to read the directions for your specific paper. Peeling at the wrong time is a surefire way to ruin a perfectly good project.
Getting Ahead of Common Printing and Transfer Problems
Even when you follow all the steps, things can still go wrong. It happens to everyone. Don't get discouraged—most issues are common and totally fixable. The real trick is learning how to spot what went wrong so you can save your project and nail it the next time.
We've all been there: smudged ink on the transfer paper, or a perfect-looking design that starts peeling off after one wash. Let's walk through some of the usual suspects. Nine times out of ten, the problem comes down to heat, pressure, or a simple setting you overlooked.
Diagnosing Issues on the Printed Paper
Before you even think about firing up the heat press, take a good look at your printout. If you see any flaws on the paper itself, you've caught the problem early. This means the issue is with your printer or its settings, not your application technique.
Here are a few common culprits:
- Ink Smearing or Bleeding: This is a classic sign of too much ink. Your printer is soaking the paper because it thinks it's printing on regular copy paper. Go back into your settings and make sure you've selected "Matte Photo Paper" or a similar high-quality option. This tells the printer to use less ink and be more precise.
- Faded or Dull Colors: Did your bright, punchy design come out looking muted and washed out? Your quality setting is probably too low. When you’re printing on iron on transfer paper, always crank it up to the "High" or "Best" quality setting in your printer's software.
- Streaks or White Lines: If you see ugly lines running through your print, you're almost certainly dealing with a clogged print head. Dive into your printer's maintenance menu and run the cleaning cycle a couple of times. This usually clears out the dried ink and gets things flowing smoothly again.
Troubleshooting a Failed Transfer
What if the print looked flawless but the result on the shirt is a disaster? Now you know the problem happened during the heat press stage. This is all about the delicate dance between heat, pressure, and time.
The most heartbreaking issue is a design that cracks or peels away from the fabric, especially after that first wash. This is almost always caused by one of two things: not enough heat or not enough pressure. If the adhesive on the back of the paper doesn't properly melt into the fabric's fibers, it’s just sitting on top and won't last.
Pro Tip: Peeling that starts at the edges of your design is a dead giveaway for uneven pressure. This is super common when using a hand iron on a padded ironing board. For a solid bond, you need a hard, flat surface—think a countertop with a thin towel on it. It makes all the difference.
On the flip side, if your colors look faded, muddy, or even a little brown on the final shirt, you've got the opposite problem: too much heat or you left it on for too long. This can actually scorch the transfer paper and the fabric, killing your colors for good.
Always stick to the recommended time and temperature for your specific transfer paper. Remember, a polyester shirt needs a much lower temperature than a 100% cotton one. By figuring out whether the issue was with the print or the press, you can quickly solve the problem and get a perfect result on your next try.
Keeping Your Custom Apparel Looking Great
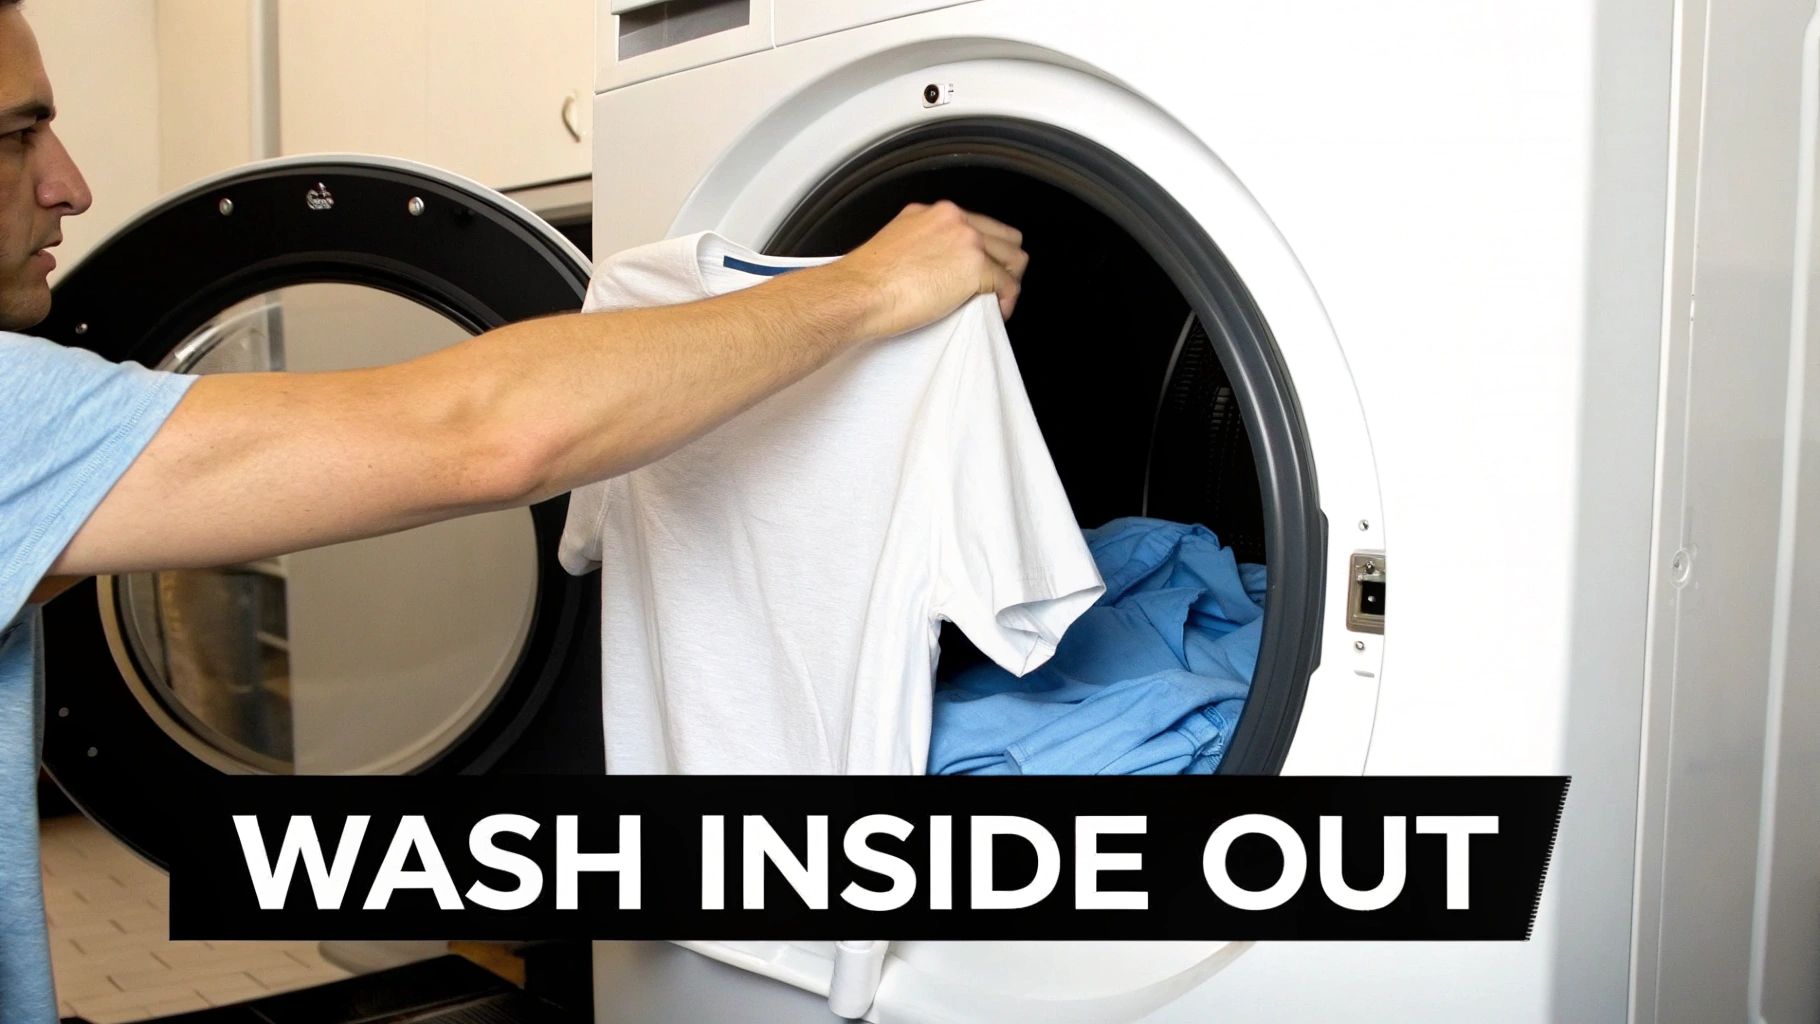
You’ve done the hard work of creating and pressing your design, so let's make sure it lasts. The first 24 hours after pressing are the most important. Just let the garment sit and give the adhesive time to fully cure before it sees the inside of a washing machine.
A little bit of care goes a long way in keeping your custom gear looking as vibrant as the day you made it. The trick is to be gentle. If you want to dive deeper into fabric care, learning how to prevent your custom apparel from fading is a great next step.
The Right Way to Wash and Dry
First rule of fight club... I mean, first rule of custom apparel care: always turn the garment inside out before washing. This single habit protects the design from rubbing against other clothes, which is what causes most of the wear and tear over time.
Once it's inside out, follow these simple guidelines:
- Go Cold: Stick with cold water. Hot water is the enemy of transfer adhesive and can cause it to soften and peel.
- Be Gentle: Choose the delicate or gentle cycle on your washer. The less agitation, the better for both the design and the fabric.
- Air is Best: The dryer is where good designs go to die. High heat is a definite no-go. The absolute best method is to hang it up to air dry. If you must use a machine, choose the tumble dry low or no-heat setting.
A quick tip for ironing: if your shirt gets wrinkled, keep it inside out and use a low heat setting. Never, ever touch a hot iron directly to the design. It'll melt the transfer and ruin both your shirt and your iron.
Following these simple steps will protect your creation and ensure you get to enjoy your hard work for a long, long time.
Got Questions About Iron On Transfer Paper?
Even the clearest instructions can leave you scratching your head with a few questions. It happens to everyone. Let's tackle some of the most common ones that pop up when you're just getting started with printing on iron on transfer paper.
Can I Run This Stuff Through My Laser Printer?
You can, but you absolutely must use transfer paper made specifically for laser printers. Don't even think about putting inkjet paper into a laser printer. I've seen the aftermath, and it’s not pretty. The intense heat from the fuser will melt the paper's coating all over the inside of your machine, causing some serious (and expensive) damage.
Help! Why Is My Design Peeling Off After I Washed It?
This is a classic problem, and 99% of the time it comes down to two things: not enough heat or not enough pressure. For the design to really stick, the adhesive on the back of the paper needs to melt and fuse deep into the fabric's fibers.
Think of it this way: you're trying to make two things become one. If you don't press hard enough or the iron isn't hot enough, the design just sits on top of the fabric. The first trip through the wash will lift it right off. Always press on a hard, flat surface—a countertop with a towel on it works great. An ironing board is too squishy and just won't give you the firm pressure you need.
Pro Tip: A lasting transfer is all about a perfect melt. If that adhesive doesn't fully bond with the fabric, it's only a matter of time before it starts to peel and crack.
Do I Really Need to Pre-Wash the Shirt?
Yes, and please don't skip this step! Brand new shirts, hoodies, and totes are often treated with sizing chemicals or have other residues left over from the factory. These invisible coatings can completely block the transfer adhesive from grabbing onto the fabric.
Washing and drying the item first (and hold the fabric softener!) gets rid of all that gunk. It also pre-shrinks the material, so your design won't get all puckered and weird after the first wash.
It’s clear that creating custom apparel is more than just a hobby. The global heat transfer paper market was valued at around $550 million in 2023 and is projected to double by 2033. That's a lot of people making cool stuff! You can find more market trend insights on datahorizzonresearch.com.
Tired of the DIY printing process? If you want professional, super-durable transfers delivered right to your door, we've got you covered. At Raccoon Transfers, we make high-quality, ready-to-press DTF transfers that work on any fabric. Check out our custom DTF transfers.